
How to Install a Gaslow Filler Kit in your Campervan (LPG inlet)
- Shane Monks O'Byrne

- Aug 12, 2022
- 6 min read
Updated: Apr 8
Cutting a hole in the side of your van can be terrifying, yet it's one of the first things you need to do for your van conversion and one of the most important. In this guide, I will show you the simple, no-nonsense approach to installing a Gaslow gas filling point in your campervan. By the end your van will be ready for a stove, heater, and hot shower.

Shane is an NCC-certified electrical installer.
He has built, taught, and lived in campervans since 2019.
This post contains affiliate links. We may earn a commission at no extra cost to you. To understand our policies on content, affiliate commissions, and liability, please review our Terms of Use.

In this guide
Supplies List
 | Gaslow Filler Kit (eBay) This is the gas inlet which you'll be installing in the side of your van |
 | For driving and drilling |
 | For protecting bare metal from rust |
 | Sikaflex 522 sealant For sticking components to your van with a watertight seal |
 | For keeping the hole saw lubricated |
 | For cutting circular holes in wood and metal |
 | For cutting grooves to hold the filler inlet |
What is a Gaslow System?

For most vandwellers, a campervan gas installation is going to be vital to a successful and comfortable build. The following are appliances that you can run via gas:
Gas water heater
Gas space heater (eg. Propex)
Yes, you could have electric versions of all of these, but powering them with electricity will be a real issue without an on-board nuclear reactor.
A campervan gas installation provides an efficient and cheap way to run many appliances that make a campervan feel like home.
The Gaslow system is a refillable gas bottle and refilling system that allows you to refill your gas at petrol stations and gas filling stations rather than having to pull out an empty bottle and replace it with a new one. We have a comprehensive guide article on Gaslow systems, including installation. Other refillable LPG systems include those made by Gas It, AluGas, and SafeFill.


How to Use a Hole Saw
You will need to use a bi-metal (metal cutting) hole saw drill attachment to cut a circular hole in the side of your van for the filler kit LPG inlet.

There are a few things you should be aware of when using a bi-metal hole saw:
Oil: Use tapping and cutting fluid (e.g. WD40) liberally on the metal you're cutting. The high friction will destroy the hole saw otherwise.

RPM: Use the drill on a low RPM (rotations per minute) to keep friction low. This means that you shouldn't press your finger all the way down on the trigger of the drill.
Pulse: Pulse the drill while you are cutting. Using a stop and start motion while drilling gives the hole saw a chance to cool down.
Don’t cheap out: Real bi-metal hole saws cost a bit of cash - the cheap ones you find online may not work as well or at all.
Be careful of the swarf:
When using mechanical tools on metal, a lot of metal shavings are produced (known as 'swarf'). It is vital that you remove all these shavings from the van when you are finished. If you don't, they will very quickly rust and damage your vehicle.
Always wear eye protection while using mechanical tools on metal. Swarf can cause real damage if it gets in your eyes.

Learn from my mistakes; the first time I used a hole saw, I destroyed it within 5 minutes because I didn't follow the above advice.
How to Install a Gaslow Filler Kit in Your Van
In order to use a refillable LPG system, you need to install an inlet valve. An inlet valve is a point on the side of your van where you plug an LPG refill hose. I personally have an 11kg Gaslow refillable cylinder with a refill point that goes into the side of the van. I love how easy refilling with LPG is with a refillable cylinder.
Step 1: Cut a hole in the side of your van
If you are using a Gaslow filler kit, cut a 70mm circular hole in the side of the van using a bi-metal hole saw. If you're using a different filler kit, measure the diameter of the inner lug that will be inserted into the hole, and choose an appropriately-sized hole saw bit.
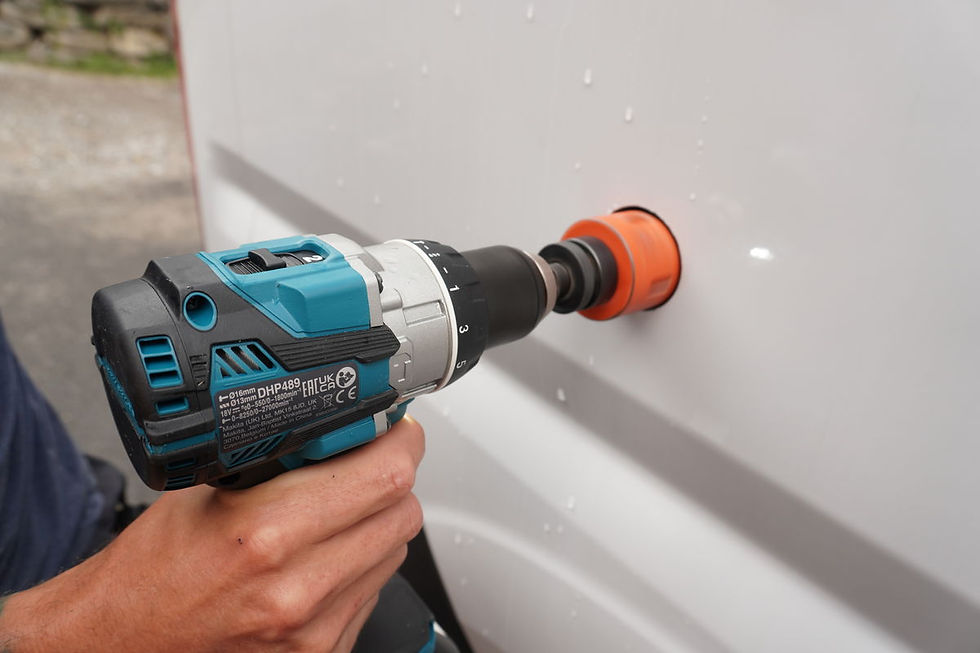
Like the other inlets, you should first attach a piece of scrap wood to the inside of the van to prevent the hole saw from wandering.
Step 2: Cut a top and bottom lug
Using a metal file, cut a small lug in the top and bottom of the hole. This is to prevent the gas inlet from rotating when installed.

Step 3: Treat the cut edges with a file and metal paint
Use a file to file away burrs, swarf, and sharp spots. Then, apply anti-rust metal paint to the cut edges.

Step 4: Install the brass filler head
Install the brass filler head into the outer plastic bracket using the 4 screws and bracket provided.

Tip: Before fixing the housing to your campervan, it is better to fit the connection hose onto the outlet of the brass filler using a spanner and a set of grips. This avoids putting too much rotational pressure onto the housing when tightening up the connection.
Step 5: Insert the outer plastic bracket
Slot the plastic bracket into the hole you cut from the outside.

Step 6: Install the backing flange
Hop inside your van and screw the interior backing flange into the exterior plastic housing. Screw it down nice and tight, and attach your gas hose to the back of the filler head.

Step 7: Apply sealant
Run a bead of sealant around the inlet to prevent any leaks.

Conclusion
I hope you found this guide to installing a Gaslow filler kit useful. Gaslow also have a fantastic manual on the installation of their filling kit which you can find here. You are well on your way to a beautiful self-build campervan. The next step might be to install the rest of your Gaslow refillable LPG system, or to move onto the installation of a hob, oven, or LPG space heater.
Planning your van conversion?
Start with the free Van Conversion Diagram Pack below.
Want a clear step-by-step path for your full build?
The Van Conversion Mastery Course walks you step-by-step through the entire build process — from planning and layout to electrics, insulation, water, gas, carpentry, and more.

Until next time.


