
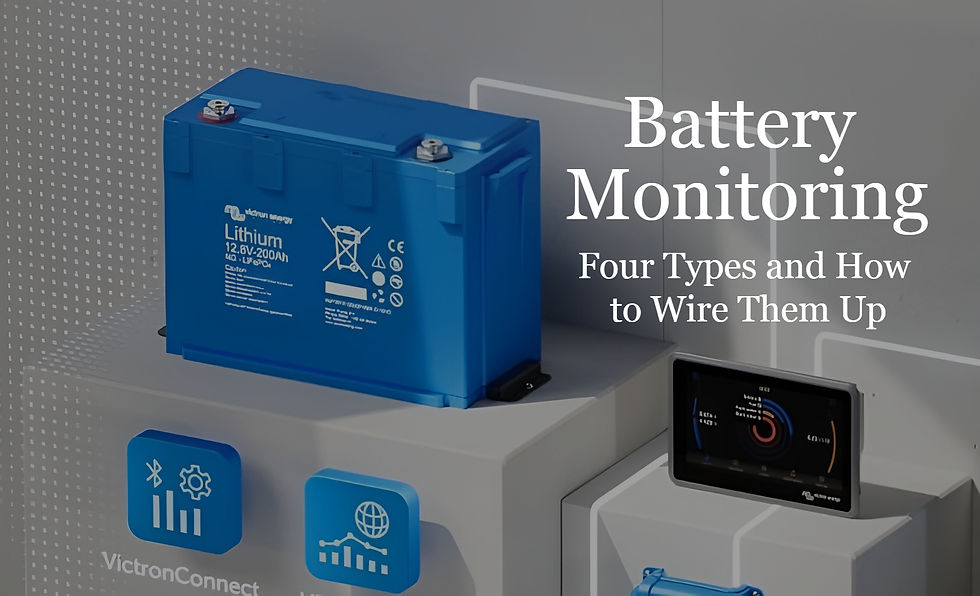
Battery Monitoring for Campervans: The Different Types and How to Wire Them
- Chris Wallace-Tarry

- Apr 8
- 15 min read
Updated: Apr 16
Battery monitoring allows you to see what's going on inside your leisure battery. At the basic level, this allows you to keep them healthy and avoid completely draining them. At a more advanced level, most vanlifers will probably want to know how effective their charging systems are and what appliances use the most power. The upper end of battery monitoring is a fully integrated system dashboard, where every component communicates with every other one and the whole system is displayed in a virtual control centre. In this article, we'll go over these tiers of battery monitoring, explaining how they work, how to implement them, and whether they're right for you.

Shane is an NCC-certified electrical installer. He has built, taught, and lived in campervans since 2019.
This post contains affiliate links. We may earn a commission at no extra cost to you. To understand our policies on content, affiliate commissions, and liability, please review our Terms of Use.
In This Guide
Why Battery Monitoring Matters in a Campervan
Leisure batteries can be a bit of a black box; by default, there's often no way of knowing how charged they are and whether they're charging effectively. It's important to know how charged your battery is (its state of charge or SoC) in order to avoid regularly discharging it to damaging levels. You might also like to know how quickly your charging systems are charging it, how quickly your appliances discharge it, and whether your charging capacity is enough to support your electricity usage.
Battery monitoring devices actively measure battery voltage and current, then calculate useful values such as state of charge, time remaining, and discharge history. This lets you answer practical questions such as “how much capacity do I actually have left?”, “is my charger really replacing what I used yesterday?”, and “am I repeatedly taking the battery deeper than I realised?” Campervan electrical systems are so complex these days, with multiple charge sources and a mix of 12V and mains appliances, that some kind of battery monitoring is essential. I would never design an electrical system without comprehensive monitoring capabilities built-in. It's why we're building Shane's new van with a Victron Lynx Shunt battery monitor and Touch 50 monitoring screen.

Battery monitoring devices come in many forms. The simplest are battery-side Bluetooth modules which allow you to see what's going on inside your battery by connecting with your phone. More advanced devices come with built-in screens or pull information from further up- and downstream, allowing you to see the contribution of individual charging devices and appliances to your battery's state of charge. Finally, integrated monitoring and control systems encompass your whole electrical system, acting as a control panel from which you can manage each individual component. This article will go over each one of these options, outlining who they're for and demonstrating how to wire them up using Wireframe, our wiring diagram software.
Shane's Story
Shane has first-hand experience installing and using very cheap, no-name battery monitors, models from established manufacturers, and full-on system-wide monitoring. Here's his story:
"I had a cheap no-name Amazon shunt and battery monitor in my first van, which I ripped out after a couple of years as it never worked very well. For a long time, I relied on my Photonic Universe MPPT solar charge controller for battery monitoring, which worked well enough. It wasn't as accurate as I knew a proper shunt could be, so I upgraded to Renogy's 500A shunt and battery monitor and it's been brilliant. I love the display + Bluetooth monitoring, and the setup worked no problem with my non-Renogy battery. You can read my review and installation experience here. I also recently installed a Renogy Smart Shunt 300 for a friend, which I'm equally impressed with.

In my new van build, I'm installing a Victron Cerbo GX with a Display 50 touch monitor, which you can read about further down in this article. I'm excited to have proper system-wide monitoring with remote access and a nice big touchscreen in my living area for checking up on what's going on with my electrics."
Built-in Bluetooth Lithium Batteries: the Easiest Starting Point
Many modern lithium leisure batteries now come with built in Bluetooth, which makes them the easiest entry point into battery monitoring. Instead of installing a separate monitor, you simply connect to the battery through an app on your phone and check its status there. In many cases, this will let you see useful data such as voltage, state of charge, charge or discharge current, temperature, cell balance, remaining capacity, and any protection warnings from the battery’s BMS. For a simple campervan electrical system, that's already very useful. It gives you a quick way to check whether the battery is healthy, whether it's charging properly, and roughly how much energy you have left without adding any extra hardware to the build. Most of the lithium batteries we recommend, like Fogstar's Drift range, Victron's Smart models, and Renogy's Pro models include built-in Bluetooth monitoring.

The limitation is that built-in Bluetooth only shows you what the battery itself can see. It will not give you the clearest picture of the wider electrical system, such as exactly how much power each load is using, what your chargers are doing over time, or how energy is flowing around a larger setup. It can also feel a bit limited in multi-battery systems or in vans with solar, shore power, alternator charging, and an inverter all working together. For weekenders, minimalist builds, and vanlifers with a single lithium battery and modest 12V loads, built-in Bluetooth may be all you need. But if you spend long periods off-grid, rely heavily on your electrical system, or want a more precise understanding of charging, discharging, and battery usage over time, you will likely want something more advanced.
Tier 1: App-based Battery Monitoring Using Smart Shunts
A good step-up for most van builders are smart shunts. Devices like the Victron SmartShunt and Renogy Battery Shunt 300 are installed on the battery negative so they can measure the current flowing into and out of the battery bank, rather than only reporting what the battery’s own BMS can see. From that, they can calculate far more useful day-to-day information, including:
Battery voltage
Input current
Output current
State of charge
Time remaining
Historical data such as discharge depth and charge/discharge cycles
In practice, that gives you a much clearer picture of how your electrical system is performing over time. You can see whether your chargers are actually replacing what you use, how quickly your loads are draining the battery, and whether you're regularly taking the bank deeper than you realised. That makes a smart shunt a very strong middle-ground solution for vanlifers who want meaningful monitoring without committing to a more complex control ecosystem. It's also the entry-level monitoring solution for batteries without built-in Bluetooth monitoring.

The main strengths here are accuracy, simplicity, and value. A smart shunt gives you far more insight than built-in Bluetooth alone, while still keeping the installation relatively neat and avoiding the cost and complexity of a full integrated system. The trade-off is that everything lives in your phone app. That is perfectly fine for many van builds, but it does mean you don't get an always-visible readout inside the van. Compared to battery monitors with dedicated displays, smart shunts are less convenient for quick at-a-glance checks, and they can feel less polished in a build where you want key battery information permanently visible from the living space. Victron explicitly positions the SmartShunt as an alternative to the screen-equipped BMV for users who want less wiring and clutter, which neatly captures its appeal. Smart shunts deliver most of the monitoring you want, at a minimal price, without asking you to install a separate screen.
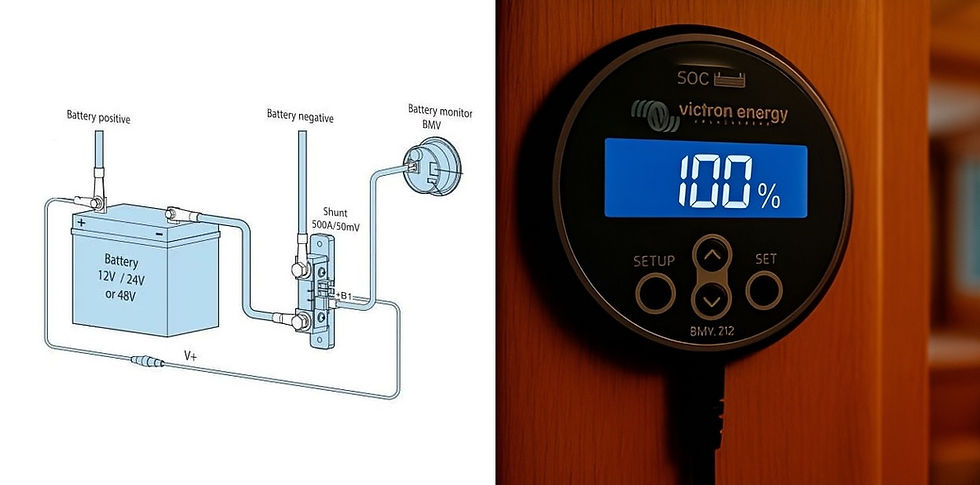
How to Wire Up a Smart Shunt
A great advantage of smart shunts is that they're very easy to wire up. The shunt sits on the negative battery cable before it connects to anything else. The shunt also has a small data connection to the battery's positive terminal. Because the shunt has no screen, you can install it close to the battery, hidden from view.

I whipped up the above wiring diagram in a couple of minutes using Wireframe, our new electrical system design tool. I'll be using Wireframe for all diagrams in this article; check it out here and have a play yourself.
Tier 2: Monitors with Dedicated Displays
Battery monitors with dedicated displays build on the same basic idea as a smart shunt, but improve the user experience by adding a display screen. Instead of pulling out your phone whenever you want to check the system, you get a permanent readout inside the van showing key battery data at a glance. In practical terms, that is the main upgrade over app-only shunts: the information you get is the same, but you have a more visible and convenient way of accessing it. Display-based monitors still use a shunt to track current flow and calculate useful values such as voltage, current, state of charge, amp-hours consumed, power draw, and time remaining, but they package that information in a form you can see instantly from your living space.
There is a useful divide here between display-only monitors and display-plus-Bluetooth models. A straightforward display-only example is the Renogy 500A Battery Monitor with Shunt, which gives you an LCD screen and shunt-based battery data without asking you to rely on an app. If you want both a physical display and wireless app access, the clearest example is the Victron BMV-712 Smart. Victron describes it as a full BMV battery monitor with Bluetooth built in, so you get the convenience of a dedicated screen in the van alongside phone-based monitoring and settings in VictronConnect. That makes this tier a particularly good fit for vanlifers who use their electrical system heavily, want a more finished-looking install, or simply like being able to glance across the van and immediately see where the battery stands.

The trade-off is cost, installation effort, and clutter. A display monitor usually means a little more wiring, a place to mount the screen, and another visible component in the living space. For some builders that is exactly what they want. For others, a simple smart shunt hidden away near the battery bank will feel cleaner and more than sufficient. It's also worth noting that even the better display monitors are still based on battery shunts, not full system managers. They're excellent for tracking battery usage, but they do not yet give you the kind of whole-system visibility and control that comes with integrated ecosystems such as Victron GX or Renogy ONE.
How to Wire Up a Battery Monitor with a Dedicated Display
Because these are simply shunts with a head unit containing a screen, the wiring is almost exactly the same as for a shunt. The screen plugs into the shunt's data port with the integrated wire.

Still figuring out your van electrics?
This is where most people get stuck — trying to piece everything together from scattered advice, second-guessing cable sizes, fuses, and system design.
The Van Electrics Masterclass walks you through the entire system step-by-step — so you can design and install it properly, with confidence.

Tier 3: Integrated Battery Monitoring and Control Systems
At this point, the focus shifts from monitoring the battery bank to monitoring the whole electrical system. A battery monitor tells you what is happening at the battery. An integrated monitoring and control system goes much further. It pulls together data from your chargers, inverter, solar controller, battery, tank sensors, temperature sensors, and other connected devices, then presents them in one place. In other words, this type of system gives you a central dashboard for how the whole van is working, with the batteries at the core. The battery monitoring component still comes from a shunt or battery management system, but this now forms just one part of a much larger monitoring suite.
Victron GX
Within the Victron ecosystem, GX is the monitoring and communications platform, and the Cerbo GX is the brain of that system. Victron describes it as a communication centre: it collects data from connected Victron products and supported third-party devices (including shunts and battery monitors), makes that data available locally, and also sends it to the VRM portal for remote monitoring.

It can also be accessed directly through the VictronConnect app via its built-in Wi-Fi access point. That is what makes it such a step up from a battery monitor. Instead of only showing battery voltage, current, and state of charge, it can act as the hub that lets the whole system talk to itself and gives the user one place to see and manage it.

If you want a local touchscreen with a Cerbo GX, the two main options are the GX Touch 50 and GX Touch 70. These are display accessories for the Cerbo, connected with a single cable. The difference between them is mainly size and resolution: the GX Touch 50 is a 5-inch screen at 800 × 480, while the GX Touch 70 is a 7-inch screen at 1024 × 600. The Ekrano GX takes a different approach. Rather than being a Cerbo plus a separate screen, it is an all-in-one GX device with its own integrated 7-inch touchscreen. Victron positions it as the most powerful GX device to date.
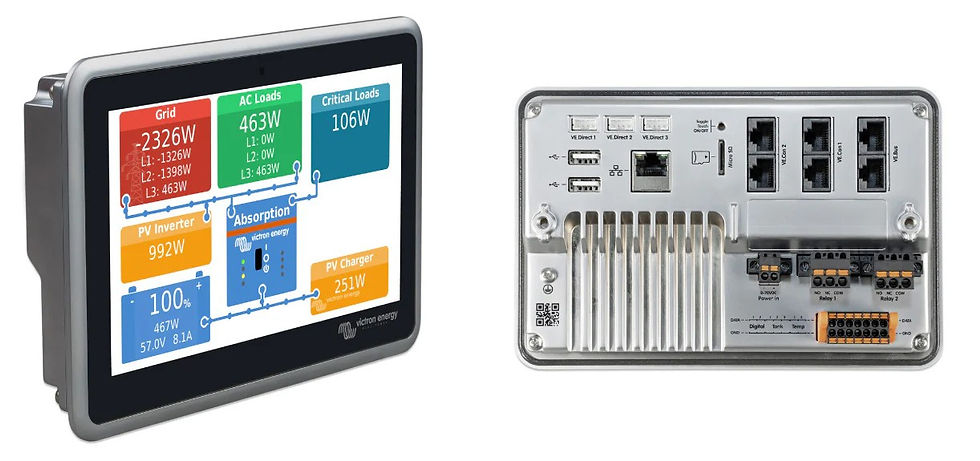
One of the strengths of GX is that you can expand it well beyond pure battery and charging data. In addition to monitoring, you can also set up behaviours and automation tasks, including the automatic powering-on of devices at certain times and automatic subsystem changeovers. Cerbo GX has inputs for water tank levels and temperature sensing, and its relays can be programmed for functions such as alarms, generator start/stop, tank pump control, or timed and temperature-controlled operation. That means a GX system can grow from a simple monitoring hub into something that also watches environmental data, logs system history remotely, and handles automation tasks.
Renogy ONE
Renogy’s equivalent move into integrated monitoring is the Renogy ONE range. The Renogy ONE Core is positioned as a central energy-monitoring and analysis hub with a built-in 4-inch touchscreen, equivalent to the Victron Cerbo GX. Renogy says it supports local monitoring on the device itself and remote monitoring through the Renogy ONE Portal and DC Home app. Like the Cerbo, the ONE Core connects to other devices (like a shunt) through data cables or Bluetooth, and integrates data from your whole system into a dashboard. This dashboard is controllable via the built-in screen or Renogy's ONE Portal app and website.

The other ONE control station, the M1, is more sophisticated and specifically designed for smart homes, with automated DC appliance control and motion sensing.
Where Victron GX is highly modular, Renogy ONE is a self-contained screen-and-app-hub. GX is more powerful, thanks to Victron's broader range of GX-compatible devices. If you want a fully smart campervan with a dashboard integrating electrical and water systems and sophisticated communications, that's the way to go. For a simpler setup and more 'core' electrical system monitoring, Renogy ONE is a better, and more affordable, choice.
How to Wire Up a Victron Cerbo GX
Like any 12V device in your electrical system, the Cerbo simply needs a negative connection from your battery bank. This can be a direct connection or one run through your 12V fuse box. You plug your shunt (wired as before) into the Cerbo's data port with a VE.Direct cable, along with the other elements of your electrical system that you'd like to monitor.

If you want to map out a complicated system like this including advanced monitoring, you need to start with a proper wiring diagram. Wireframe is a great tool for easily producing neat, detailed wiring diagrams for your whole electrical system. Check it out here.
Which Type of Battery Monitoring is Right for You?
The right option depends on how complex your electrical system is and how much information you actually want day to day. If you have a simple van build with a single lithium battery and modest 12V loads, built-in Bluetooth may be enough. It gives you an easy way to check battery status without adding extra hardware. A smart shunt is the next step up, and for many vanlifers it's the sweet spot. It gives you much more meaningful data on charging, discharging, and state of charge, without the cost or complexity of a full control system. It's also the only solution if you have an AGM or gel battery with no integrated BMS.

If you want battery information permanently visible inside the van, a monitor with a dedicated display will feel like a worthwhile upgrade. And if you are building a larger or more advanced system with multiple charge sources, multiple battery banks, water tank sensors, and automation or remote monitoring, an integrated platform such as Victron GX or Renogy ONE makes more sense. In other words, the further you move from a simple battery bank to a fully integrated electrical system, the more likely you are to benefit from moving beyond basic battery monitoring to whole-system monitoring and control.
Interoperability: Can You Mix Battery Monitoring Brands?
In purely electrical terms, battery monitoring is often more interoperable than the apps and screens make it seem. A Victron SmartShunt is described by Victron as compatible with any battery type, so it can monitor a non-Victron AGM or lithium battery bank perfectly well as long as it is installed correctly and configured for the battery you actually have. Renogy’s Battery Shunt 300 is similarly sold as compatible with multiple battery chemistries, including lead-acid and lithium types.
Where interoperability becomes more limited is at the level of ecosystem integration. A Cerbo GX is built first and foremost to talk to Victron devices over Victron protocols such as VE.Direct, VE.Bus, and VE.Can, though it also supports a defined list of supported non-Victron products. Victron’s own docs explicitly cover selected third-party batteries, certain PV inverters, and some other supported devices, but that is not the same thing as saying any random third-party shunt or inverter will show up neatly in GX. In practice, a non-Victron inverter may work fine electrically in the van, but unless it is one of the specifically supported devices, it usually will not integrate into the Cerbo GX as a fully monitored and controllable component in the same way a Victron inverter or SmartShunt will.
The same broad principle applies to Renogy ONE. Renogy says the ONE Core works seamlessly with Renogy power supply devices and smart accessories over its supported communications methods. Renogy is much less open, at least in its own documentation, about third-party energy-device support. They do say that the ONE Core works with Victron Cerbos and Multipluses, but are less clear beyond that. That strongly suggests that Renogy ONE is best understood as a Renogy-centric ecosystem rather than a broadly brand-agnostic control hub.
So can Victron and Renogy work together? Yes, but mostly at the level of a mixed electrical system rather than a single seamless software ecosystem. For example, you could absolutely build a van with a Renogy battery or charger and a Victron SmartShunt, or a Victron battery monitor alongside non-Victron charging hardware, because the shunt is simply measuring battery current and voltage. What is much less likely is that a Renogy shunt or inverter will integrate natively into a Cerbo GX, or that Victron devices will be fully absorbed into Renogy ONE.
Setup Tips for Battery Monitoring
Setup is usually straightforward, and good manufacturers will include instructions. The following tips come from Shane's and my personal experience.
Initial Sync and Reset
In order for the battery monitor or shunt to sync up with your battery, you need to first charge your battery up to its full capacity, and then reset the battery monitor. Without this initial setup, the device won't properly sync up with your battery's chemistry and size.
Battery Settings
Once the shunt is synced to the battery, make sure you've entered the correct battery settings. This is done either via Bluetooth through the app, or using the monitor screen if you have one. Input the correct battery capacity, chemistry, and key specs like battery current thresholds and maximum discharge levels.
Final Test
Once everything is all set up, do a simple real-world test once everything is live. Turn on a known load and make sure the monitor shows the appropriate discharge. Then connect a charger or solar input and make sure it shows the appropriate charge. This quick test helps you catch wiring mistakes, reversed current readings, or missing circuits before you start relying on the monitor day to day.
Final Thoughts
With proper battery monitoring being as indispensable as it is, it's important to choose a system that works for you. Whilst integrated Bluetooth in modern lithium batteries is enough for simple systems, most people with complete campervan electrical systems who rely on off-grid power will want to start with a smart shunt. From there, add a screen if phone- and computer-based monitoring isn't enough for you. If you have a very complex system, or if you just want a fancy, data-rich monitoring and control dashboard for ultimate oversight, look at monitoring ecosystems. In all cases, you'll want to plan your system out with a proper wiring diagram; use Wireframe to get your project off the ground.
Still unsure how to design your van electrics?
Start with the free wiring diagrams below.
Want to build your van electrical system properly from start to finish?
The Van Electrics Masterclass shows you exactly how to design and install a safe, reliable electrical system — step by step.
Until next time.

