
Dometic S4 Window Review & Installation Guide [With Step-by-Step Instructions]
- Chris Wallace-Tarry

- Aug 18, 2025
- 15 min read
You'll most likely be installing at least one window in your van if you're converting from scratch. Indeed, our 2023 Roaming Home study found that 87% of van converters installed a window, making it by far the most common addition to a van's exterior. We just installed a Dometic S4 window in Shane's new van, Elvis. We chose the Dometic S4 for its double-glazed, insulating construction, its versatile sliding shades, and for Dometic's reputation for build quality and features. In this Dometic S4 window review, we'll look at the new window in detail and show you how we installed it, step-by-step.

Shane is an NCC-certified electrical installer.
He has built, taught, and lived in campervans since 2019.
This post contains affiliate links. We may earn a commission at no extra cost to you. To understand our policies on content, affiliate commissions, and liability, please review our Terms of Use.
Prefer watching? Check out our video on the installation of the Dometic S4 window:
In this guide
Supplies List
Before starting your Dometic S4 window installation, make sure you have the following:

A power drill of at least 500W For driving and drilling

A jigsaw For cutting the hole in the van, and for cutting the wood for your frame

HSS metal drill bits For drilling holes in your van's metal walls

25mm bi-metal hole saw bit For cutting the round corners of the window hole

Screwdriver bit set For screwing together your windowframe

Metal cutting saw blades Necessary for cutting metal

Campervan sealant Sikaflex 522 is our preferred flexible, weather-resistant silicone sealant

Sealant gun For applying sealant

Metal file For filing away burrs on cut metal edges

Anti-rust zinc mental spray paint For protecting bare metal from future rusting

White spirit For cleaning paint brushes, excess metal paint, and excess sealant

Tapping and cutting fluid Lubricates metal and dissipates heat whilst using the hole saw

Sandpaper For sanding cut wood

Painter's tape For protecting your van's paintwork during metal cutting

Tape measure For measuring wood and metal

Assortment of wood screws For screwing the window frame together

Wood glue For securely bonding the window frame

200cm of wood batten of the right dimensions for your wall thickness For building the window frame

Corner clamps For holding wood in place at a 90 degree angle

D clamps For clamping wood during cutting

Ear protection Sawing metal is very loud; protect your ears
What's in the Box?
In the box, the Dometic S4 is mostly put together and ready to go. The window comes in two parts: the exterior part is comprised of the outside frame and double-glazed window glass. The interior part includes the inside frame, integrated blackout blind, and integrated fly screen. Dometic supply screws for joining these two halves together, with no need to drill anything yourself. You also get little covers for the screw holes, which give a nice finish once everything's in place.

The instructions included with your window kit are fairly basic, and require some interpretation to understand exactly what Dometic want you to do. This has been our only major complaint with the Dometic products we've installed in Shane's van.
Key Specs
Dimensions: 500mm x 450mm
Weight: 5kg
Material: Double glazed acrylic with slight tint
Built-in reflective blackout blind and fly screen
Friction hinges allow opening of window and blinds to any position

Dometic S4 Size and Format Variations
This article is going to focus on the installation of the 500mm x 450mm sliding window variant of the Dometic S4, which we put in the rear door of Shane's new van. Dometic make a hinged version of the S4 window, and in a variety of sizes which suit all kinds of installations:
Dimensions (mm) | Opening Type | Dimensions (mm) | Opening Type |
|---|---|---|---|
500 x 300 | Hinge and sliding | 900 x 450 | Hinge and sliding |
500 x 350 | Hinge only | 900 x 500 | Hinge and sliding |
500 x 450 | Hinge and sliding | 900 x 550 | Hinge and sliding |
500 x 500 | Hinge only | 900 x 600 | Hinge and sliding |
550 x 550 | Hinge only | 1000 x 450 | Hinge only |
600 x 500 | Hinge and sliding | 1000 x 500 | Hinge and sliding |
600 x 550 | Hinge only | 1000 x 600 | Hinge and sliding |
600 x 600 | Hinge and sliding | 1000 x 800 | Hinge only |
700 x 300 | Hinge and sliding | 1100 x 450 | Hinge and sliding |
700 x 400 | Hinge and sliding | 1100 x 550 | Hinge only |
700 x 450 | Hinge and sliding | 1200 x 300 | Hinge only |
700 x 500 | Hinge only | 1200 x 500 | Hinge only |
700 x 550 | Hinge and sliding | 1200 x 600 | Hinge and sliding |
700 x 600 | Hinge and sliding | 1300 x 600 | Hinge and sliding |
750 x 600 | Hinge and sliding | 1450 x 550 | Hinge only |
800 x 350 | Hinge and sliding | 1450 x 600 | Hinge and sliding |
800 x 450 | Hinge and sliding | 1450 x 700 | Hinge only |
900 x 400 | Hinge and sliding | 1600 x 600 | Hinge only |
We also installed a 1000mm x 500mm sliding Dometic S4 in the side of the van. The installation procedure and functionality of the bigger window is exactly the same as for the small window.

Dometic S4 Alternatives
We were happy to go with Dometic for both the windows because we were confident in their reputation and happy with the range of available sizes. Outside of the UK and Europe, Dometic gear can be hard to source. We can happily recommend Tern Overland's hinged windows as an alternative. They're priced competitively against Dometic's offerings, with a similar range of sizes and the same feature set and reputation for quality.
First Impressions
Out of the box, the build quality that Dometic are known for is obvious. The window glass is clear, sturdy, and fetchingly tinted. The sliding mechanism feels good, locking in position through friction without ever being hard to slide. The window slides open and closed in an aluminium rail, which has flanges that overlap the frame and which contain rubber seals. The seal between the sliding and fixed portions of the window is soft foam rubber, which feels very solid and produces a soft hissing sound as the window opens and closes. Overall, the sliding mechanism and seals inspire a lot of confidence.

The whole thing is lightweight, at only 5kg, but feels very solid in its construction. In all our playing with the window, nothing felt sticky, flexy, or flimsy. All the mechanisms worked intuitively and smoothly, giving an overall feeling of quality that's very satisfying.
Dometic S4 Window Review
With the window installed, the mechanisms all come together. The inner frame contains the ingenius hybrid blackout blind and bug screen system. These are two sheets of material which slide up and down on rails like a Velux blind. The bug net is a fine black mesh that lets in plenty of light, and the blackout blind is backed with reflective material for keeping heat out. Each of these blinds can be smoothly opened and closed on their own using the intuitive clasp system.
The clever part reveals itself when you slide one blind until it touches the other, at which point the clasp links the two together. Now, with one movement, you can extend the one blind whilst retracting the other, setting your window to 50% blackout, 50% bug screen, vice versa, and any combination in between. It's a simple, easy to use system that allows you to get the most out of your window. I've previously dealt with the hassle of installing custom bug netting and curtains to complete a van window. It was brilliant to install something so self-contained, knowing that the job only had one step.

From the outside, the sleek, flush-mounted and factory-finish style looks like it was built into the van from day one. The dark tint of the window itself looks premium and offers noticeable privacy from the outside. From the inside, the window's soft cream finish will go well with interior finishings, especially the wood panelling we've got planned.
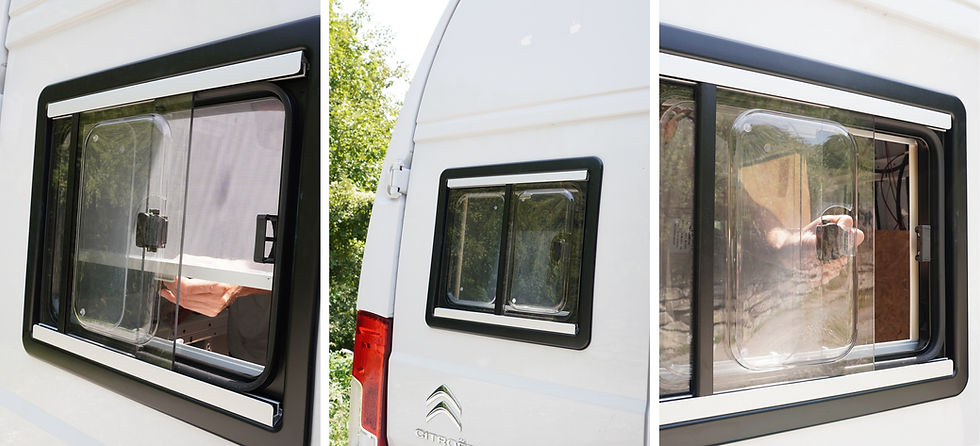
Having driven around with the window fitted for a while, we've heard no rattling and the window and blinds stay in the positions you fix them in. In the end, the most impressive thing about the Dometic S4 sliding window is that it just works. The quality-of-life features are well-built and thoughtfully implemented; nothing feels superfluous or overdesigned. Overall, we're very happy with the installation, and feel comfortable recommending it to any van builder looking for a fully-featured window that will last as long as their van does.

How Easy is it to Install the Dometic S4 Sliding Window?
The only complaints we had about the Dometic S4 came up during installation. These were to do with the complex instructions, and the need to construct our own frame.
The Dometic S4 is designed for installation in vans with walls that are 26mm. This is a standard wall thickness for caravans and motorhomes. If your walls are thinner than this (for example, if you're installing the window directly in the sheet metal of a panel van's walls), you need to build your own frame. If your walls are thicker than 26mm, you'll instead need to cut and install your own spacer strips. Dometic do provide measurements and instructions for these frames and spacers, but we found the installation diagrams difficult to interpret and felt like we were guessing our way through the process. The instructions below detail the procedure we came up with.
The frame or spacers need to be precisely measured and cut, and a square frame is best built with corner clamps. Thus, you'll need a bit of equipment and know-how to install your Dometic S4 if your walls aren't exactly 26mm thick. Of course, installation also requires you to cut into the wall of your van, but this is relatively straightforward. Overall, the whole thing took us 4-5 hours.

The one big tip we have for installing a Dometic S4 window is: when building the wooden frame, choose wood that won't overhang the interior window frame.
The width of the space between the window hole and the outside of the interior window frame is about 2cm. We used battens which were 3cm wide, and which stick out about 1cm past the interior window frame. This meant that our wooden frame was bigger than the space in the van's panelling that the window is designed for. We had to do some very finicky adjustments to the wooden frame to get this to work. Next time, we'd choose wood which fit exactly flush with the edge of the interior window frame.

Still figuring out your van build?
This is where most people get stuck — jumping between blog posts, YouTube videos, and forums, never quite sure what to do next.
The Van Conversion Mastery Course gives you a clear, step-by-step system to design and build your van from start to finish — without the guesswork.

How to Install the Dometic S4 Sliding Window: Step-by-Step Guide
Step 1: measure and cut the wood for your frame or spacers
Your wooden frame needs to be made of wooden battens that are of the thickness specified in the tables provided in the instruction manual. For van walls 1-2mm in thickness, these battens must be 25mm thick. As explained above, choose battens whose width won't jut out past the interior window frame.
Your wooden frame should fit snugly around the flange on the exterior window frame, and so its internal dimensions need to match the external dimensions of this flange:

The Dometic S4 comes in multiple different sizes, so measure the flange on your model thoroughly. If you're using simple butt joints, as we did, you'll need:
two lengths of wood whose length matches the horizontal length of this flange
two lengths of wood whose length matches the vertical length of this flange + 2x the thickness of the wood
This is because the longer pieces of wood need to fully overlap the ends of the shorter pieces:

If you're using mitre joints, you'll need:
two lengths of wood whose length matches the horizontal length of this flange + 2x the thickness of the wood
two lengths of wood whose length matches the vertical length of this flange + 2x the thickness of the wood
Cutting the ends off these lengths of wood at a 45° angle will give you a frame that fits over the flange.
Measure the flange on your window, calculate the lengths of wood you'll need to cut, measure and mark your wood, and clamp it to your worktop. Use a saw to cut the wood to size, and sand the cut ends to remove splinters.

Step 2: build the frame from your lengths of cut wood
Use corner clamps to set the wood up in the form of your frame. Don't tighten these all the way down yet; keep some wiggle room between the lengths of wood whilst holding the structure in place.

Squeeze wood glue onto the butt ends of the shorter lengths of wood, seat them flush against the longer lengths, and clamp them into place. Don't bear all the way down on the clamps one at a time, as the tension on one joint can pull the others out of position. Instead, get each clamp mostly tight, ensure everything's aligned, then go back around and tighten the clamps all the way.

Because the outside of this frame is going to be hidden in the walls on Shane's van, we decided to secure these joints with screws. If you decide to do this, drill pilot holes first to prevent splitting of the wood before driving the screw home. An impact driver counter sinks the screws without needing to use a counter sink drill bit first.

With the wood glue in place and the screws in, leave the frame clamped together for your glue's specified setting time.
Step 3: measure for the hole in your van
Once the glue's set, unclamp the frame and take it out to your van along with:
painter's tape
tape measure
non-permanent marker or pencil
drill with 25mm hole saw attached
tapping and cutting fluid
metal paint
paint brush
jigsaw
metal file
Set the wooden frame against the inside of your van where you want the window to be. Check that both the inner window frame and the outer window frame have room on all sides to sit flush against the van.
This is where we hit a snag: the corners of our wooden frame overlapped the inner flange of the van's rear window panel:

This sort of thing is hard to predict without making very precise measurements and visualising everything in your head beforehand. Because we'd put screws into the ends of the joints, we weren't able to just slice off those troublesome corners. Instead, we used an orbital sander to shave an indent into the corners until the frame fit flush against the van:

With the frame sitting flush and where you want it, it's time to mark out the hole for your window. Dometic's instructions specify that you should measure 12mm (half the diameter of your hole saw) inwards from the wooden frame and mark where these lines intersect at the corners. These marks are the locations for your hole saw cuts.

We found this measuring to be the trickiest part of the whole installation. In the end, we followed the following steps:
hold the wooden frame tightly against the van
very precisely trace the inside of the frame onto the van with a marker pen
verify that the traced line has the exact same internal dimensions as the wooden frame (this took us a couple of tries)
measure and mark lines 12mm in from the traced line near all 4 corners
the four intersections of these lines, inward from the corners of the traced line, are your hole sawing points
Step 4: cut the hole for the window
Get your ear protection on and, using an HSS drill bit for pilot holes and a 24mm bi-metal hole saw for the main hole, cut holes at the marked points. Use tapping and cutting fluid to lubricate the hole saw, and use a pulsing action to minimise heating.

You'll be connecting these four holes with straight jigsaw cuts, and the end result will be a rectangular hole with rounded corners. On the outside of the van, carefully lay painter's tape in straight lines between the outside edges of the holes. This tape will be the guideline for your cutting.
When cutting with a jigsaw, use a low setting and move slowly and steadily. High saw speeds cause heating, warping, and breakage of the blade. Pushing too much with the saw causes it to snag and jump, making for a jagged cut and broken blades.

Step 5: file and treat the edges of the hole
Peel off the painter's tape, and wipe away loose swarf and metal dust with a rag. Use a metal file to file down the perimeter of the hole until it's smooth and free of burrs. Take a moment to sweep or hoover up any metal shavings on the inside of the van.

All cut metal needs to be treated to prevent rust. We used white Hammerite metal paint, but anti-rust zinc spray dries more quickly and is easier to use. Apply it all around the cut metal edge, ensuring full coverage.

Let the paint dry before moving on to the next step.
Step 6: apply sealant to the outer window frame
Per Dometic's instructions, run a thick bead of campervan sealant along the groove under the outer window frame's rim. Be liberal in your application of sealant, ensuring the bead is consistent all the way around, with no gaps.

Step 7: fix the two window halves together
Press the outer window frame into the hole in the van and squeeze around the edges. On the inside of the van, put the wooden frame in place around the outer frame's flange. Finally, fit the inner window frame around the flange, over the wooden frame. Make sure everything fits correctly and that the inner frame's screw holes are engaging with those of the outer frame.

Due to the curvature of the van's walls, the outer frame is unlikely to fit flush at first. As you drive the screws from the inside, they should bite into the outer frame and pull it inward as they tighten down. For this reason, it's best to drive the corner screws first, and only tighten them to 70% or so. Next, drive the screws along the edges of the frame, also only to 70%. Once all the screws are in and pulling the frames together, you can go around screwing them to full tightness.
Step 8: finishing touches
Once you're happy with the fit of your window, insert the little screw hole covers all around the inside frame. On the outside of your van, check on the sealant. It's likely to have been squeezed out around the frame as everything was tightened down. A squeegee tool or wet fingertip is perfect for smoothing this extra sealant around the edge of the window frame. Give everything a final clean with paper roll or a microfibre cloth, peel the protective plastic film from the window panes, and admire your handiwork.

Final Thoughts
We've been very happy with the Dometic S4 window. Once installed, it looks sleek and clean, blending seamlessly with the outside of the van. The construction is solid, and all the moving parts operate cleanly with a solidity that inspires confidence. The installation isn't the easiest, however, and we'd have much preferred an installation that required the cutting of simple square corners, rather than rounded ones. Despite this, if you feel your measurement and DIY skills are up to the task, you'll struggle to do better than the Dometic S4.
For more information on windows, including a full breakdown of opening types, key paramaters, and a buying guide, check out our comprehensive article. Your next job might be the installation of a roof vent: we've got a guide on that, too, as well as an in-depth review of Dometic's excellent Mini Heki skylight. We also have an in-depth review of Dometic's FanTastic Breathe roof fan, which, along with a window and skylight, completes the ventilation system in Shane's new van.
Planning your van conversion?
Start with the free Van Conversion Diagram Pack below.
Want a clear step-by-step path for your full build?
The Van Conversion Mastery Course walks you step-by-step through the entire build process — from planning and layout to electrics, insulation, water, gas, carpentry, and more.
Until next time.

