
Dometic Mini Heki Skylight Review and Installation Guide [With Step-by-Step Instructions]
- Chris Wallace-Tarry

- Aug 28, 2025
- 16 min read
In our view, a roof vent is an essential addition to any campervan. Most people install windows for light and ventilation, but a roof vent completes the picture, giving hot air an escape and establishing a healthy breeze through your van. We just installed a Dometic Heki Mini skylight in Shane's new van, Elvis. We chose the Dometic Heki Mini skylight because it shares its brilliant integrated shade and bug net with Dometic's windows (which we loved), and because we had confidence in Dometic's reputation for build quality. In this Dometic Mini Heki skylight review, we'll look at the new skylight in detail and show you how we installed it, step-by-step.

Shane is an NCC-certified electrical installer.
He has built, taught, and lived in campervans since 2019.
This post contains affiliate links. We may earn a commission at no extra cost to you. To understand our policies on content, affiliate commissions, and liability, please review our Terms of Use.

In this guide
Supplies List
Before starting your Dometic Mini Heki skylight installation, make sure you have the following:

A power drill of at least 500W For driving and drilling

A jigsaw For cutting the hole in the van, and for cutting the wood for your frame

HSS metal drill bits For drilling holes in your van's metal roof

25mm bi-metal hole saw bit For cutting the round corners of the skylight hole

Screwdriver bit set For screwing together your frames

Metal cutting saw blades Necessary for cutting metal

Campervan sealant Sikaflex 522 is our preferred flexible, weather-resistant silicone sealant

Sealant gun For applying sealant

Mastic/butyl tape For evening out uneven roof surfaces

Metal file For filing away burrs on cut metal edges

Anti-rust zinc mental spray paint For protecting bare metal from future rusting

White spirit For cleaning paint brushes, excess metal paint, and excess sealant

Tapping and cutting fluid Lubricates metal and dissipates heat whilst using the hole saw

Sandpaper For sanding cut wood

Painter's tape For protecting your van's paintwork during metal cutting

Tape measure For measuring wood and metal

Assortment of wood screws For screwing the skylight frame together

Wood glue For securely bonding the skylight frame

200cm of wood batten of the right dimensions for your wall thickness
For building the skylight frame

Corner clamps For holding wood in place at a 90 degree angle

D clamps For clamping wood during cutting

Ear protection Sawing metal is very loud; protect your ears
What's in the Box?
The Dometic Mini Heki comes in three parts, making for a comparatively simple installation. The exterior part of the skylight is comprised of the window itself, the exterior frame, and a flange that extends through the your van's roof. The interior part of the skylight includes the inside frame and backing. Finally, the integrated blackout blind and bug screen come in their own frame, which slots over the inside frame and hides screw holes and structural elements. Dometic supply screws for joining the outer and inner frames, and holes are pre-drilled.

As we discussed in our review of the otherwise excellent Dometic S4 window, the instructions included in the box aren't always clear. We had to employ some guesswork during the installation, and we're still not 100% convinced that our steps are what Dometic had in mind.
Key Specs
Dimensions: 400mm x 400mm
Weight: 3.3kg
Ventilation Opening Area: 70cm²
Maximum Opening Height: 364mm
Double-walled PMMA acrylic glazing minimises noise from rain and hail and insulates against winter cold
Opening handle fixes vent to fully open, half-open, or covered-open position for bad weather
Integrated reflective blackout blind and fly screen
Dometic Mini Heki Variants and Ventilation Requirements
The Dometic Mini Heki skylight comes in variants that differ in the thickness of the roof they're installed in, and whether or not they provide permanent ventilation.
Roof Thickness
The Dometic Mini Heki can be bought in a version intended for roofs that are 25-42mm thick, and a version for roofs that are 43-60mm thick. If you're installing your skylight before insulating and cladding your roof, you'll want the 25-42mm version. Dometic don't make a Mini Heki that's designed for bare sheet metal roofs only a couple of mm thick, so you'll need to build a wooden frame that brings the total thickness up to 25mm.

If you're installing your skylight into insulation and cladding, or if you're buying one for a motorhome, you'll need to ascertain your roof's thickness. This can be done by driving a thin drill bit all the way through your roof at the location you're planning on installing your vent. Make sure you're certain that there aren't any electrical wires in this section of roof. Once you know how thick your roof is, you can buy the Mini Heki version that's right for you.
Permanent Ventilation
Dometic also make the Mini Heki in a variant which always permits a trickle of ventilation, even when fully closed. They refer to this as 'forced ventilation', and it's useful if you're building your van to comply with UK or EU motorhome standards. BS EN 1646-1:2018 and the equivalent EU standards require a certain area of permanent free ventilation in or near the roof. Shane's van has a floor plan area of 5.8m², meaning it requires 100cm² of total permanent ventilation area in the roof. We're therefore installing the 'forced ventilation' variant of the Mini Heki, as it provides 70cm² of permanent ventilation area. We'll then only need a small additional vent alongside this to make up the remaining 30cm².
If you're not worried about making regulations, you can go for the standard Mini Heki model.
Dometic Mini Heki Alternatives
We think the Mini Heki is the perfect balance between size and price. If you want something bigger (or much smaller), Dometic make a suite of skylights in different sizes, all with the same features and some with a couple extra:


960mm x 655mm
Integrated lighting and double-pleated honeycomb blind

960mm x 655mm
Integrated double-pleated honeycomb blind and fully variable opening positions
We were happy to go with a Dometic skylight because of how much we liked the Dometic window we installed. If you're having trouble sourcing Dometic gear, we can happily recommend Fiamma's skylights as an alternative. They're priced competitively with Dometic's offerings, and also feature permanent ventilation and an integrated bug screen in a range of sizes.
First Impressions
The Dometic Mini Heki comes in three parts out of the box, making for a straightforward installation. Dometic's trademark build quality is immediately evident: the glass is nicely domed, crystal clear, and sturdy. The opening mechanism feels good, with the handle sliding smoothly in its rail and snugly locking in the three opening positions. The domed window glass fully overlaps the frame by a few centimetres when closed, giving extra confidence in the skylight's waterproofing.

The inner frame, which provides the solid backing that the outer construction screws into, feels appropriately sturdy. The only thing that doesn't feel especially solid is the trim frame which contains the blind and bug net. It's made of thin, flexy plastic, and the aluminium-backed blind feels quite fragile to handle. When installed, however, this piece isn't structural and you'll only be moving the blind with the integrated handle. Overall, the Mini Heki is attractive in its design and solid where it needs to be. The moving parts all slide back and forth smoothly, giving the impression that the skylight just works right out of the box.
Dometic Mini Heki Skylight Review
The Dometic Mini Heki skylight works so well when installed that there's surprisingly little to say. The blind and bug net both slide back and forth very smoothly, and the blind's blackout material blocks all light when it's fully extended. You can have them both extended at the same time, each taking up half of the skylight, one at 70% and the other at 30%, and any combination in between. Having previously had to fiddle around with aftermarket bug netting kits and DIY blackout covers, this neat, perfectly functional system is a real blessing.

The opening mechanism also works brilliantly with no fuss. The handle provides just the right leverage to move the vent up and down with minimal effort, and it all feels very clean. The handle slides back and forth in a rail and locks into the sequence of notches with a satisfying click. These notches hold the vent in fixed positions, and the 45° opening has an extra thumb-latch locking system which keeps it in place even when you're driving. This is the kind of addition that tells us that a product has been thoughtfully user-tested, and we appreciated the consideration.

The van suddenly had an airy, open feeling with the Mini Heki installed. The skylight glass is crystal-clear, giving it a glassy look that lets in all the light you'd want. The interior trim isn't fancy, but it's clean and will blend in with any ceiling finish we can imagine.

Having driven around with the skylight in place, we've heard no rattling and the vent stays in the positions you fix it in. Rain drumming on the glass sounds quite muted, and is quieter than rain falling on the van's metal roof. Overall, the Dometic Mini Heki looks great and works exactly how you'd want it to. Everything is solidly built and thought-out, giving a comforting sense that Dometic really considered the user experience. We're very happy with the installation, and feel comfortable recommending the Mini Heki to any van builder.

How Easy is it to Install the Dometic Mini Heki Skylight?
As with Dometic's windows, the only complaint we had with the Mini Heki arose during the installation, and again, it was to do with the instructions.
The instructions discuss 'reinforcing rails' and tell you to remove foam from your roof, but aren't clear on what either of these things refer to. Reinforcing rails aren't included with the skylight and aren't even sold separately by Dometic. We eventually assumed that installing the Mini Heki in a motorhome roof requires you to remove foam insulation from the roof cavity and replace it with wooden rails, but we're still not sure.
There's no mention of how to install the fan directly into sheet metal, either. We worked out an installation involving a wooden frame ourselves, but this omission from Dometic is odd, considering the number of panel van converters who will be installing these skylights.

Another issue arose during the last step, when you're instructed to push the trim frame into the inner structural frame. The instructions suggest that slots in the trim frame match with tabs in the structural frame, and that the whole thing stays together through friction. We couldn't get this to work at all. The slots and tabs don't line up well, and even when we got them to come together with a lot of jimmying and forcing, the trim frame still fell out. We eventually used sealant to glue the trim frame in place.

This vagueness and lack of clarity in the provided instructions was disappointing. Earlier, we praised Dometic for thoughtfully designing a skylight with the real user experience in mind. This consideration doesn't extend to the instructions they provide. We didn't find the installation hard, but it would have been much easier if the documentation were clearer and provided more context for the instruction steps.
Still figuring out your van build?
This is where most people get stuck — jumping between blog posts, YouTube videos, and forums, never quite sure what to do next.
The Van Conversion Mastery Course gives you a clear, step-by-step system to design and build your van from start to finish — without the guesswork.

How to Install the Dometic Mini Heki Skylight: Step-by-Step Guide
We installed the Dometic Mini Heki directly in the van's sheet metal roof. As this will be the case for most people converting panel vans, our instructions will follow that installation process.
Step 1: Build a wooden frame to support your skylight
The Mini Heki version we installed is designed for roofs 25mm-42mm thick. We bought 2m of 25mm square wooden batten for our frame. The internal dimensions of this frame need to exactly match the dimensions of the hole we cut in our roof. This hole is 400mm x 400mm (per Dometic's instructions).
You'll also need to make sure that the frame is the same thickness as the thickness of your planned ceiling stack. This includes your insulation and cladding layers. During our latest van build, we made the frame too shallow, meaning that our insulation and cladding overtops it, leaving ugly gaps around the perimeter of the skylight.
Measure and cut the wood for your frame
If you're using simple butt joints to build your frame, you'll need:
two lengths of wood the same length as the sides of your roof hole
two lengths of wood the length as the sides of your roof hole + 2x the thickness of the wood
This is because the longer pieces of wood need to fully overlap the ends of the shorter pieces:

If you're using mitre joints, you'll need:
four lengths of wood the same length as the side of your roof hole
Cutting the ends off these lengths of wood at a 45° angle will give you a frame that fits over the hole.
Calculate the lengths of wood you'll need to cut and measure and mark them out. Make sure you're precise in your measurements: measure twice, cut once.

We used a mitre saw to cut our wood to size as it's easy to be very accurate. A jigsaw works too, but make sure you've clamped the wood securely to your workbench. Once the wood is cut, verify that all your pieces are the right length, and sand any splinters off the ends.

Clamp and glue your frame together
Use corner clamps to set the wood up in the form of your frame. Don't tighten these all the way down yet; keep some wiggle room between the lengths of wood whilst holding the structure in place.

Squeeze wood glue onto the butt ends of the shorter lengths of wood, seat them flush against the longer lengths, and clamp them into place. Don't bear all the way down on the clamps one at a time, as the tension on one joint can pull the others out of position. Instead, get each clamp mostly tight, ensure everything's aligned, then go back around and tighten the clamps all the way.

Because the outside of this frame is going to be hidden in the walls on Shane's van, we decided to secure these joints with screws. If you decide to do this, drill pilot holes first to prevent splitting of the wood before driving the screw home. An impact driver counter sinks the screws without needing to use a counter sink drill bit first.

With the wood glue in place and the screws in, leave the frame clamped together for your glue's specified setting time.
Step 2: Cut the hole in your van's roof
Once the glue's set, unclamp the frame and take it out to your van along with:
painter's tape
tape measure
non-permanent marker or pencil
drill with 25mm hole saw attached
tapping and cutting fluid
metal paint
jigsaw with metal cutting blade attached
metal file
Mark the outline of your hole and your hole saw locations
Set the wooden frame on the roof where you want the skylight to be. Check that the exterior frame of the skylight won't be obstructed by anything structural when it's installed around the hole, and make sure you won't be cutting into anything structural on the inside of the van.

When you're happy with the location of your hole, lay down some painter's tape where you're planning to cut. Use a set square to draw the outline of your hole onto the tape. Once the outline is drawn, verify that the dimensions are accurate. This took us a couple of tries to get right: take your time.

Dometic's instructions specify that your hole saw locations should be 12mm in from the corners of your wooden frame. We used a set square to measure 12mm inwards from each side of our outline and draw a straight line. The points at the corners where these lines intersect are the locations for your hole saw cuts.

Cut out the corner holes using your hole saw
Get your ear protection on and, using an HSS drill bit for pilot holes and a 24mm bi-metal hole saw for the main hole, cut holes at the marked points. Use tapping and cutting fluid to lubricate the hole saw, and use a pulsing action to minimise heating.

You'll be connecting these four holes with straight jigsaw cuts, and the end result will be a rectangular hole with rounded corners.
Connect the corner holes with jigsaw cuts
When cutting with a jigsaw, use a low setting and move slowly and steadily. High saw speeds cause heating, warping, and breakage of the blade. Pushing too much with the saw causes it to snag and jump, making for a jagged cut and broken blades.

File and treat the edges of the hole
Peel off the painter's tape, and wipe away loose swarf and metal dust with a rag. Use a metal file to file down the perimeter of the hole until it's smooth and free of burrs. Take a moment to sweep or hoover up any metal shavings on the inside of the van.

All cut metal needs to be treated to prevent rust. We used anti-rust zinc spray because it dries quickly and is very easy to to use. Apply it all around the cut metal edge, ensuring full coverage.

Let the paint dry before moving on to the next step.
Step 3: Prepare the edges of the hole for the skylight frame
Most vans have ribs and runnels that traverse the length of the roof. These ensure drainage of rainwater, but create an uneven surface that isn't much good for the mounting of a skylight.
Dometic do sell an adapter frame that fits into these grooves and provides an even surface for mounting your skylight. We came up with a DIY solution using mastic/butyl tape.
Mastic/butyl tape is a waterproof, malleable tape that has a texture something like plasticine. This texture makes it easy to mold, and means it provides a slightly soft surface for your skylight frame to press snugly into. We laid down strips of mastic tape in the grooves in the roof, pressing them into each other and building them up until they matched the height of the ribs. A couple more layers on all four sides created a uniform surface of the same height. You can read more about mastic tape in our article on campervan roof sealing.
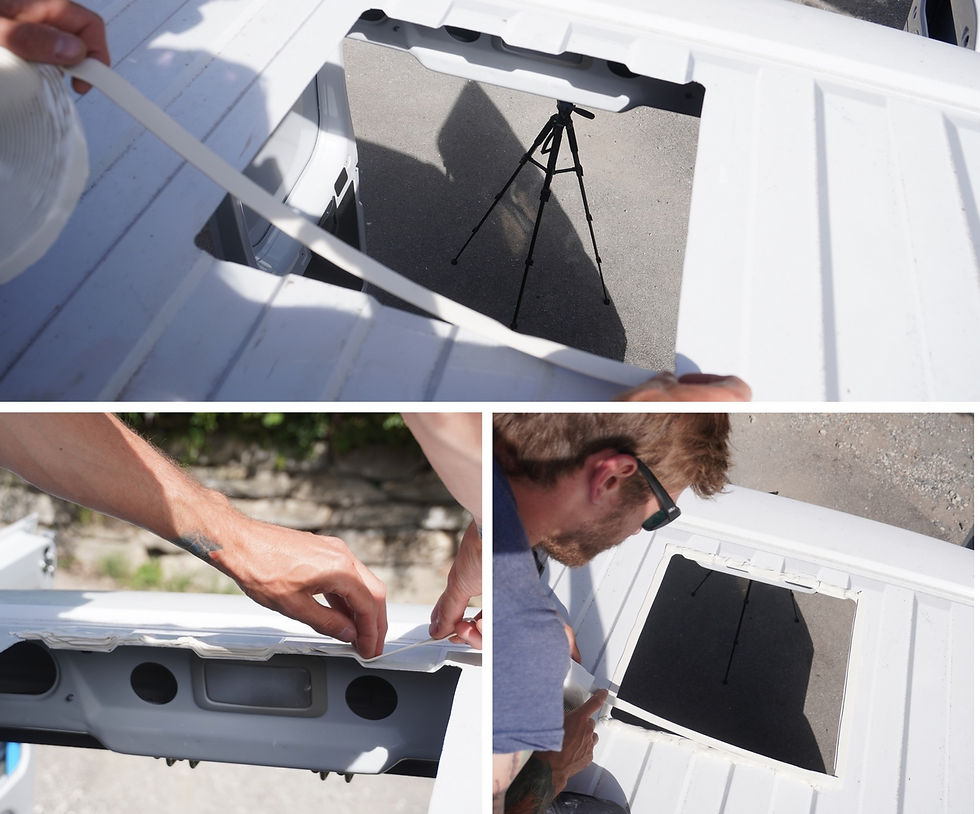
Step 4: Stick the outer half of the skylight to your roof
Per Dometic's instructions, run a thick bead of campervan sealant along the groove under the outer vent frame's rim. Be liberal in your application of sealant, ensuring the bead is consistent all the way around, with no gaps.

With your sealant in place, fit the skylight into the hole you cut (make sure it's facing the right direction). Press the skylight down firmly on all sides and corners, squeezing it into the mastic tape. You should see sealant oozing out a little bit all around the perimeter.
Step 5: Fix the inner frame to the outer frame
On the inside of the van, put the wooden frame in place around the outer skylight frame's flange, which should now be projecting into the van. Fit the inner skylight frame around the flange, over the wooden frame. Make sure everything fits correctly and that the inner frame's screw holes are engaging with those of the outer frame.

As you drive the screws from the inside, they should bite into the outer frame and pull it inward as they tighten down. For this reason, it's best to drive opposing corner screws first, and only tighten them to 70% or so. Next, drive the screws along the edges of the frame, also only to 70%. Once all the screws are in and pulling the frames together, you can go around screwing them to full tightness.
Step 6: Fix the trim plate to the inner frame
As mentined above, this part didn't go smoothly for us. We found that the plastic tabs on the inner frame didn't engage the slots in the trim plate as Dometic's instructions suggest. In the end, we just ran a thin bead of sealant around the trim plate at a point which touches the inner frame but which isn't visible, and pressed it into place. We hope that your mileage varies and that you're able to dry fit your trim plate according to the instructions.

Step 7: Finishing touches
Get back onto the roof and check that the outer frame has been pulled tightly into the mastic tape. The sealant you applied is likely to have been squeezed out around the frame as everything was tightened down. A squeegee tool or wet fingertip is perfect for smoothing this extra sealant around the edge of the window frame. Give everything a final clean with paper roll or a microfibre cloth, peel the protective plastic film from the glass, and admire your handiwork.
Final Thoughts
We're very happy with the Dometic Mini Heki skylight. It lets in plenty of light, and the opening adjusts and locks into its three positions easily. The integrated bug net and blackout blind are inspired; I'd struggle to live with a skylight that doesn't have this feature again. We do feel that Dometic could improve upon their instructions, however. A bit of common sense got us through, and by following our steps, you'll be able to easily install a fetching, functional skylight yourself.
For more information on skylights, including an exploration of powered roof fans, check out our comprehensive article. For a look at a specific rfoof fan, take a look at our article on Dometic's FanTastic Breathe. Your next job might be the installation of a window: we've got a guide on that too, as well as an in-depth review of Dometic's excellent S4 windows.
Planning your van conversion?
Start with the free Van Conversion Diagram Pack below.
Want a clear step-by-step path for your full build?
The Van Conversion Mastery Course walks you step-by-step through the entire build process — from planning and layout to electrics, insulation, water, gas, carpentry, and more.
Until next time.

