
.png)
12V Switch Wiring: How to Wire a Campervan Switch Panel
- Shane Monks O'Byrne
- Sep 30, 2022
- 8 min read
Updated: Aug 24, 2025
I remember being completely baffled when I wired my first campervan switch panel. Switches are essential for turning key components of your electrical system on or off. At the very least, your low-current appliances like lights, roof vents, heaters, and fridge should have switches wired in. In this guide we will discuss the 12V rocker switch and switch panels with USB chargers. We will examine 12V switch panel wiring diagrams, as well as how to wire a rocker switch to a fuse box.

Index
Shane, the founder of The Van Conversion, is a campervan professional and NCC-certified electrical installer. Since 2020, he’s lived on the road full-time, completing several van builds along the way. He’s the author of Roaming Home and the creator of The Van Conversion Course, which have helped thousands build their own vans. Shane also writes The Van Conversion Newsletter, where he shares hands-on tips and practical insights. He’s passionate about empowering others to make their vanlife dreams reality.
This post contains affiliate links, which means that if you click a product link and buy anything from the merchant (Amazon, eBay, etc.) we will receive a commission fee. The price you pay remains the same, affiliate link or not. By using these links, you are helping us to continue writing free educational content. To understand our policies on content, affiliate commissions, and liability, please review our Terms of Use.
Did you know you can get a free electrical wiring diagram by signing up for The Van Conversion Newsletter?
Supplies List

 | Individual 12V rocker switches For installing switches away from your main switch panel |
 | Simple rocker switch panel If you want something simpler and don't need USB sockets |
 | For connecting wires |
 | For splicing wires |
 | For protecting wire connections after crimping |
 | For compressing heat shrinks on crimp connections |
 | 12V fuse box For fusing all the appliances you're connecting to your switch panel |
 | For crimping wires |
 | For stripping wires |

What is a Switch?
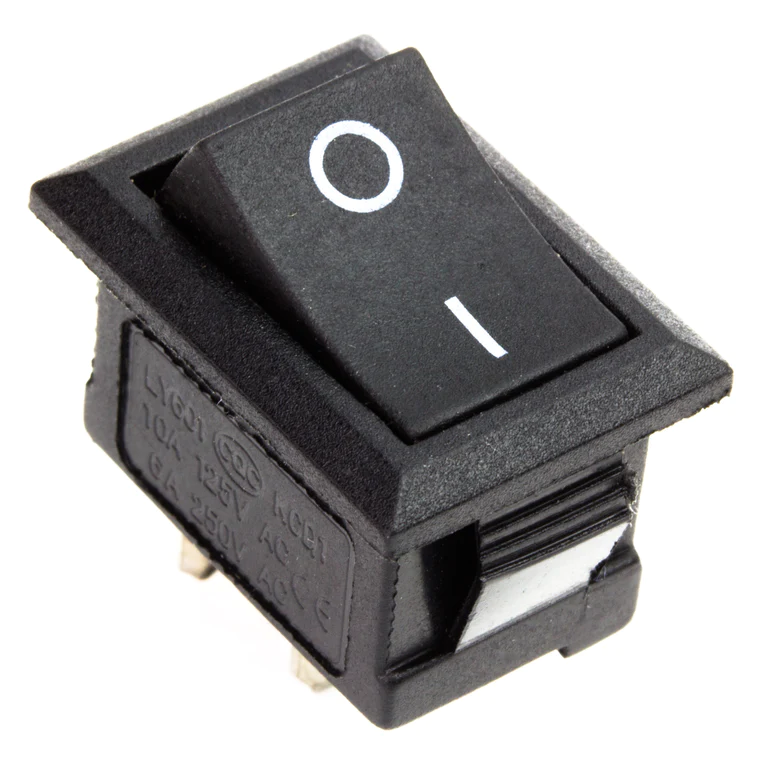
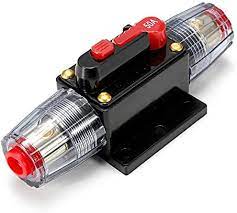
A switch is an electrical component that can disconnect or connect the conducting path in an electrical circuit. It breaks a cicruit on command, turning an appliance off. In campervans, we commonly use switches to control the lights in our van and other such appliances. The most common types of switches in campervans are:
Rocker switch (left)
Isolator switch (middle)
Inline circuit breakers (right)


Isolator switches are large and bulky and are installed as a kill switch for your whole electrical system. This is essential for emergencies and electrical system maintenance.
Inline circuit breakers are used to protect electrical components like your solar charge controller, and also function as switches.
In this chapter, we will focus on rocker switches, as these are what we commonly use to control our 12V DC appliances. They can be installed individually or in a group as a switch panel.
12v Rocker Switch Positions: Poles and Throws
There are four types of rocker switch:
Single Pole, Single Throw (SPST)
Single Pole, Double Throw (SPDT)
Double Pole, Single Throw (DPST)
Double Pole, Double Throw DPDT)
Let's examine the terminology.
Pole: Poles refer to the number of separate circuits the switch controls. If a rocker controls just one circuit, it is a single-pole rocker switch. If it controls two separate circuits, it is a double pole switch.
Throw: Throws refer to the number of ON positions the switch can move between. A simple on-off switch is known as a single throw switch. If it has two ON positions, like off, low, and high, it is a double-throw switch. Let’s look at some examples.
Single Pole Single Throw - SPST
A rocker switch that just controls a simple LED light (ON-OFF) is SPST. It just turns the one LED light on or off.

Single Pole Double Throw - SPDT
A rocker switch that controls an LED light with a high and low brightness is SPDT. It switches the single light between off, low, and high.

Double Pole Single Throw - DPST
A rocker switch that controls two simple LED lights, turning one on when the other is off and vice versa, is DPST.
Double Pole Double Throw - DPDT
A rocker switch that controls two LED lights as above with a high and low brightness setting is DPDT.

12V Rocker Switch Terminals/Pins
A 12V rocker switch can have between two and eight metal terminals/pins on the underside into which we wire.

When a rocker switch has a built-in LED lamp which indicates when it's on, we generally add one extra pin for the light itself. Rocker switches with lamps are very common in campervans.


How to Attach a Wire to a Rocker Switch
The pins on the underside of the rocker switch are male blade terminals. We can connect a wire to these pins using a female 'quick disconnect' crimp connector. Learn about crimp connecting in this guide.

12V Switch Wiring: How to Wire a 2 Pin 12V Rocker Switch
The 2 pin rocker switch (SPST) is the simplest rocker switch to wire up. As you might remember from physics class in school, this switch is simply wired between the battery source and the appliance, which it turns on and off.

Before installing switches, we need to install a 12V fuse box to fuse our appliances. Read more about fusing in our detailed guide here. We then install the switch between the fuse and the appliance.

12V Switch Wiring: How to Wire a 12V Switch with LED (3-pin)
3 pin rocker switches are very common in campervans. They have 3 pins because they have a small LED lamp which needs a ground/negative connection. Here is a diagram of how to wire a 12V switch with LED:

One of the three pins on the rocker switch should have a brassy colour - this is the negative connection for the LED lamp. We can wire this pin to the negative bus bar of our fuse box.
12V Switch Wiring: How to Wire a 3 pin Switch Panel
When we are installing many 12V rocker switches, we typically bunch them together in a switch panel. Switch panel wiring can be a little tricky, so let's dive in and have a look at how to deal with it.
One of the most common switch panels is the one shown in the photo below. It has the positive connection and LED negative connection already wired up and ready for connection to the fuse box. All that is left to do is wire your appliances into the middle pins.

However, there is a problem with the out-of-the-box wiring of this panel. Notice that all the positive connections are daisy chained together, leaving no room for a fuse. We have two options of dealing with this:
Option 1: Inline fuse
Our first option is to insert inline fuses on the wires running to our appliances from the middle pin.

Option 2: Fuse box
Our second option is to rewire all the daisy-chained positive connections to run to the 12V fuse box. Each switch will have an individual blade fuse in the fuse box. The negatives can stay daisy chained, as negative is just the common ground in 12V DC systems.
12v Switch Panel Wiring Diagram

The above 12V switch panel wiring diagram shows you how to wire a simple rocker switch panel to a fuse box. Wiring the switch panel to the fuse box is a very neat way to keep all your fuses in one place.

12V Switch Wiring: How to Wire a Panel of 3 pin Rocker Switches with USB Chargers
Another very popular type of rocker switch panel is the one shown below. This type of switch panel combines switches with USB chargers, a cigarette lighter, and a battery monitor.

You can read our full guide to van electrical outlets here.
The wiring for this type of panel will be much the same as a standard 3 pin rocker switch panel. Notice how we run into the same problem as before with the out-of-the-box wiring of this panel. All the positive connections are daisy-chained together, and the USB socket, cigarette lighter, and battery monitor aren't fused.
The best way to solve this is to wire everything back to our 12V fuse box, in which case we will need to rewire all the daisy-chained positive connections to run to the fuse box.
12V Switch Wiring: How to Wire a 5 Pin Gang Rocker Switch Panel
We're getting into more tricky territory now. Some people buy 5 pin switch panels and then nearly lose their minds trying to wire them. Each rocker switch has five pins on the back.

The five pins are as follows:
Positive IN for LED backlights (always on)
Negative OUT for LED backlights (always on)
Positive IN for appliance
Positive OUT for appliance
Negative OUT for LED lamp (Turn ON when switched)

However, once again the lovely people who supply the switch panels have daisy-chained the positive appliance connections together for us. If we want to fuse everything from our 12V fuse box, once again we will need to remove the daisy-chains and wire each switch to our fuse box individually.
Here is an excellent video from a guy who wires up and customizes a 5 pin gang rocker switch panel. He shows excellently how to wire a rocker switch to a fuse box.
Conclusion
We should now have a neatly wired, fused, and switched electrical system. A common switch panel is an excellent way of neatly consolidating the controls for your 12V electrical components. If you haven't already, make sure you take a look at our articles on wiring and fusing to understand these essential concepts. If you're still confused, take a look at our electrical masterclass for a step-by-step course on campervan electrical systems.
Don't forget to subscribe to The Van Conversion Newsletter for everything you need to get started with your own van conversion (we'll send you a free wiring diagram when you join).
If you're looking for some guidance with your van conversion, you might be interested in our book Roaming Home, or in our online course The Van Conversion Mastery Course. You'll learn directly from our founder Shane how to convert a van into your dream home - no prior experience needed. Shane also offers one-to-one consultations, where he'll help you with any aspect of your build in a face-to-face video call. All consultations come with a free copy of Roaming Home and our Diagram Pack.
Finally, our Van Conversion Ultimate Guide lays out the whole van conversion process in easy-to-follow sections with tools, materials, and step-by-step instructions. It's the perfect companion for your van build.

Until next time.