
The Ultimate Guide to Campervan Wiring
- Shane Monks O'Byrne

- Sep 14, 2022
- 17 min read
Updated: Apr 5
Most people don't think about wiring very much, despite the fact that we're surrounded by it every day. It becomes important when you come to wire your campervan's electrical system. In this guide you will learn everything you could ever want to know about campervan wiring. What are the different types of wires? How do you size wires? How do you connect wires together? How do you crimp, solder, and heat shrink? This information-packed guide will tell you everything you need to know about wiring campervan electrics.

Shane is an NCC-certified electrical installer. He has built, taught, and lived in campervans since 2019.
This post contains affiliate links. We may earn a commission at no extra cost to you. To understand our policies on content, affiliate commissions, and liability, please review our Terms of Use.

In this guide
Supplies List
We updated our supplies list during our latest van build. For a list of the tools you'll need to install your electrical system, check out our van conversion tools guide.
 | For connecting cable to ring terminals |
 | For protecting wires & connectors after crimping |
 | For splicing one wire into the middle of another (e.g. wiring puck lights) |
 | For connecting wires to 12V appliances |
 | For splicing wires |
 | For connecting wires together |
 | Screw terminal connector block For connecting wires together (e.g. wiring water pump) |
 | For connecting wires to connector blocks or appliances (e.g. solar charge controller) |
 | Heat shrink & crimp at the same time |
 | Essential for any electrician. For connecting, protecting, anddifferentiating wires. |
 |
 | Safety goggles Very important when soldering |
 | For testing and troubleshooting your campervan electrical system |
 | Cutters, stripper, and crimper for thinner wires, all in one. |
 | Large crimping tool and cable cutters For cutting and crimping large cables |
 | A more precise tool for crimping wires |
 | A more precise tool for stripping wires for crimping |
 | For compressing heat shrinks on crimp connections |
 | Soldering kit For making soldered connections between wires |
What are Wires Made of?
Electricity travels through wires - a metal conductor that is sheathed by a plastic or rubber insulator. A conductor is a material that allows electricity to flow through it. The insulator blocks electricity from escaping the wire.

Copper is by far the most common metal used in wiring. It is highly conductive, bendy, thermally resistant, and a lot less expensive than other metals. Aluminium is the second most common metal used in wiring. It is very lightweight and long-lived.
Aluminium has 61% of the conductivity of copper, at only 30% of the weight. Consequently, aluminium offers a lower cost per amp and provides up to 48% weight reduction over copper. Unfortunately aluminium is a metal that corrodes very easily. As a result, it should not be used in a vehicle as it is very common to have high humidity inside. Use copper instead.
Sometimes, copper wire will be tinned, whereby the wire is coated with a thin film of tin to protect against corrosion. This gives the wire a silvery appearance as opposed to the usual copper colour. Tinned cable is useful if you are using the campervan by the sea. Solar cable should be tinned as being on top of the campervan, it is constantly exposed to the elements.
Solid vs Stranded Wire
Solid wires consist of a single, solid core, whereas stranded or concentric wire consists of several thinner wires twisted into a bundle. Stranded wire has many layers of wires, gently twisted into a helix shape. Stranded wire is more flexible and more resilient to damage and being bounced about. Solid wire is a better conductor, but a lot less flexible.
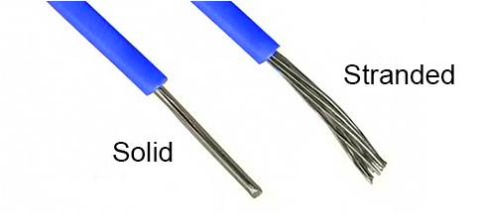
In all vehicles, including campervans, we should use stranded wire.
Regulatory Guidelines for Wiring Installations in Campervans (BS 7671 & NEC)
When wiring your campervan’s electrical system, it's essential to follow both the BS 7671: IET Wiring Regulations (UK) and the NEC (National Electrical Code) (USA). These guidelines ensure that your campervan wiring is safe, efficient, and compliant. Read our complete guide to campervan electrical regulations (UK, USA, EU) here.
We'll summarise some of the key takeaways from BS 7671 below. These are important, and provide a good basis for planning out your wiring going forward.
All cabling inside your van must be flexible, class 5 stranded wire made from copper.
All cabling outside your van must be flexible, class 5 stranded, tinned copper wire with double-wall UV resistant insulation.
All cabling must be clearly colour-coded; we recommend adopting the standard of red for 12V positive, black for 12V negative, green and yellow for ground, blue for AC neutral, and brown for AC live.
Cabling must never pass in front of a heat source.
AC and DC cabling must be separated by 50mm unless both are inside conduit.
The recommended cable gauge for AC cabling is 2.5mm²; it should never be less than 1.5mm.
Keep slack in your cables; they shouldn't be tight at the terminals. Vehicle vibration will damage and loosen tight terminal connections over time. Slack shouldn't be excessive and should be supported by cable supports.
All cabling must be supported at regular intervals to prevent sagging, vibration, and strain on terminals.
Horizontal runs: standard cable should be supported every 300mm, twinned and earth cable should be supported every 400mm, conduit should be supported every 1,000mm.
Vertical runs: standard cable should be supported every 400mm, twinned and earth cable every 1,200mm, conduits every 1,500mm.
Cable supports should be tight enough to prevent vibration of cables and must be resistant to damp; use proper metal P-clips or automotive cable ties with saddles.
Conduits/trunking: due to vibration, all cabling must be protected where it passes through holes in metal and wood and in areas where it might be chafed by stored gear. You can use rubber grommets for holes, but for exposed wiring in your garage, for example, you'll need conduit. Flexible plastic split conduit is easy to use and the split keeps your cables accessible for maintenance and inspection.
We discuss a lot of different cable connection types in this article. Until recently, they all had their uses. However, the recent advent of WAGO connectors has effectively superceded other methods of connecting wires together. You'll still use ring connectors and ferrules at terminals (busbars, device inputs/outputs, inlets, ground points), but WAGO is now the standard when connecting wires to each other.
Voltage Drop and Why it's Important
It's important to consider the size of your wiring to minimize voltage drop, especially over long cable runs. Voltage drop is the reduction in voltage that we see as electricity passes down wires. Voltage drop increases with wire length, which can drastically affect the functioning of your electrical components.
For example, if you have a current of 5A flowing down 100ft of 16 AWG wire, the voltage drop can be as high as 2V, representing a 17% loss in voltage. The graph below plots cable length and size against voltage drop.
Sensitive equipment like inverters or lithium batteries typically require no more than a 3% voltage drop, while less critical devices like LED lights can tolerate up to 10%. However, according to BS 7671 standards, voltage drop should never exceed 5% for any given cable run in your campervan. We therefore need to be aware of voltage drop, and mitigate it when appropriate.
To help you figure all this out, we built a handy voltage drop calculator. Use it to calculate voltage drop over given lengths of cable, and compare the figures to your appliances' acceptable voltage drop. We mitigate voltage drop by increasing the size of our cables.

Voltage drop also increases with resistance. Resistance is strongly affected by cable length, but that's not all that introduces resistance into your circuits. Other sources of resistance are:
The thickness of your cable, with thin cable producing more resistance than thick cable
Fuses
Shunts
Switches and circuit breakers
Poor-quality and poorly-crimped cable connectors
Poor-quality electrical connections
You should especially watch out for:
Loose connections
Dirty or corroded connections
Bad crimps
In addition to the resistance calculated in the above calculator, you should factor in these rules of thumb:
Every cable connection adds 0.06mΩ (assuming it's a clean, tight, well-crimped connection)
A 500A shunt adds 0.10mΩ
A 150A fuse adds 0.35mΩ
This is why we always recommend buying fuses, fuse holders, switches, and busbars from known manufacturers rather than no-name Amazon brands. Companies with an established reputation for quality are likely to produce components whose connections are all of high quality and which will introduce minimal resistance to your electrical system.
It is good practice to measure the voltage drop in your circuits once you've completed your electrical installation to make sure it's within acceptable levels.
Thinking about your van’s electrics? I put together an honest, hands-on Vunked In-Depth Review covering their complete campervan electrics kit, custom wiring diagrams, pricing, and support.
👉 Read it here: Vunked In-Depth Review: A Complete Campervan Electrics Kit
How to Size Wires
To calculate the size of wire needed in a system we need three variables:
The length of the wire (distance to the appliance and back)
The amps the wire will be carrying (i.e. the amp rating of the appliance)
Acceptable voltage drop
12V DC Wire Size Chart

Alternatively, use our wire size calculator to quickly figure out your cable sizes.

Here is the campervan wire sizing I used in my conversion:
12V appliances: 1.5mm² (16 AWG)
Solar panels to solar charge controller to batteries: 10mm² (8 AWG)
Batteries to inverter: 35mm² (2 AWG)
Batteries: 55mm² (0 AWG)
A good rule of thumb for wire sizing in cable runs up to 5m long is:
load (amps)/3 = cable size in mm²
So, for a cable run that's less than 5m long and which powers a 200A appliance, we'd use a cable that's 200/3 or 66mm².
Note that you might need to convert mm² to AWG depending on where you're buying your wiring. mm² is generally used in the UK and Europe, whilst AWG is used in North America. For a more detailed explanation of wire sizing, take a look at our ultimate guide.

How to Cut and Strip Wires
When wiring your campervan electrical system, you'll be doing a lot of cutting wires to size, and then stripping the ends before making connections.
How to Cut Wire
Small wires: Small wires (1.5mm² to 6mm²) can be cut using a wire stripping multi tool, or simple pliers. A multi tool cuts, strips, and crimps smaller wires. I would definitely recommend getting one.

Medium wires: Medium-sized wires (10mm² to 35mm²) are commonly cut using cutting pliers.

Large wires: Large wires (50mm² and thicker) are cut using large wire cutters, which give extra leverage.

Make sure you cut your wires straight, forming a right-angled cut that cuts evenly through all the strands. Cutting unevenly or at a slant changes the wire's properties and can cause electrical malfunctions.
How to Strip a Wire
Stripping a wire simply means cutting back the rubber insulator around the wire. It's important that we strip the wire correctly, not nicking, cutting, or breaking wire strands. If we nick or cut strands, it results in decreased electrical and mechanical strength. If we have an uneven or tapered strip, it will result in a poor connection and compromised insulation.

To strip a wire, we use a wire stripping tool.
Small wires (1.5mm² to 6mm²) can be stripped using a wire stripping multi tool or wire strippers.

Large wires are typically stripped manually using a Stanley blade. To strip a wire using a Stanley blade, hold the wire with your thumb and trace around the rubber with the knife.

It's very important that you don't press too hard with the Stanley blade when you are cutting, to avoid cutting or nicking any strands. Bear in mind that with stranded wire, 63% of the wire strands are on the outside, so damaging them results in a drastic change in the wire's properties.
How do I Connect Wires Together?
There are four ways we can connect wires together:
Twisting
Screw / Lever connectors
Crimp connecting (cold welding)
Soldering
We should always cover our electrical connection with a heat shrink (or at least electrical tape) after we have made the connection. We will discuss heat shrinking after we learn about the four methods above.
Twisting
Twisting is the most primitive technique for connecting two wires together. If you're feeling quick and dirty, you can twist the exposed ends of the two wires together and pop some electrical tape over the connection to insulate it. This is not recommended as the connection may not be very good and it can very easily break apart.

Screw / Lever Connectors
Screw and lever connectors are a quick and easy way to connect two wires together and certainly better than the twisting technique. They are a great solution to campervan wiring.
Still figuring out your van electrics?
This is where most people get stuck — trying to piece everything together from scattered advice, second-guessing cable sizes, fuses, and system design.
The Van Electrics Masterclass walks you through the entire system step-by-step — so you can design and install it properly, with confidence.

Lever (WAGO) Connectors
If you want to connect wires together without crimping or soldering, lever connectors are definitely the way to go. They are easy to use, cheap, reusable, and secure.
To connect two wires with a lever connector, simply pop the wires inside the connector and close the lever down to secure them in place. WAGO makes lever connectors with 2, 3, or 5 inlets.
Lever connectors have a current rating, so make sure you match your connector to the current that will be traveling through your wires.

Strip Terminals and Choc Boxes
A strip terminal and choc box are types of screw terminals. These connectors hold wires together with the tightening of a screw. Quite simply, you put a wire into each end of the screw terminal and tighten the screw to connect the wires together.

When using strip connectors, it is important that we attach ferrules onto the ends of each wire. We insert the wire with the ferrule on the end into the strip connector. You should not insert bare wire into strip connectors as the wires typically break and have a poor electrical connection. We will learn more about ferrules later in this chapter.

Sometimes, screw terminals are housed in plastic casings for neatness and safety. This device is known as a chocbox.

Wire Crimp Connectors
Crimping, also called cold welding or contact welding is a welding process in which joining takes place using pressure instead of heat. In cold-welded connections, wires are connected using crimp connectors. A crimp connector is a device used to create an electrical connection between parts of an electrical circuit.

A crimp connector typically has a male plug and female socket side, to connect two wires together.
How do Crimp Connectors Work?
We first insert the cut and stripped wire ends into the ends of crimp connectors. Using a crimping tool, we cold weld the wires to the crimp connectors. We then have two crimp connectors that fit securely together and can be easily plugged and unplugged.

Crimp connecting is the most popular and arguably the best way to connect wires. Because no solder is used, the joint is mechanically stronger and more reliable.
Crimped connections are permanent, meaning the crimp connectors can't be separated from the ends of the wires. Connections can, however, be easily unplugged from each other.
Crimp connectors are coloured and sized according to the current rating they support. Here's a table of the generally accepted colours and supported wire gauge of crimp connectors:

How to Crimp Correctly
A crimp is the applying of mechanical pressure to the crimp connector in order to cold weld it to the wire. To crimp a connector, we use a crimping tool. For small wires we can use the same cutting/stripping/crimping multi tool that we've already discussed. For connections thicker than about 6mm², you will need a large crimping tool.

First, strip about half an inch off the end of your wire. Then, insert the wire into the appropriate crimp connector. The wire is inserted into the crimp connector with the end of the wire flush with the exit of the connector to maximise cross-sectional contact.

Next, place the crimp connector into the crimping tool, being sure to us the appropriately sized crimp barrel. Squeeze the handles of the crimp tool to compress and reshape the crimp connector until it is cold welded to the wire.
It is very important that we crimp correctly, or we put the strength, safety and efficiency of the connection at risk.

If the crimp is too loose, there will be no mechanical support or strain relief for the wire and the connection could come loose. Conversely, if the crimp is too tight, the barrel digs into the wire strands and can damage them. Additional force applied beyond what the crimp connector is designed to handle can result in a rapid reduction in performance both electrically and mechanically.

An optimal crimp holds the wire insulation firmly with a slight indentation of the insulation plastic.
Wire Crimp Connector Types
There are many wire crimp connector types. Let's look at some of the most important types and understand what they are used for.
Quick Disconnects
Quick disconnects, also known as blades or snap-ons are the most common type of wire connector. They connect two wires together. Sometimes the female side alone is used to connect to other devices (e.g. the back of a cigarette lighter socket or a 12V switch).

Bullet Connectors
Bullet connectors function in the exact same way as quick disconnects, but are cylindrical rather than flat.

Ring Connectors
Ring connectors are typically used for connecting wires to busbars. For example, on a 12V fuse box, the busbars come with bolts and nuts which take ring connectors.

On the ring connector, you will find two numbers. The number of the left is typically the size of wire (in mm²) that the lug will take. The number on the right is the size of the hole in the lug, dictating what size bolt can fit through it. This number will typically be M2, M4, or M6 (ie. 2mm, 4mm, or 6mm diameter).
Lugs
A lug is the same as a ring connector, only bigger and able to handle more current. Lugs are also used for connecting thicker wires to busbars. In a campervan, we would use a lug to connect the leisure batteries to the busbars.

As with ring connectors, the two numbers on a lug indicate the wire gauge and bolt gauge it takes.
Fork Connectors
A fork connector or spade connector is another way of connecting a wire to a busbar. These connectors are also very commonly used in fuse boxes as they can slide onto the side of a bolt, rather than having to be put over the top.

Butt Splice Connectors
Butt splice connectors are very simple crimp connectors for connecting two wires together. Simply put a wire into each side and crimp down on the middle.

Ferrules
Ferrules are an important crimp connector that a lot of people overlook. They are used when we want to insert a wire into a socket with a screw down mechanism, as in the screw terminals we discussed earlier. We use ferrules when wiring our solar charge controller or for wiring up mains plug sockets in our van.
If you simply placed a bare wire into the back of the plug socket and screwed it down to secure it, it would very likely result in the wire breaking inside without you realising. You would also have a poor connection between the wire and the socket as not all the wire would be in contact with the screw.
For this reason, we should instead crimp a ferrule onto the end of the wire and insert that terminal into the socket. We can then safely screw down onto the wire and know that we will not break any strands and create a good connection.
We need a special ferrule crimper to get a solid, square-shaped crimp on the wire.
Solar MC4 Connectors
This one is more of an honorable mention. When we are connecting solar cables together we use MC4 connectors. They make wiring your solar array much simpler and faster.

T-tap Connectors
T-tap connectors are used when we want to splice one wire into the middle of another wire.

We commonly use t-tap connectors when we are wiring up devices in parallel. For van conversions, most people will use these connectors when wiring 12V LED puck lights in their ceiling.
Piggy Back Connectors
For all intents and purposes, piggy back connectors are the exact same as t-tap connectors. They are like three-way quick disconnects.

Soldering
Soldering is the process of joining electrical components together by melting solder to make an electrical connection. Soldering is an important technique in household wiring, but is not appropriate in campervans. This is because soldered joints are inflexible and can eventually be rattled apart by vibrations from driving. Campervan wiring is also more often reconfigured and moved around as you upgrade or reconfigure your setup. The rigidity of soldered connections means they degrade if they move around too much. It's much better to use the connectors we've discussed for wired connections in your campervan.
Heat Shrinking
A heat shrink is a plastic tube that shrinks when exposed to heat. We use heat shrinks to form a tight, insulating seal around wired connections where we've exposed the metal wire by stripping it. It's the essential final step when making a connection, and is much safer and durable than just wrapping the connection in insulating tape.
There are three types of heat shrinks:
Thin wall (most basic insulation)
Dual wall (weatherproof)
Heavy wall (weatherproof & abrasion resistant)
To use these simple devices, all you need is a set of heat shrinks and a heat gun.

Simply slide the heat shrink over the exposed connection and heat it with the heat gun until it shrinks tightly around the wire. Be careful not to overheat the connection, as the plastic will start to melt. These days, you can find crimp connectors with built in heat shrinks. They're very useful, greatly simplifying your wiring process.
Final Thoughts
The very last step of any wiring job is to tidy up the wires and fix them in place. Cable ties are a simple way of bunching wires together, and electrical tape is good for colour coding. Ensure hanging wiring is supported with plastic hangars every 50cm to prevent wear, and use anti-chafe tape where the wire passes through any metal holes.
You should now feel equipped to make your own wired connections in your campervan. The key to electrics is careful planning. Make sure you calculate your cable thicknesses and lengths before jumping into anything. If you're still unsure about how it all works, give our electrical masterclass a look for a step-by-step course on electrics as a whole. For a more detailed look at wire and fuse sizing, check out our new dedicated guide. Your next step might be to plan your fusing or to set up a switch panel; check out our guides on those, too.
Still unsure how to design your van electrics?
Start with the free wiring diagrams below.
Want to build your van electrical system properly from start to finish?
The Van Electrics Masterclass shows you exactly how to design and install a safe, reliable electrical system — step by step.
Until next time.


