
Campervan Electrics Explained
- Shane Monks O'Byrne

- Sep 1, 2022
- 11 min read
Updated: Apr 16
An electrical system is essential for any van conversion, but it's often the most daunting or confusing element of a van build. Our wiring diagram walkthrough explained campervan electrics in the context of wiring the components together. In this article, we'll go over the principles of electrics as they apply to campervans. We'll discuss the common terms and units, as well as issues like batteries, fusing, and parallel vs. series wiring.

Shane is an NCC-certified electrical installer. He has built, taught, and lived in campervans since 2019.
This post contains affiliate links. We may earn a commission at no extra cost to you. To understand our policies on content, affiliate commissions, and liability, please review our Terms of Use.

In this guide
How Electricity Flows
Let's start with the basics. Electricity is the flow of electrons. When electrons are "lost" from an atom, the free movement of these electrons constitutes an electric current.
Electricity travels through wires, which comprise a metal conductor (copper is most popular) that is sheathed by an insulator (rubber or plastic). The insulator keeps electrical current running down the wire without escaping. We can think of electricity flowing through a wire like water running through a hose. Water can flow down the hose, but it can't escape.
Alternating Current (AC) vs. Direct Current (DC)
There are two kinds of electric current: direct current (DC) and alternating current (AC). Direct current means electrons flowing in one direction, whilst alternating current means electrons moving back and forth.
Direct Current
Direct current is most commonly seen in batteries. Here, current flows in one direction: from the positive (+) end of the battery through an appliance and back to the negative (-) end of the battery. In a DC system, positive wire is typically coloured red and negative wire is typically coloured black. We can think of this movement of electricity like a river, only flowing in one direction.
Car batteries produce 12V DC power, meaning that this is the basis for vehicle electrical systems. Therefore, most van conversion electrical appliances will be 12V DC, such as fans, heaters, fridges, and lights.

Alternating Current
With alternating current, the electrical force vibrates back and forth rather than flowing continuously. This is known as oscillation. In an AC system, there are no positive or negative poles. We can think of this like waves across an ocean: energy moves in a direction, but the water only moves up and down in place.
The mains electricity that comes into your house is AC. In North America, this is 110V AC electricity, whilst in the UK and Europe, we use 230V AC. When converting a van, you may want mains plug sockets to power mains appliances like laptops and televisions. These plug sockets will produce AC power, and so you'll need a mains shore hook-up or a DC-to-AC inverter to have AC power in a DC system.
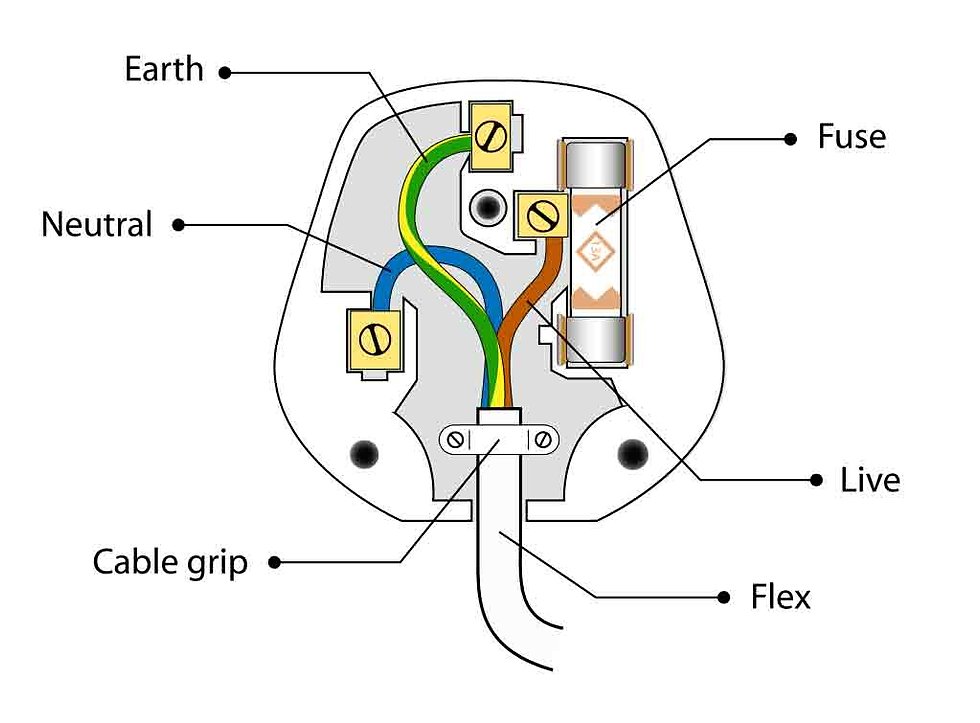
An AC household appliance will have 3 wires running to it: the live wire (brown), the neutral wire (blue), and the earth or ground wire (green & yellow). These 3 wires are sheathed together into the single cable you're familiar with.
Converting between AC and DC
We can convert DC into AC using an inverter. This is an essential component for most electrical systems, as it allows you to power AC devices from your DC leisure batteries. To determine which size inverter you need, check out our inverter sizing calculator.


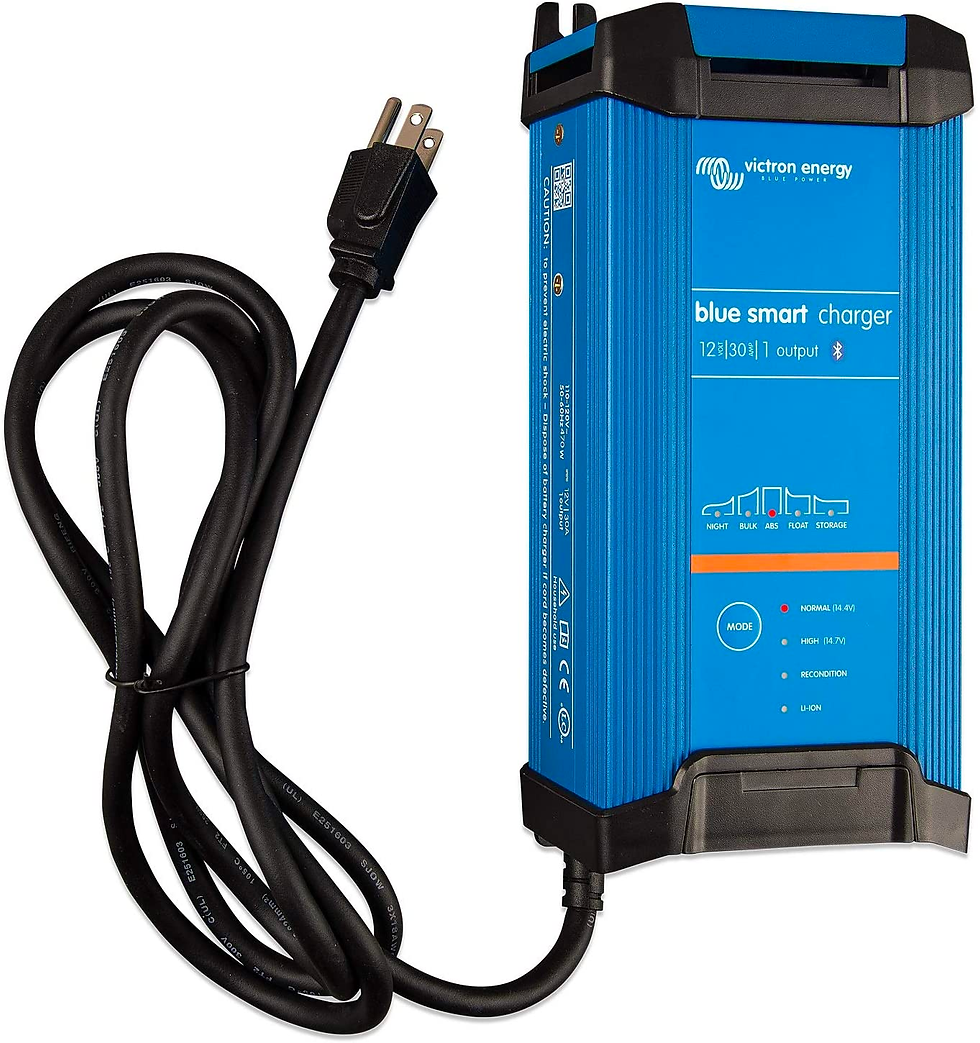
We can convert AC into DC using an AC-DC converter or battery charger. This is an essential component for a shore power in your van, allowing you to charge your DC leisure batteries and power your electrical system by plugging in at a campsite. Many manufacturers produce combined inverter-charger units, meaning you only need to buy and wire one component to benefit from the functions of both.

Measuring Electricity: Volts, Amps, and Watts
Next up in this campervan electrics guide, we'll look at three very important terms. We measure electricity using three units: volts, amps, and watts.
Voltage, measured in volts (V), is a measurement of 'electric pressure'. Think of it like the speed at which water flows down a pipe. The more energetic the flow of electricity, the higher the voltage. The voltage needs to be the same across your whole electrical system, or you'll need a DC-DC converter to change between voltages. The voltage of your batteries is the 'base' voltage that defines the voltage of the rest of your electrical system, so it's an important decision.
Amperage, measured in amps (A), is a measurement of electrical current flow. Think of it like the amount of water flowing down a pipe. The more electricity is flowing, the higher the amperage.
Wattage, measured in watts (W), is a measurement of electrical power, calculated by multiplying voltage by amperage. Think of it like the combination between the amount of water flowing down a pipe and the speed of that water. These two factors together would determine the power that the water had to turn a water wheel, and so it is with wattage. The higher the wattage, the more electrical power is available to do work.
How to Calculate Volts, Amps, and Watts
You can remember the relationship between volts, amps, and watts using this conversion triangle:

Units next to each other are multiplied, and units above and below each other are divided. Thus we see that:
watts = volts x amps
volts = watts ÷ amps
amps = watts ÷ volts
Therefore, if we have an appliance that doesn't state one of these values, we can easily figure it out from the other two.
Storing Electricity: Batteries
A battery is a device that stores chemical energy and converts it to electricity on demand. In campervans, we store electricity in leisure batteries, which are designed specifically for the campervan use-case.


Battery Capacity: Wh and Ah
When looking at batteries, we're most interested in their capacity. It's not enough to just look at electrical power (wattage), as we also need to know for how long that power will be available. In other words, we need to know the total stored electrical energy of the battery. This value is quoted using the units watt-hours (Wh) and amp-hours (Ah).
Watt-hours (Wh) tell you the amount of power in watts that a battery can output for one hour. For example, a 1200Wh battery can output 1200W of power for one hour.
Amp-hours (Ah) tell you the amount of current in amps that a battery can output for one hour. For example, a 100Ah battery can output a current of 100A for one hour.

Whilst watt-hours are more descriptive of a battery's practical usefulness, most battery manufacturers quote capacities in amp-hours. Fortunately, we can easily convert from amp-hours to watt-hours by multiplying the battery's capacity in amp-hours by the battery's voltage. For example, Tesla sells two different kinds of home batteries:
A 12V battery with a 500Ah capacity
A 24V battery with a 250Ah capacity
We can work out the capacities of these batteries in watt-hours like so:
12V x 500Ah = 6000Wh
24V x 250Ah = 6000Wh
Thus we see that both batteries have the same capacity in terms of watt-hours. Because this is the measure that tells us the amount of work a battery will be able to do over time, it's the most useful unit to use. We thus see that these batteries have essentially the same capacity and that the difference is in their voltage.

To determine your battery size, you will first need to figure out your daily electrical usage. You can use our energy consumption calculator to figure that out. Once you know your daily electrical usage, you can use our battery sizing calculator to determine exactly how much capacity you will need. For more battery recommendations and our favourite leisure battery manufacturer, check out our leisure batteries buying guide.
Given Our Battery Size, How Long Can We Run Rur Appliances For?
Finding out how long we can run our appliances for given the battery we have is essential for choosing a battery of the right size.
For example, let's say that we have a 100W load in total - the sum total wattage of all our van appliances we expect to run at a given time (fan, fridge, heater, etc.). Let's also say we have a 1500 Wh battery. Taking these two parameters: 1500 Wh ÷ 100W = 15 hours. We can expect to run our appliances for roughly 15 hours before running out of power.
In a nutshell: use volts and amps to calculate watts. Then, use watts with time to figure out watt hours. You can then you can use this to figure out battery size, how long it takes to recharge, and how long you can use this battery to charge your appliances. For a detailed look at sizing your leisure batteries and electrical system as a whole, take a look at our full-length guide.
Still figuring out your van electrics?
This is where most people get stuck — trying to piece everything together from scattered advice, second-guessing cable sizes, fuses, and system design.
The Van Electrics Masterclass walks you through the entire system step-by-step — so you can design and install it properly, with confidence.

Electrical Circuits: Parallel vs. Series
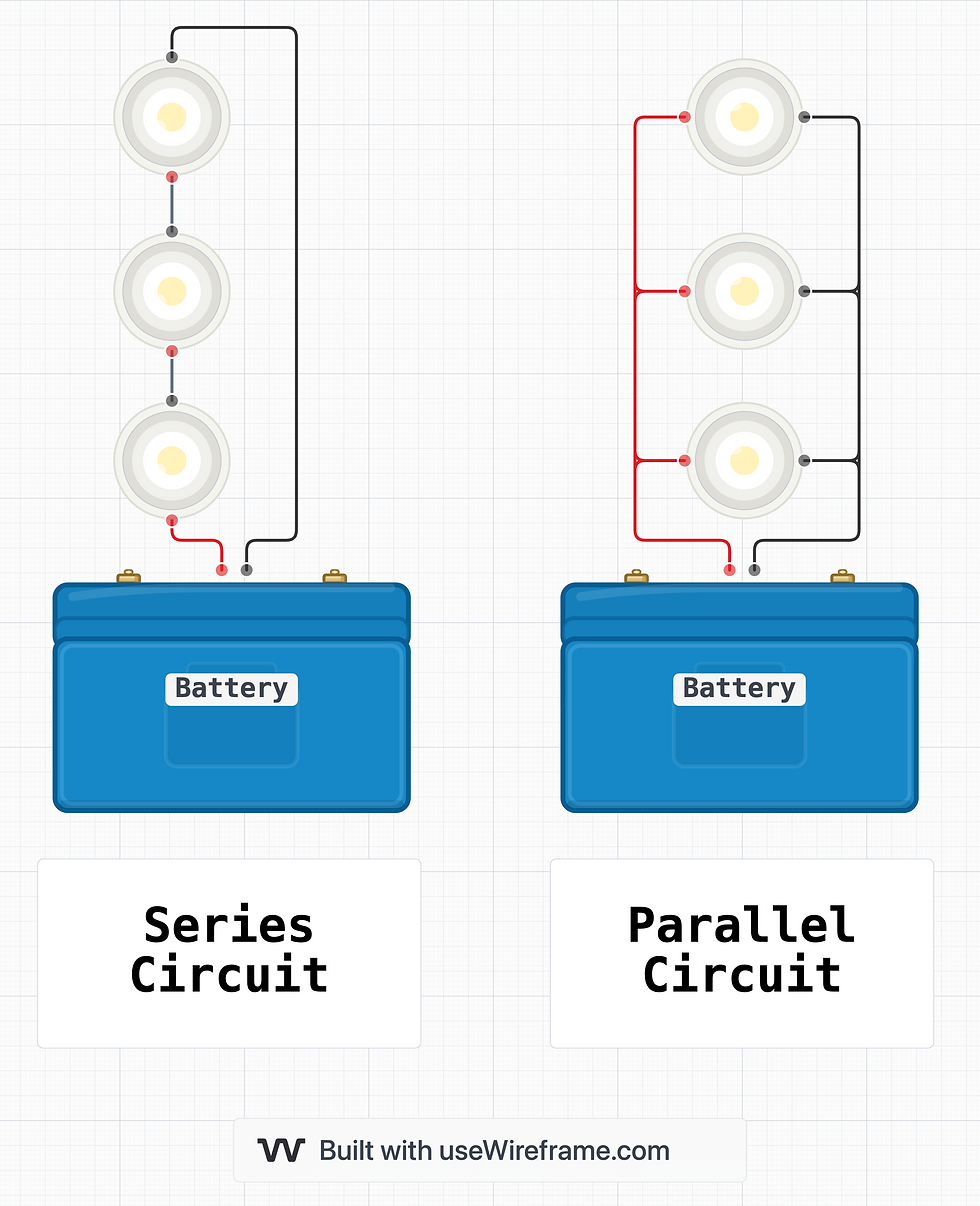
If we have multiple appliances (eg. lights), we can choose to wire them in series or parallel on the same circuit. Depending on how we choose to wire them, the voltage or amperage will change.
In a parallel circuit, we connect all the positives together and all the negatives together. In a series circuit, we daisy chain all components together along the circuit. The difference in these circuits is what units get added up, and what units stay the same:
Parallel circuit: Voltage stays the same, but the amperage does not. For example, if we wire up four solar panels in parallel that are each 10V and 10A, our voltage output will remain the same, but our amperage output will increase to 40A (4 × 10A).

Series circuit: Amperage stays the same, but the voltage does not. For example, if we wire up four solar panels in series that are 10V and 10A, our amperage output will remain the same, but our voltage output will increase to 40V (4 × 10V).

In the Roaming Home 2023 study, we found that of those vans with solar panels, 54% were wired in parallel.

There are benefits to wiring solar panels both in series and in parallel. With batteries, it's almost always best to wire them in parallel. We go into much more detail on parallel and series wiring setups in this dedicated article.
Campervan Electrics Explained: Sizing a Sample Electrical System
Let's put what we've discussed into practice and design an example electrical system that suits our needs.
Battery Capacity
Let's say that we've calculated our daily electricity usage to be 500Wh per day. We'll account for 3 days of off-grid independence to allow for gaps in charging due to bad weather or no driving. This means we need a usable battery capacity of around 1500Wh.
Two 12V 130Ah sealed lead-acid leisure batteries wired in parallel in parallel gives us a total capacity of 260Ah. This equates to 3120Wh (12V × 260Ah).

However, because these are lead-acid batteries, we should only regularly discharge them by 50% to maximise their usable lifespan. This gives us a usable capacity of 1560Wh, which is close to our calculated requirement.
Note: Though more expensive, lithium (LiFePO) batteries can be regularly emptied by about 80% without issue.
Solar Panels
Let's say we purchase 4 × 100W solar panels online. We look at their data sheet, and see that each panel is 17.2V and 5.82A under ideal circumstances. We are buying four, for a total of ~400W. We wire our solar panels in series, bringing our voltage up to 68.8V (17.2V × 4).
Given our 400W of solar power flowing to our 12V batteries, we now need to size our solar charge controller. A solar charge controller keeps the battery from overcharging by regulating the voltage and current moving from the solar panels to the battery. A solar system in a van conversion contains a solar array, a solar charge controller, and a leisure battery. For simplicity, we recommend Renogy's solar panel kits which come with everything you need out of the box. Victron also offer kits incorporating their premium components.


To size our solar charge controller, we need to figure out how many amps at 12V our 17.2V solar panel array will actually produce. Our solar charge controller must be able to handle 400W ÷ 12V = 33.7A. We should buy a solar charge controller that is slightly bigger to account for fluctuations. A 40A PWM solar charge controller would be perfect here, or a 25-30A MPPT charge controller; the latter requires overpaneling for optimal sizing.
Not sure about the size of your solar array? We built a solar panel sizing calculator to help you determine how much solar wattage you will need for your system. To figure out which size MPPT you should use, you can use our MPPT sizing calculator.
How Long Will it Take the Solar Panels to Charge our Leisure Batteries?
Given the above information in this campervan electrics guide, we know we have to fill up 1560 Wh of battery using 400W of solar power.
1560 Wh / 400 watts = 3.9 hours
However, solar panels typically only output 70% of the rated wattage. This is primarily due to the angle of the sun, though there are several factors at play.
1560 Wh ÷ (400W × 0.7) = 5.5 hours
To figure out exactly how long it will take to charge up your leisure batteries, you can use our charge time calculator.
Fuse and Wire Sizing
Fuse Sizing
A fuse is a small wire that heats up at a certain amp rating. If too many amps go through, it will melt and disconnect the circuit. This acts to safely break the circuit in the event of a malfunction, and makes fuses an essential component of any electrical installation.
It is important that we size the fuse correctly to prevent a fire; the fuse should be smaller than the wire, meaning it blows before the wire does.

To calculate the fuse size, we should add 25% to the current rating in amps of whatever appliance we're fusing.
For example, let's say we have eight 12V puck lights which are 3W each. The amperage of each light would be 3W ÷ 12V = 0.25A. We have eight of them, giving us: 0.25A × 8 = 2A. We want to give ourselves a 25% buffer, so we will choose a 2.5A fuse for this system.
Fuses vs. Breakers
Both fuses and breakers protect a circuit. A fuse is single use (self-destructive), whereas a breaker is more like a switch: when it is tripped it can be reset.

Wire Sizing
A wire that is too thin for the current passing through it will give off more heat and not be as efficient. It's therefore important to correctly size your wires for each component of your electrical system. This is a whole topic by itself, covered in our dedicated campervan wiring article. Once you've read that, use our wire sizing calculator to calculate your wire sizes.

Conclusion
We covered a lot in this article, but you should now have a solid understanding of the key terms and units we use when designing electrical systems. Sizing your components is simple once you understand these principles. You should now feel ready to look in more detail at individual components, like batteries, inverters, and solar systems. If you're still confused, our electrical masterclass course provides a structured, step-by-step explanation of everything you need to know.
Still unsure how to design your van electrics?
Start with the free wiring diagrams below.
Want to build your van electrical system properly from start to finish?
The Van Electrics Masterclass shows you exactly how to design and install a safe, reliable electrical system — step by step.
Until next time.


