
A Complete Guide to Campervan Inverters (12V to 240V)
- Shane Monks O'Byrne

- Sep 3, 2022
- 27 min read
We can build the majority of our electrical system using dedicated 12V campervan components. However, not all essential appliances run on 12V. If you want to charge a laptop or blend a smoothie in your campervan, you'll need some mains plug sockets. These mains sockets will be powered by an inverter, which converts 12V DC electricity from your leisure batteries to 120V/240V AC mains electricity. In our Roaming Home 2023 study, we found that 60% of people installed an inverter in their van conversion. In this article, we'll learn all about campervan inverters, how to size them, the best brands, and how to install one.

Shane is an NCC-certified electrical installer. He has built, taught, and lived in campervans since 2019.
This post contains affiliate links. We may earn a commission at no extra cost to you. To understand our policies on content, affiliate commissions, and liability, please review our Terms of Use.

If you already know everything you need to know and want help buying an inverter, check out our inverter buying guide. In that article, we recommend our favourite inverters by size and key features, as well as inverter installation kits.
Index
Our Top Picks
If you'd like to skip ahead, our top picks for inverters are those made by Renogy and Victron. Both brands offer inverters at a variety of capacities with high-quality internal components. Choose Renogy as a mid-range option, and Victron as a high-end option, especially if you're going for an all-Victron system.


Supplies List
| Inverter |
 | Kill switch for the inverter |
 | Appropriately sized MEGA fuse Fuse to protect the inverter |
 | MEGA fuse holder To safely hold the fuse |
 | For connecting the plug socket to the inverter |
 | Connects to your inverter to deliver AC power |
 | For connecting cables to ring terminals |
What is a Campervan Inverter?
An inverter is a device that converts 12V DC electricity from your leisure battery into 120V/230V AC mains electricity. We use an inverter when we want to run AC appliances from our leisure batteries when off-grid.
Alternating Current (AC) vs. Direct Current (DC)
There are two kinds of electric current: direct current (DC) and alternating current (AC). Direct current means electrons flowing in one direction, whilst alternating current means electrons moving back and forth.
Direct Current
Direct current is most commonly seen in batteries. Here, current flows in one direction: from the positive (+) end of the battery through an appliance and back to the negative (-) end of the battery. In a DC system, positive wire is typically coloured red and negative wire is typically coloured black. We can think of this movement of electricity like a river, only flowing in one direction.
Car batteries produce 12V DC power, meaning that this is the basis for vehicle electrical systems. Therefore, most van conversion electrical appliances will be 12V DC, such as fans, heaters, fridges, and lights.

Alternating Current
With alternating current, the electrical force vibrates back and forth rather than flowing continuously. This is known as oscillation. In an AC system, there are no positive or negative poles. We can think of this like waves across an ocean: energy moves in a direction, but the water only moves up and down in place.
The mains electricity that comes into your house is AC. In North America, this is 110V AC electricity, whilst in the UK and Europe, we use 230V AC. When converting a van, you may want mains plug sockets to power mains appliances like laptops and televisions. These plug sockets will produce AC power, and it's for this reason that we need an inverter to have AC power in a DC system.
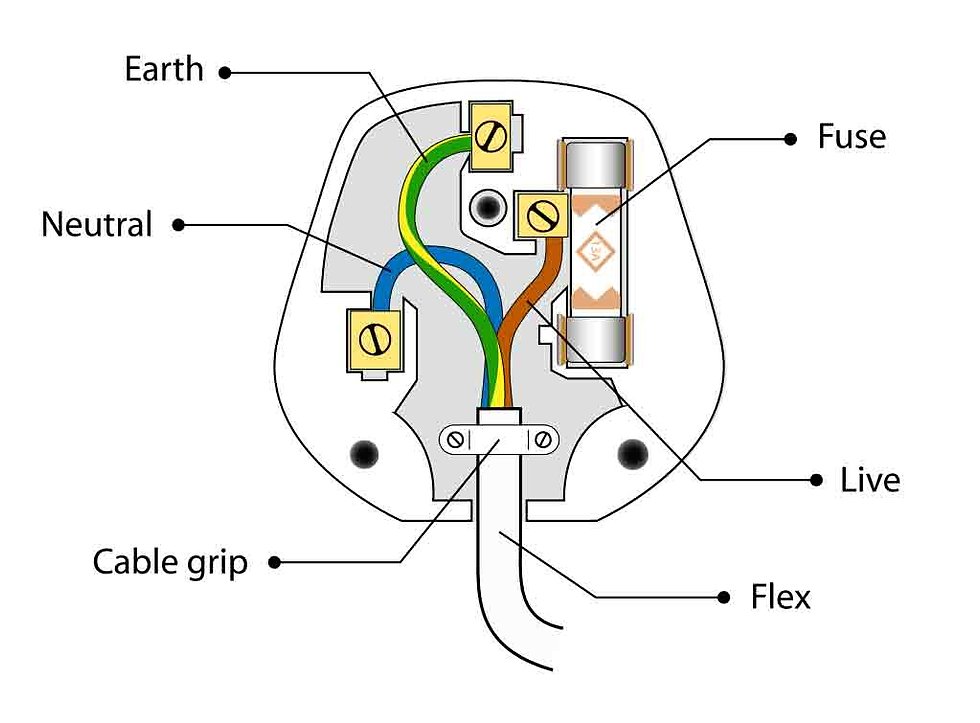
An AC household appliance will have 3 wires running to it: the live wire (brown), the neutral wire (blue), and the earth or ground wire (green & yellow). These 3 wires are sheathed together into the single cable you're familiar with.
If you want to learn more about electricity as it relates to van conversions, you can read about key units, concepts, and terms here.
Waveforms - Pure Sine Wave vs. Modified Sine Wave
An inverter takes DC electricity and converts it to AC by imitating the undulating sine wave that an AC power supply provides. Depending on the quality of the electronics, an inverter may produce either a modified sine wave or a pure sine wave.
A pure sine wave inverters give us much 'cleaner' electricity. This means a smooth wave that closely matches the actual sine wave of AC electricity. A modified sine wave is an approximation of a sine wave comprised of square steps.
This matters because the sharp transitions in a modified sine wave affect the components in some electronics, causing malfunctions or damage. Sensitive electronics like those found in computers, games consoles, televisions, and CPAP machines can be damaged by a modified sine wave. Audio equipment may produce a buzzing sound, digital timers or clocks may go out of sync, and dimmer switches or variable power dials won't work properly. Inductive loads, like those in motors, fans, and induction hobs won't operate as efficiently and may produce heat and noise.
Even if your device seems to work fine, longterm use with a modified sine wave inverter could reduce its lifespan by wearing out its internal components.

On the other hand, simple resistive loads like incandescent lightbulbs or basic power tools work fine on a modified sine wave.
It's up to you to choose whether a modified sine wave inverter or a pure sine wave inverter is right for you. Pure sine wave inverters are more expensive, but this cost ensures that all your devices and appliances will work seamlessly.
Harmonic Distortion and its Impact on Sensitive Devices
Harmonic distortion, measured as Total Harmonic Distortion (THD), refers to 'noise' in an electrical waveform. This is the noise that damages sensitive electronics. Manufacturers of inverters often quote a THD figure for their devices. A high-quality pure sine wave inverter will have a THD value of 3% or less. More basic pure or modified sine wave inverters can have THD values of 10-30%. When buying an inverter, pay attention to this value, and choose a model with a THD value of 3% or less.
Surge vs. Continuous Rating
Load surge behavior refers to the sudden increase in power demand when certain appliances, like refrigerators or power tools, start up. This is known as inrush current, and it can be significantly higher than the appliance's normal running power. Inverters must be able to handle these surges to prevent overloads.
Understanding Peak Power Ratings
All inverters have two power ratings:
Continuous rating: The maximum power the inverter can supply continuously.
Surge (or peak) rating: The maximum power the inverter can supply for a short burst (typically a few seconds).
Inrush currents from appliances with motors, compressors, or transformers can be 3-7 times their operating wattage. For example, a refrigerator that typically consumes 200W might need 1000W during startup. An inverter must be sized to accommodate this surge.
If you plan to run a 1000W appliance with an inrush current rating of 2000W, your inverter should have at least a 2000W surge rating to handle the initial startup load without shutting down.
Campervan Inverter Efficiency
The efficiency value of a campervan inverter relates to the amount of power lost during its operation. Inverters use some electricity themselves whilst they're converting from DC to AC, and some inverters perform that conversion more efficiently than others.
High quality pure sine wave inverters are rated at 90-98% efficiency, meaning that only 2-10% of the power they take is lost in the conversion. Lower quality inverters are less efficient, at around 75-85%.
Inverter efficiency also depends on load. With a high load, inverter efficiency can drop by over 5%. If you know you will be using high wattage appliances frequently, get a larger inverter to improve efficiency.
Inverter Efficiency Curves and Load Matching
Inverter efficiency varies depending on the load it’s handling. Inverters typically operate most efficiently when running at 50-75% of their maximum capacity. Understanding these efficiency curves and matching the load to the inverter’s optimal range can significantly improve power usage in your campervan.
At very low loads (e.g. running a small 10W device on a 2000W inverter), the inverter's own power consumption becomes a larger proportion of the total draw, reducing efficiency. Similarly, at high loads (close to maximum capacity), thermal losses and internal resistance increase, reducing efficiency.
Optimizing Load for Maximum Efficiency
To ensure your inverter operates efficiently:
Aim for 50-75% Load: Plan your device usage so the total load falls within this range for maximum efficiency. For example, if you have a 2000W inverter, aim to run devices at the same tiem whose total load falls between 1000W and 1500W.
Avoid Low Loads: Running only low-power devices (e.g. phone chargers) on a large inverter is inefficient. Use direct 12V DC chargers for smaller loads when possible to bypass the inverter.
Choose the Right Inverter Size: If your typical power usage is low, consider using a smaller inverter to maintain higher efficiency under typical loads.
Regulatory Guidelines for Campervan Inverters (BS 7671 and NEC)
When installing an inverter in your campervan, ensuring compliance with safety regulations is crucial. Both BS 7671 (UK) and the NEC (US) provide detailed guidelines for proper grounding, overcurrent protection, and the use of disconnects to safeguard your electrical system. In this section, we'll cover the key regulations that apply to inverter installations, helping you create a safe, efficient, and reliable setup in your van.

BS 7671 - UK Wiring Regulations
Regulation 551.4.3.2.2: Neutral–Earth Bonding in Inverter Systems
When an inverter is supplying the AC system independently (i.e., not passing through shore power), the installation must include a single neutral–earth bond on the inverter output. This bond establishes a reference point so RCDs can operate correctly. The neutral–earth link should occur at one location only.
If the inverter includes an internal bonding relay, it will make this connection automatically; if it does not, the bond must be created externally in the consumer unit. Multiple bonds must be avoided, as they create circulating currents and nuisance RCD tripping.
Regulation 551.7: Isolation for Inverters
The inverter must be capable of being fully isolated from the system. This means installing a manual disconnection device (e.g., a switch or isolator) between the inverter and the system. This device should disconnect both live and neutral conductors for safety during maintenance or in case of faults.
Regulation 551.8: Overcurrent Protection for Inverters
The circuit connected to the inverter must be protected by a suitable fuse or circuit breaker that is rated for the maximum current the inverter can supply. This overcurrent protection must be located as close to the inverter as possible to prevent potential damage or fire caused by short circuits or overloads.
Regulation 411.3.2.1: Protective Earthing (AC Systems)
Inverter outputs that provide AC power (e.g., 230V in Europe or 120V in the US) must be earthed (grounded) according to BS 7671 standards. The earth conductor should connect to a dedicated ground point on the vehicle chassis, separate from the DC ground. This ensures that faults in the AC system are safely directed to ground.
Regulation 721.55.1.1: Earthing of Inverter Circuits
If your campervan system uses shore power and an inverter, both systems must have separate earthing points. The AC system from the inverter should not be bonded with the DC ground. For inverters with built-in AC outputs, the chassis and electrical housing should be connected to an earthing point to prevent the inverter case from becoming live.
The body of the inverter must also be connected to the AC ground point. This is the only way of guaranteeing that the cinverter's consumer unit's ground connection will function properly.
Regulation 722.411.4.1: Residual Current Device (RCD) Protection
For safety, RCDs must be installed in circuits connected to the inverter output if the inverter is providing AC power to outlets. The RCD will disconnect the power in the event of a ground fault, protecting the user from electric shocks. Ensure that RCDs are compatible with the inverter type to prevent false tripping, which can occur in some inverters.
Regulation 551.7.2: Ventilation Requirements for Inverters
Inverters must be installed in well-ventilated areas, away from heat sources and confined spaces. Proper ventilation ensures that the inverter does not overheat during operation, which can lead to damage or reduced performance. Ensure there is sufficient airflow around the inverter, as specified by the manufacturer’s guidelines.
BS 7671 Chapter 52: Cable Sizing Based on Inverter Load
The cables connecting the inverter to the leisure battery must be appropriately sized based on both the inverter’s power rating and the distance from the battery. Incorrect cable sizing can cause voltage drop and overheating. Use the cross-sectional area recommended for the load and distance to avoid these issue
BS 7671 Section 551: Earthing Portable Inverters
Portable inverters, even when not permanently installed, must follow earthing and bonding practices. Ensure the inverter is earthed properly to the vehicle chassis to prevent electrical hazards. Portable setups must also have overcurrent protection to protect against overloads.
National Electrical Code (NEC) - United States
Article 551.32: Grounding Requirements for Inverter Systems
All inverter installations must have a dedicated grounding conductor connected to the vehicle chassis. This is critical for ensuring the inverter chassis is properly grounded and for safe operation of the AC system. This ground connection should be separate from the DC ground used for the 12V system to avoid grounding loops.
Article 551.40: Disconnecting Means for Inverter Systems
Inverters must have a disconnecting means (manual switch or breaker) that disconnects both line and neutral conductors. This disconnection ensures that the inverter can be safely isolated during maintenance, particularly if the inverter is used in conjunction with a shore power connection or solar charger.
Article 240.21: Overcurrent Protection
The NEC requires that overcurrent protection devices (fuses or breakers) be installed on the output side of the inverter to protect the wiring and appliances from overloads. These devices must be rated according to the inverter’s continuous power output and should be installed as close as possible to the inverter.
Article 250.30: Grounding and Bonding of Inverter Systems
When installing inverters, ensure that the neutral conductor is properly bonded to ground only at the main bonding point (usually the shore power connection or the inverter itself if it has a built-in neutral-to-ground bond). This prevents ground loops or electrical hazards from occurring in the system.
Article 551.56: GFCI Protection for Inverter AC Circuits
Install Ground Fault Circuit Interrupters (GFCIs) on the AC output circuits of the inverter, particularly near outlets in wet areas (e.g., near sinks or showers). GFCIs provide essential protection against ground faults and are required by the NEC in areas where electrical appliances may come into contact with water.
Article 690.13: Inverter Disconnect for Solar-Powered Systems
For solar-powered systems with an integrated inverter, ensure there is a DC-rated disconnect switch between the solar array and the inverter. This allows the inverter and solar system to be fully isolated for maintenance and prevents any backfeeding of current from the inverter to the solar panels.
Article 110.3(B): Installation and Ventilation
The inverter’s location must allow for adequate heat dissipation. Follow the manufacturer’s installation instructions regarding spacing and airflow around the unit. Overheating due to poor ventilation can cause inverter shutdowns or shorten its lifespan.
Article 690.10(C): Grounding and Protection for Multiple Inverters
If installing multiple inverters in your campervan, ensure that each inverter has separate grounding, overcurrent protection, and disconnect means. This prevents interference between inverters and ensures safety if one system fails or requires maintenance.
Article 310: Wiring for Inverters
Ensure cables are rated for the full continuous load of the inverter. The cables should have the correct ampacity to handle the current, and the wire gauge should be selected based on the distance to minimize voltage drop. Overheating can occur if cables are undersized.
Article 250: Grounding Portable Inverters
For portable inverters, the grounding conductor must connect to the vehicle’s chassis or a suitable ground point. Ensure that the earthing setup meets the safety requirements, and that the inverter is safely bonded to prevent faults.
Key Points to Consider for Safe Inverter Installation
Overcurrent protection: Use fuses or breakers rated for the inverter’s continuous power output to protect the system from overloads and short circuits. These must be located close to the inverter.
Grounding: The inverter chassis and AC output must be grounded to the vehicle chassis via a dedicated grounding conductor. Keep AC and DC grounding points separate to prevent interference or ground loops.
Disconnecting means: Install an isolation/kill switch that can isolate both live and neutral conductors on the inverter to allow for safe maintenance and emergency shutdown.
Residual Current Devices (RCDs) or GFCIs: Ensure RCDs (UK) or GFCIs (US) are installed to provide ground fault protection on the AC circuits, particularly in areas where moisture is present. RCDs must be double pole, type A, with a disconnection threshold of 30mA and a disconnection time of 40ms.
By adhering to these BS 7671 and NEC guidelines, your campervan's inverter installation will meet safety and compliance standards, ensuring proper operation while protecting users from electrical hazards. Read our complete guide to campervan electrical regulations (UK, USA, EU) here.
I also recommend you read our full guide to testing a van electrical system. This is particularly important when it comes to AC electricity.
Understanding Inverter Load Efficiency and Power Factor
Inverter load efficiency and power factor are two critical factors that determine how well your inverter performs, especially when powering various devices in your campervan. Both affect how much power you can draw from your batteries, how efficiently your inverter operates, and ultimately, how long your batteries last.
What is Power Factor?
Power factor (PF) is a measure of how effectively electrical power is being used by your devices. It's generally given by the manufacturer on the spec sheet of an appliance. It’s the ratio of the real power (in watts, W) that your appliances actually use to do work, versus the apparent power (in volt-amperes, VA) that the inverter supplies. For purely resistive loads (such as heaters or incandescent bulbs), the power factor is 1, meaning all the power supplied is being used effectively. However, for appliances with motors or inductive loads—such as refrigerators, air conditioners, or power tools—the power factor often drops below 1.
Formula: Power Factor (PF) = Real Power (W) / Apparent Power (VA)
Real Power (W): The actual power consumed by the device to perform its intended function.
Apparent Power (VA): The power that is drawn from the inverter, which includes both the real power and the reactive power (the power required to sustain the electromagnetic fields in inductive devices).
For devices with a lower power factor, the inverter has to supply more apparent power to achieve the required real power, leading to inefficiency and potential overheating. This is particularly important when sizing an inverter, as you must account for the fact that inductive loads may require more power than their wattage rating suggests.
Impact of Power Factor on Inverter Sizing
When the power factor drops below 1, your inverter must supply more apparent power than the device actually uses. For example, a device rated for 1000W with a power factor of 0.8 will require 1250VA of apparent power. This means that even though the device is using 1000W, the inverter must handle 1250VA to ensure proper operation.
Imagine you have a refrigerator rated for 200W of real power, but its power factor is 0.7. The actual load on the inverter will be:
Apparent Power (VA) = 200W / 0.7 = 285.7VA
The inverter must be able to supply 285.7VA even though the fridge is only using 200W of real power. This is important when considering the total load your inverter will handle. If you only consider the wattage (real power) of your devices, you may under-size your inverter, leading to overloads and shutdowns, particularly with devices that have motors or transformers.
This is why some inverter manufacturers, like Victron, use VA instead of W on their labelling. It gives a clearer picture of what you can actually expect from the device. Many modern inverters, like Victron or Renogy models, include advanced technologies that help mitigate the effects of low power factors, improving overall efficiency.
Calculating Total Inverter Load
To size your inverter properly, you must consider both the real power and the power factor of all the devices you plan to use simultaneously. It's impractical to try to factor in the power factors of every one of your appliances, especially considering not all manufacturers provide this figure. Instead, we can estimate an average power factor of 0.8 across all of your appliances. Using this figure, we can calculate our required inverter power:
Required inverter power = total electrical load (W) / 0.8
We factor in this calculation when sizing an inverter for a campervan.
What Size 12V to 240V Inverter to Use in your Campervan
Getting a rough estimate of your inverter size is very simple. It just needs to be rated a bit above the total wattage of all the AC appliances you'll be powering at once. This figure is referred to as total electrical load.
Calculating Total Electrical Load
Let’s say you will be charging a 90W laptop, while also using a 650W blender and a 170W electric blanket. Totalling these figures gives us 870W. This means your inverter must be able to handle 870W at a minimum. We will want to give ourselves a ~15% buffer on top of this, so we would go with a 1000W pure sine wave inverter at minimum (ideally larger for better efficiency, as discussed above).
However we can be more exact (and more safe) with our calculation if we also consider the safety factor and inverter efficiency in our calculations. The safety factor is an added buffer to account for atypical electricity draw from appliances due to variable power factors. Inverter efficiency is equally important because the energy lost during DC to AC conversion counts against the total electrical load.
To help you size your inverter perfectly, taking into account all of these factors, we have built an inverter sizing calculator. For a detailed look at inverter sizing as it relates to usage and leisure battery size, take a look at our electrical system sizing article.

Battery Sizing with Inverters
When using an inverter in your campervan, battery sizing becomes crucial to ensure your system can handle the power demands without prematurely depleting your batteries.
When sizing a battery, we take into account the power draw of all of our appliances. When factoring in AC appliances run via an inverter, we need to factor in the inverter's efficiency:
AC appliance power usage (Ah) = (Inverter Load (W) × Time (hours)) / (Battery Voltage (V) × Inverter Efficiency (percentage converted to decimal)
For example, running a 1000W appliance from an inverter for 2 hours from a 12V battery with 90% inverter efficiency would use:
(1000W × 2h) / (12V × 0.9) = 185Ah
This is the number you'd need to add when totalling your electricity usage for battery sizing. Check out our battery sizing calculator for an easy way to do these calculations.
Battery Discharge Limit and Inverter Size
Choosing the right inverter isn’t just about wattage over time. It must also match your battery bank’s discharge limits. For example, a 3000W inverter on a 12V system can draw up to 250A (3000W ÷ 12V). That’s far more than small batteries can handle.
Most lithium batteries have a stated discharge limit (or maximum discharge) of 1C, meaning a 100Ah lithium battery can safely provide 100A continuously. So, to support a 250A draw, you’d need at least 3 × 100Ah lithium batteries (300Ah total).

AGM batteries are even more restrictive: they typically only provide 0.2C–0.5C continuous discharge. That means a 100Ah AGM battery might only manage 20–50A of discharge, requiring 6–10 batteries (600–1000Ah) to handle the same inverter load.
Always check your battery’s spec sheet for its maximum continuous discharge current (often listed in amps or C-rate). If it’s not clear, use 1C for lithium and 0.3C for AGM as a conservative estimate. Matching your inverter size to your battery’s capabilities is essential for a safe, efficient system.
The Best 12V to 240V Inverter for Campervans
Top Pick: Renogy Pure Sine Wave Inverter
Renogy's inverters are pure sine wave as standard, efficiently producing clean AC power for all of your devices. They have a 90% efficiency rating and run quietly, balancing performance against an affordable cost.
Premium Option: Victron Pure Sine Wave Inverter
Victron's pure sine wave inverters also boast 90% efficiency ratings. They differentiate themselves with Victron's typical ultra-long lifespan and intelligent features like automatic eco mode. Plus, Victron components work best with other Victron components, so the more of them you install, the more sense it makes to go for an all-Victron electrical system.
Inverter-Chargers
For those looking to install an inverter as well as shore hook-up in their campervan, an inverter-charger makes more sense than a standard inverter. Inverter-chargers combine the functionalities of an inverter and a battery charger into one device. This saves you money, reduces wiring and fusing, and makes for a tidier and simpler electrical system. Both Renogy and Victron also make inverter-chargers.


Victron MultiPlus Inverter/Chargers and Why They’re so Popular
Victron MultiPlus inverter/chargers are popular because they combine a true sine wave inverter, an adaptive mains battery charger, and a high-speed transfer switch in one box. This makes the shore power and inverter functionalities feel like a single, seamless system rather than two separate systems you have to manage. For a lot more information on Victron's excellent MultiPlus range, take a look at our in-depth guide.

Why Choose an Inverter/Charger Instead of a Separate Inverter and Charger?
A separate inverter + mains charger works, and it can be cheaper. But an inverter/charger usually wins on simplicity, cleanliness, and behaviour:
Less kit and less wiring: one device, one set of heavy DC cables, one AC changeover built-in.
Automatic changeover: when you plug into shore power, it switches to pass-through and charges the battery; when you unplug, it returns to inverter mode.
Cleaner AC architecture: with a MultiPlus/MultiPlus-II you’re generally building around a single central unit on the AC side, rather than bolting separate boxes together.
Still figuring out your van electrics?
This is where most people get stuck — trying to piece everything together from scattered advice, second-guessing cable sizes, fuses, and system design.
The Van Electrics Masterclass walks you through the entire system step-by-step — so you can design and install it properly, with confidence.

Three Standout Features of the Victron MultiPlus
Other highly-rated manufacturers produce inverter/chargers of their own. We believe that the enduring popularity of Victron's offering comes from the following features:
PowerAssist and PowerControl
This is the killer feature for campsite hookups. If you’re on a low-power campsite supply (say 6A/10A), the MultiPlus can cap the input current to avoid tripping the pedestal's overcurrent protection, and then top up the extra demand from the battery during short peaks (like when you turn on a kettle, hair dryer, or induction hob). When your load drops, it then uses the spare capacity to recharge the battery, meaning you can use shore power and charge your battery simultaneously. In this way, your battery charge times at campsites are optimised, whether or notyou're using shore power to run appliances.
UPS-style Changeover
The MultiPlus can switch between charger and inverter functionality so quickly that sensitive electronics keep running. This is useful in vans because shore power in the real world isn’t always clean: brief dropouts, someone unplugging the bollard, and flaky generators can all cause the shore power supply to drop out. With UPS, your MultiPlus seamlessly switches over to inverter power to keep powering your appliances with no interruption.
GX System Integration for Monitoring and Control
MultiPlus units are built to sit inside a wider Victron ecosystem via VE.Bus, and that’s a big reason people go all Victron. Adding a GX device like a Cerbo GX allows you to monitor your whole system's status and performance in real-time, seeing how all of your components interact via the VRM portal. You can also see historical data like power usage over time and solar production visualised as graphs, and set up rules and settings for your entire integrated system.

If you go for a MultiPlus-II GX, a GX device is effectively built in, with networking for monitoring and VRM connectivity.
What Size MultiPlus Should you Choose?
You should size your MultiPlus based on your required inverter size, which we've discussed above. Victron make them in three distinct 'bands', which you can map to the voltages you might base your system on:
12V systems: up to the 3000VA MultiPluses
24V systems: up to the 5000VA MultiPluses
48V systems: 5000VA MultiPluses and above
The MultiPlus Trickle Charger and When you Can Use It
One of the MultiPlus' attractive features is the inclusion of a trickle charger. Trickle charging means providing a battery with a small amount of continuous power (up to 5A) when it's not in use, in order to keep it from going completely flat. The MultiPlus will already trickle charge your leisure batteries when it's set to 'Storage' mode, as long as it's connected to shore power. The trickle charger is specifically for keeping your van's starter battery alive during winter or periods of non-use.

A word of warning; we avoided using the trickle charger output on our MultiPlus because it works by mirroring the leisure battery bank's voltage onto the starter battery. This is fine if your leisure batteries are lead-acid like your van's starter battery. However, if you have a lithium leisure battery bank, the float voltage of lithium chemistry (13.5V) will be mirrored onto your starter battery, which is only designed to float at 13.2-13.4V. Over time, this disparity can cause overcharging, water loss, and a shortened lifespan.
In short, only use your MultiPlus' trickle charger if you're using lead-acid leisure batteries. For a lot more information on Victron's excellent MultiPlus range, take a look at our in-depth guide.
Do I Need an Inverter Consumer Unit in my Campervan?
A consumer unit (breaker panel) is required for shore power and inverter-fed outlets to ensure safety and compliance with BS 7671 (UK) and NEC (USA).
What Protection Does a Consumer Unit Provide?
RCD (UK/EU) / GFCI (USA): Protects against electric shocks by shutting off power if current leaks to ground. Your RCD must be double pole, type A, with a disconnection threshold of 30mA and a disconnection time of 40ms.
MCB (Miniature Circuit Breaker): Protects against overcurrent and short circuits by tripping if a circuit is overloaded.

Neutral-Earth Bonding
It's important to note that an inverter's RCD will not work unless there is a neutral-earth bond incorporated into the circuit. Thus, neutral-earth bonding is required under UK and US electrical regulations. The Victron Multiplus series of inverter/chargers incorporate neutral-earth bonds by default. When you are disconnected from shore power the Multiplus automatically connects the neutral-earth bond, when you are connected to shore power the Multiplus automatically disconnects the neutral-earth bond (to prevent double N-E bond which would cause all sorts of problems).
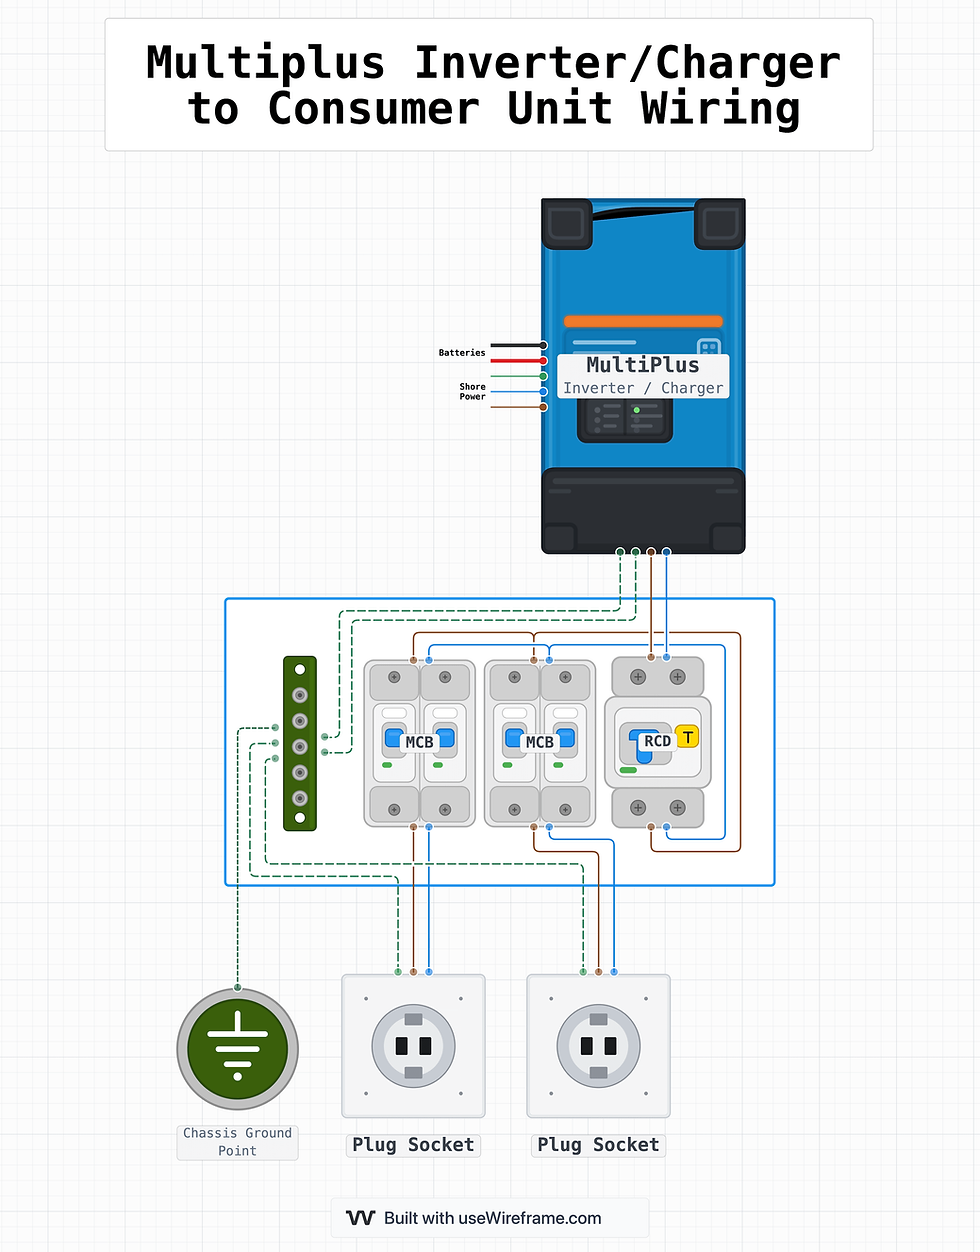
This is how the automatic internal N-E bonding inside the Victron Multiplus works (in case you're interested):

But just so you're clear, here's a schema of how this looks:
   3-pin socket wires:
   L ─────────────┐
                  │
               [RCD]──→ sockets/appliances
                  │
   N ─────────────┘──→ Neutral bus (or RCD N input)
                      │
                      └── N–E bond (2.5mm² link)
                          ↓
   Earth ───────────────→ PE bar ──→ chassis
Note: You always need to include the N-E bond for you inverter, unless it is a centre-tapped inverter (ie. split phase inverter). These inverters allow you to run both 110V and 230V. They are practically never seen in Europe, and rarely in North America. Almost never in campervans.
IET specifically updated their guidance in March 2021 and now recommend this approach. You can read more on that in their island mode earthing arrangements article.
If you don't have a Victron Multiplus (or Quatro), you'll need to set this up yourself. Take a look at this excellent video from Cleversolarpower for a summary of neutral-earth ground works and why it's important:
When is a Consumer Unit Required?
Scenario | Is a Consumer Unit Required? | Why? |
Shore Power Connection | Yes, always | Required for RCD/GFCI and MCB protection against faults. |
Single Victron Phoenix GFCI Outlet (USA Only) | No (for one outlet only) | The built-in GFCI provides ground fault protection, but an MCB is still needed. |
Multiple Outlets (Any Inverter) | Yes | An RCD/GFCI is required to protect all outlets, along with MCBs for circuit protection. |
Using an RCBO Instead of Separate RCD + MCBs
An RCBO (Residual Current Breaker with Overcurrent Protection) combines:
MCB function (e.g., 10A): Trips if too much power is drawn.
RCD/GFCI function (e.g., 30mA): Cuts power if current leaks to ground.
A 10A / 30mA RCBO will trip if:
A circuit draws more than 10A (overload).
More than 30mA of current leaks to ground (shock protection).
RCBOs save space, but separate RCD + MCBs offer more flexibility for multi-circuit setups. Whichever you choose, your RCBO or RCD must be double pole, type A, with a disconnection threshold of 30mA and a disconnection time of 40ms.
Using an Automatic Transfer Switch (ATS) in a Campervan
An Automatic Transfer Switch (ATS) allows your plug sockets to automatically switch between shore power and inverter power, ensuring seamless transitions without manual intervention.
How an ATS Works
An ATS monitors two power sources:
Shore Power (Primary Source) – Prioritized when available.
Inverter Power (Backup Source) – Used when shore power is disconnected.
When shore power returns, the ATS automatically switches back, preventing unnecessary battery drain. As we discussed above, some inverter/chargers like the Victron MultiPlus come with this functionality built-in; it's sometimes referred to as UPS.
Below is a diagram we put together on how to wire up an ATS in your van. Note that we use an RCBO between shore power and the battery charger to simplify the wiring (there is only one circuit in that location).

Note: An ATS has two inputs and one output. An ATS always prioritises input number one. You should wire shore power to input one and the inverter to input two. When shore power is present (one), the inverter (two) source will be disconnected.
Why Use an ATS?
✔ Hands-free switching – No need to unplug devices.
✔ Prevents inverter overload – High-power devices only run on shore power when available.
✔ Seamless power transition – No disruption when switching sources.
Do You Need an ATS?
Scenario | Is an ATS Recommended? |
Occasional shore power use | Not necessary – manual switching is fine. |
Frequent shore power use | Yes – prevents manual switching, improves efficiency. |
Running high-power AC appliances | Yes – ensures they only run on shore power. |
An ATS is a great addition for convenience and efficiency, especially if you frequently switch between shore and inverter power.
Using a Manual Changeover Switch Instead of an ATS
A manual double pole changeover switch allows you to manually switch your plug sockets between shore power and inverter power. Unlike an ATS, it requires physical operation, but it's a simpler, more affordable option with no risk of switching delays or malfunctions.

Installing a Manual Bypass for Your Inverter/Charger
It's also not a bad idea to include a manual bypass in your inverter/charger circuit, especially if it's powering something mission-critical. A manual bypass switch allows you to bypass the inverter/charger and connect the AC input directly to your loads. This can be useful if your inverter/charger needs to be inspected, its configuration changed, or if there's a fault and it needs removal.

Below we can see a wiring diagram for this system component, with the two changeover switches shown separately. Note that the switches are three-way with centre-off positions, to allow you to disconnect both inverter/charger and bypass.

If you're using a low-power inverter/charger, like the MultiPlus Compact anything up to 2000W, it is easy to manually bypass the inverter/charger. Simply pull the black AC in and AC out plugs out of the inverter/charger and insert these plugs into each other.

How to Install a Pure Sine Wave Inverter in your Van Conversion
Step 1: Choose a suitable location
Inverters tend to get quite hot when they are running - choose a cool, well ventilated location for installation. Do not install the inverter in the same location as the battery bank, but avoid voltage drop by not installing it too far away either.
Step 2: Connect the inverter to your busbars
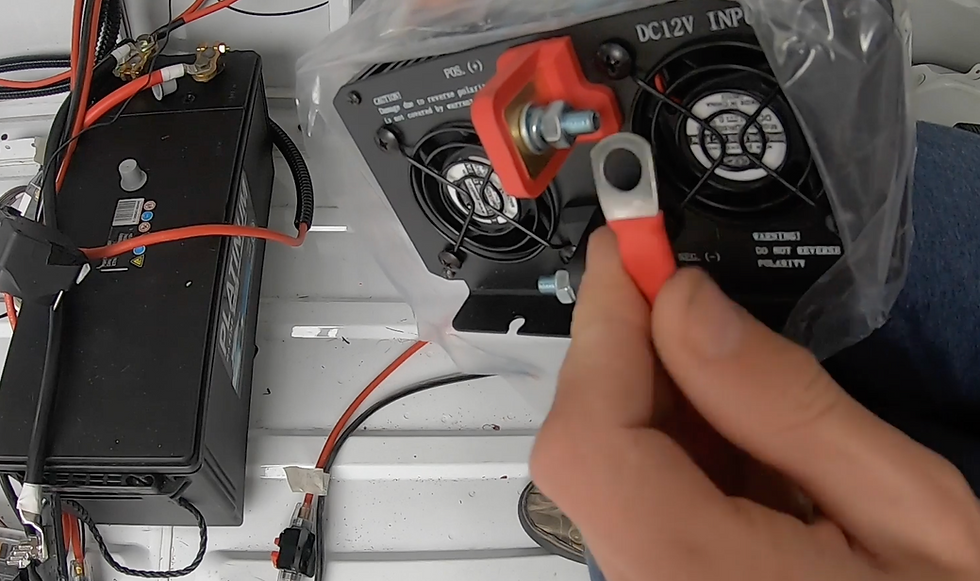
The inverter has a positive and negative terminal on it. Wire the positive terminal to your positive busbar and the negative terminal to your negative busbar (assuming these are already wired to your leisure battery). I used 55mm² cable for this, but you should do your own calculations for the wire size you need.
Step 3: Fuse the inverter
On the positive wire, we will connect an appropriately-sized fuse as close to the busbar as possible. This protects the inverter in case of a surge in electricity. You can learn about fuse sizing here.
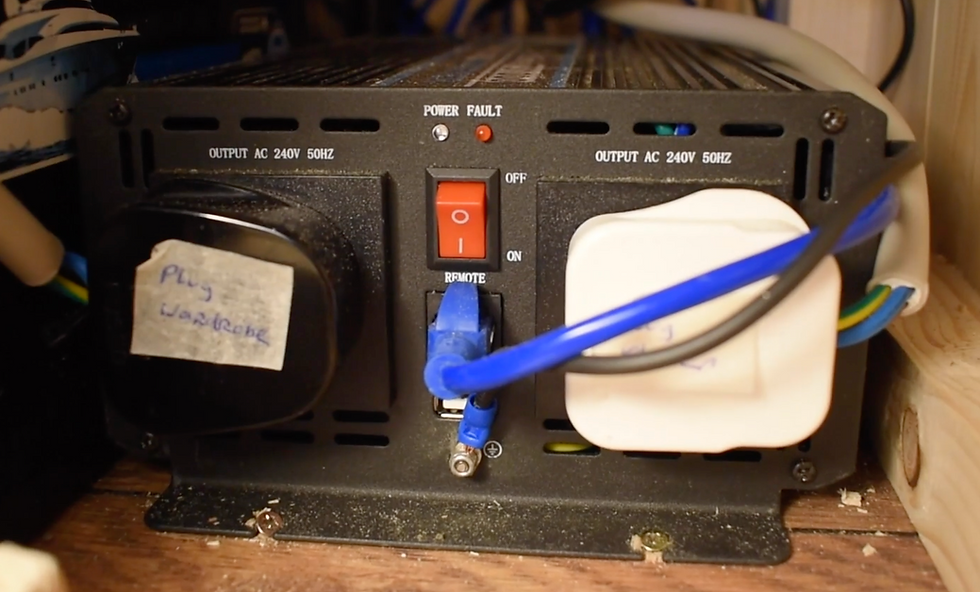
Step 4: Add an isolator/kill switch
On the positive wire we also want to install a isolator/kill switch. This is a big switch that allows us to easily kill power to our inverter for maintenance or in case of an emergency.

Step 5: Ground your inverter
Check the manufacturer’s guidelines for more information on grounding your specific inverter. Some inverters need grounding, whilst others do not. If a consumer unit is required, its grounding will depend on the inverter. You can learn all about grounding in our dedicated article.
How to Wire Plug Sockets in your Van Conversion
Step 1: Wire up a plug head: Use three-core cable and a fused plug head, or buy a ready-made plug head with a wire attached. Plug the plug head into your inverter.
Step 2.1: Wire a consumer unit: As per the instructions in the previous section; wire up at least one MCB and RCD, or a single RCBO.

Step 2.2: Wire up the neutral-earth bond (if required*). The bond should be made at a single, clear point, usually at the PE bar inside your AC consumer unit.
*ie. not using a Victron Multiplus inverter, or other N-E bonded inverter
a. Bring AC from inverter into your consumer unit
Live (L) → RCD input live
Neutral (N) → RCD input neutral or the neutral bar feeding the RCD (depends on CU design)
b. Create a single neutral–earth bond inside the consumer unit
One short ≥2.5 mm² copper link from the neutral bar (or RCD output neutral) → PE bar
This provides the N–PE reference your RCD needs to trip in a fault
c. What the PE bar must handle
All socket/appliance earths
The chassis bond (≥6 mm²)
The neutral–earth link from step b
d. All circuits must be downstream of the RCD
RCD output → MCBs or final circuits
All sockets/appliances wired after the RCD so they’re fully protected
Step 3: Wire a plug socket: Run the three-core cable from the inverter out to some double-pole (or unswitched) plug sockets. Wire the live (brown) wire to the to live contact point, the neutral (blue) wire to the neutral contact point, and the earth (yellow and green) wire to the earth contact point.
If you want multiple outlets, you can wire up the sockets in a daisy chain fashion. This is known as a radial circuit.

Most plug sockets will come with a wiring diagram for you to follow here.
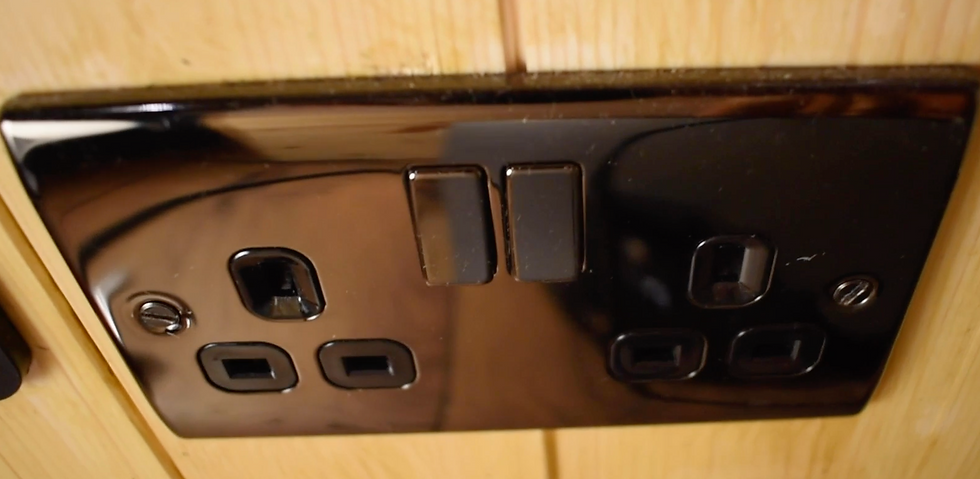
Step 3: install your plug socket: You will likely be inserting the plug socket into your van's cladding walls. You can use a jigsaw to easily cut out the shape of the plug socket and pop it into the cavity.
Heat Management and Ventilation in Inverter Installations
Heat management is critical when installing an inverter in your campervan. Inverters generate heat, especially when running at higher loads, and improper ventilation can lead to overheating, reduced efficiency, and a shortened lifespan.
Tips for Proper Inverter Ventilation
Choose the Right Location: Install the inverter in a well-ventilated space, away from confined areas or other heat-generating devices like batteries or electrical components.
Maintain Airflow: Leave at least 10-15 cm of space around the inverter to allow proper airflow. Some inverters also come with built-in cooling fans to aid heat dissipation.
Avoid Direct Sunlight: Heat from external sources, like sunlight, can exacerbate the inverter’s internal temperature. Ensure the inverter is installed in a shaded, cool area of the van.
Thermal Shutdown Protection: High-quality inverters often come with thermal protection circuits that will automatically shut down the inverter if temperatures rise too high.
Conclusion
We've covered a lot, but you should now have a good understanding of campervan inverters and how to choose one for your electrical system. As always with electrics, if you're still not confident, consult a professional electrician. Alternatively, our Electrics Bundle is detailed, step-by-step course on campervan electrics, including inverters. With your inverter chosen, your next step might be to spec your solar system or choose a split charger.
Now that you understand how inverters work, take a look at our inverter buying guide to see which inverters we recommend depending on your required size, key features, and budget. For a lot more information on Victron's excellent MultiPlus range, take a look at our in-depth guide. For a detailed look at inverter sizing as it relates to usage and leisure battery size, take a look at our electrical system sizing article.
Still unsure how to design your van electrics?
Start with the free wiring diagrams below.
Want to build your van electrical system properly from start to finish?
The Van Electrics Masterclass shows you exactly how to design and install a safe, reliable electrical system — step by step.
Until next time.


