Auto-Vox Solar 5B Review: The Best Wireless Magnetic Backup Camera for RVs?

About a year ago I reviewed the Auto-Vox Solar 3A Plus - a wireless, solar-powered reversing camera that I fitted to the back of my new Citroën Jumper build. I loved it. It quickly became one of my favourite bits of kit on that van, and judging by my inbox, plenty of you went out and bought one off the back of that review.
But I had two niggles with it.
The first was the installation. The 3A is designed to mount on your registration plate bolts, which works a treat in the US where plates simply unscrew. Here in the EU, our plates are riveted on. So I ended up drilling two small holes in the back of the van and bolting the camera on. Not the end of the world, but not quite the "tool-free" install either. (Auto-Vox later told me they do a mounting kit for EU plates - I only found this out after I'd put two holes in a brand new van. Typical.)
The second niggle took weeks of daily use to reveal itself. On a van, the registration plate is not centred on the vehicle - it's centred on one of the back doors, so it sits offset to one side. I mounted the 3A just above the plate without thinking twice about it. And it turned out to be quietly maddening: the view behind you is skewed off to one side, so judging what's directly behind the van takes a little mental arithmetic every single time. On a car, where the plate sits dead centre, this is a non-issue. On a van, centred would be far, far preferable.
So when Auto-Vox kindly sent me their new Solar 5B magnetic backup camera - no drilling, no bolts, no wiring, just a magnet - I was intrigued. And, I'll admit, a little dubious. Can a magnet really hold a camera to the back of a van on Alpine roads?
Having now used it every single day for a solid month on my Ford Transit (the van I live in), I can confirm: it can. And more than that - this camera has totally and utterly blown me away. It is better than the 3A in almost every way, and quite frankly, I can barely think of a reason why anyone would fit a permanent, hardwired camera to their van - with all the DIY wiring and fitting that requires - when the 5B is on the market. Truly, I mean that.
10/10. I can't imagine life without the little fellow now. This article is my in-depth review.

A good post day. The Solar 5B arriving at the workshop.

Shane is an NCC-certified electrical installer. He has built, taught, and lived in campervans since 2019.
This post contains affiliate links. We may earn a commission at no extra cost to you. To understand our policies on content, affiliate commissions, and liability, please review our Terms of Use.
In this guide
What's in the Box

The whole kit arrives in a proper zipped hard case - the kind of case you'd expect with a decent power tool, not a reversing camera. I didn't expect that. The camera is removable by design, so you have somewhere to keep it (and all the bits) when it's not on the van. If you ever needed to do that.

The full kit in its (surprisingly nice) hard case.
Inside you get:
• The magnetic camera, with a small solar panel built into the top
• The 7.2" 1080P monitor
• One aerial for the camera and two small aerials for the monitor
• A USB "switch cable" that plugs into your cigarette lighter socket
• A spare metal mounting plate (with a big strip of 3M VHB tape on the back)
• An angled mounting plate with an anti-theft security screw
• The manual - which, as with the 3A, is very clear and well written
There is a small amount of assembly when it arrives: you screw the single aerial into the side of the camera, and the two tiny aerials into the back of the display. That is roughly the full extent of the "build".

Two small aerials screw into the back of the monitor. This is about as technical as the assembly gets.
Installation: A 3-Second Job
Here is my complete installation process for the Autovox Magnetic camera, documented in full for posterity:
I walked to the back of the van and stuck it on.
That's it. That's the install. The magnet grabs the steel panel with a satisfying thunk, and the camera is mounted. It took three seconds, and most of that was me deciding where to put it.

The entire installation process, captured in one photo.
If you've read my other electrical guides, you'll know I'm no stranger to running cables through vans. I've done full 12V/230V systems, solar, split-charge setups, shore power, the lot. And I can tell you the wiring for a traditional hardwired reversing camera - fishing cable from the back doors, up through the headliner, along the chassis, into the cab - can be one of the more tedious jobs on a build. The 5B simply deletes that entire job from your list.
Now, about that magnet. I was sceptical. My van lives on bumpy mountain roads here in the French Alps, I open my back doors every single day, and I had visions of the camera pinging off somewhere on the road to Chamonix. A month in: it has not slipped a millimetre. Not once.
And yet - and this is the clever bit - it's still easy to deliberately pull the camera off and move it. I tried several different positions over the first few days before settling on the final spot. Try doing that with a bolted-on camera.
Which brings me to my favourite thing about the Autovox 5B magnetic reversing camera. Remember my niggle with the 3A being offset above the registration plate? With the magnetic mount you can put the camera anywhere you like. Mine now sits high up and dead centre on the back of the van, exactly where a reversing camera should be. The view on the screen finally matches what your brain expects, and reversing accurately is noticeably easier for it.

Mounted roughly centre on the van
Mounting on Plastic or Fibreglass (Caravan Owners, Take Note)
"But Shane," I hear you say, "my caravan is made of fibreglass. Magnets famously do not stick to fibreglass."
Auto-Vox thought of this. In the box you get a metal mounting plate: fix the plate to your vehicle, and the magnetic camera sticks to the plate. In fact, the magnetic bond to the plate is noticeably stronger than the bond to my van's bare panel steel.

The metal mounting plate for plastic and fibreglass vehicles. The camera's magnet grips this even harder than bare van steel.
You can bolt the plate on - though that would rather spoil the drill-free party. But you don't need to, because the back of the plate carries a large strip of genuine 3M VHB tape.
Let me say a word about VHB, because I suspect some of you will look at "sticky tape" and wince. I have used a huge amount of 3M VHB in my day. The flexible solar panels on my own van - the van I live in full-time, that gets driven through Alpine winters and summers - are attached purely with VHB. No bolts, no brackets. That was years ago and they haven't moved. I would trust the stuff with my life. Clean the surface properly with isopropyl alcohol, press it on firmly, give it 24 hours to cure, and it is going nowhere.

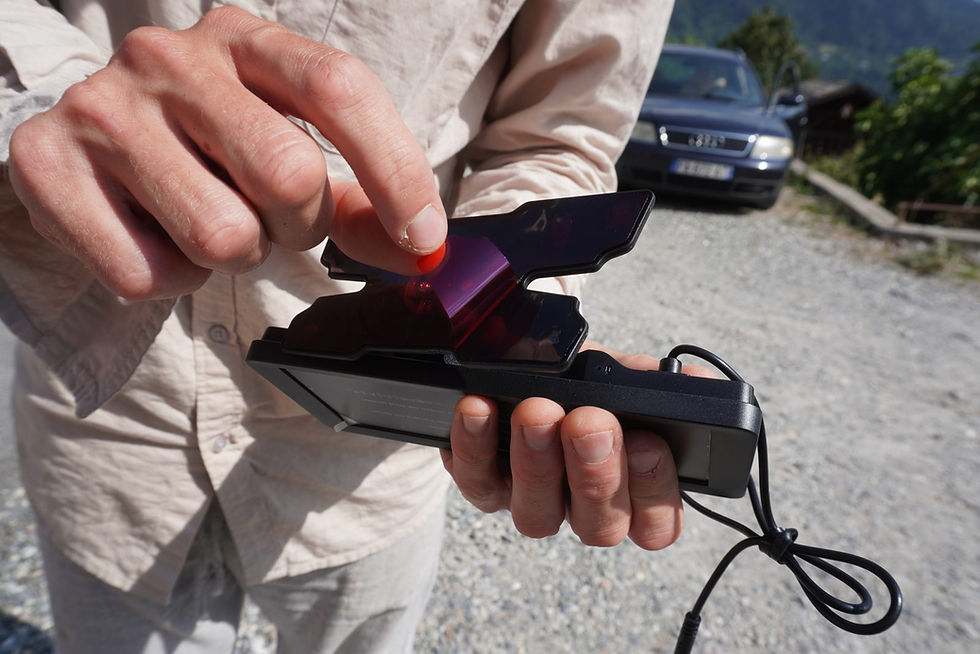
Peel off the red liner and the plate sticks on with 3M VHB - no drill required.
So caravan and motorhome owners with plastic or fibreglass rears: the drill-free promise still holds for you.
The Anti-Theft Question
The obvious flip side of a camera that installs in three seconds is that, in theory, it can be removed in three seconds by someone other than you.
Auto-Vox gives you two answers to this. The first is the angled mounting plate, which comes with a security screw so you can physically lock the camera to the plate. (The angled plate also lets you point the camera at a more extreme downward angle if you need it, though honestly the camera's own built-in tilt mechanism covers most situations.)
The camera has its own tilt adjustment, an aerial, and a solar panel on top.
The second answer is simpler: just take it with you. If I'm parked somewhere dodgy overnight, the camera comes off the van and into the cab in less time than it takes to lock the doors. It lives in its little hard case. A hardwired camera can't do that.
In a month of parking around busy Alpine towns, mine has never been touched. But it's nice that the options exist.
Setting Up the Monitor
The monitor setup for the Autovox magnetic backup camera is nearly as painless as the camera itself. It sticks to the dashboard with an adhesive mounting bracket - peel, position, press.
Peel the film off the monitor's dash mount, stick it down, done.
Power comes from the cigarette lighter socket via the supplied USB switch cable. There's no wiring into the van's electrics at all - which means, like the camera, the whole system can move between vehicles in about a minute.

The monitor powers from the 12V cigarette socket - no wiring into the van's electrics.
The first time I powered it on, the monitor found the camera by itself, instantly. No pairing buttons, no menus, no swearing. It was all pre-paired from the factory, and it has connected instantly every day since.

The view from the driver's seat. Like a little flat-screen telly by the steering wheel.
Video Quality & Features
This was the first thing that struck me, before the magnet, before the night vision: the image is really, really good.
The monitor is a 7.2" 1080P IPS panel, and the picture is noticeably better than my 3A. It is like having a small HD flat-screen telly up by the steering wheel. The image is sharp, the colours are accurate, and the anti-glare coating deals with the one complaint I had about the 3A's screen, which was glossy and caught the sun. In a Transit with a big windscreen in summer sun, the anti-glare coating earns its keep daily.
The wireless link (2.4GHz digital, with those dual aerials doing frequency-hopping to dodge interference) connects instantly and has practically no delay. I've read plenty of horror stories about laggy wireless cameras over the years; whatever Auto-Vox is doing here, there's none of it. Auto-Vox claims a stable signal at up to 150 metres, which is far more than any van needs - but it does mean the signal has headroom to spare through a van full of insulation, cabinetry and water tanks.

Adjustable parking guidelines overlay on a sharp 1080P image.
On screen you get adjustable parking guidelines - you can tune the lines to match your vehicle, or switch them off entirely. And the system supports a second camera with a split-screen view on the same monitor, which opens up some interesting options: a camera on the caravan and one on the tow car, a blind-spot camera on a long wheelbase van, or eyes on a trailer.
The camera itself is 1080P with a high-sensitivity sensor, and it's rated IP69K for water and dust - the same top-tier rating as the 3A, meaning rain, pressure-washing and Alpine grime are all fair game.
The Night Vision Surprise
I'm slightly embarrassed to admit this, but I had no idea the Autovox 5B wireless magnetic backup camera had night vision. I hadn't read that part of the box.
So there I was, pulling out of a car park late one evening, and I did an honest-to-goodness double take at the screen. The display had switched itself into a crisp, high-definition, black-and-white night vision image. Apart from trap cameras in national parks, I'm not sure I had ever actually seen night vision in real life before. It's quite cool.

Here's what I saw - too cool!
The camera has infrared illumination that switches on automatically in the dark - down to complete darkness, no ambient light needed - and the resulting image is far better than it has any right to be. Reversing into a pitch-dark forest pull-in, you can clearly see rocks, posts and ditches that are completely invisible in the mirrors.

The infrared lights either side of the lens switch on automatically in the dark.
For those of us who regularly park in the dark - which, if you sleep in your vehicle, is all of us - this might quietly be one of the most useful features on the whole system.
Battery Life & Solar Charging
Like the 3A, the Autovox magnetic backup camera is solar-powered: there's a little solar panel on top of the camera that keeps the internal 5000mAh battery topped up.

The little solar panel on top keeps the 5000mAh battery topped up.
After a full month of every-single-day use, my battery still reads full. Now, in fairness, it is mid-July here in Chamonix and the sun is doing a lot of heavy lifting. But the numbers back it up: the manual estimates 100 days of typical use from a full charge at 25°C, before the solar panel contributes anything - and Auto-Vox claims up to 150 days with solar assist. Based on my month of use, I believe them.
If you do run it flat - say, after a long dark winter under a wet Irish sky - you top it up over USB in a few hours. Realistically, I'd expect to plug it in once or twice a year at most, and possibly never in summer. I've never once had to plug my Autovox 3A in to charge.
The operating range is rated from -20°C to 65°C. Chamonix winters will test the bottom end of that for me.
Loop Recording
The Autovox 5B Solar magnetic backup camera also works as a rear DVR: it can continuously record onto a microSD card (it supports up to 64GB), looping over the oldest footage as the card fills - the same way a dashcam works.
I'll be honest with you: I haven't used this feature. A month in, reversing safely has been quite enough excitement for me. But for anyone who wants a record of what happens behind their vehicle - an insurance claim after a car park scrape, or keeping an eye on a trailer - it's there, it's included, and it needs no extra hardware.
Manual Activation (Important to Know!)
This was the one thing I flagged in my 3A review that people needed to understand before buying, and it applies to the 5B too - so let me explain it clearly.
The system is not wired into your van's reversing circuit. So the screen does not switch on automatically when you select reverse gear, the way a factory-fitted camera does.
What actually happens: when you start the van, the display powers on automatically and shows the rear view for a couple of minutes, then switches itself off to save power. If you need to reverse later - leaving a car park, backing into a pitch - you press the button on the 12V plug and the display wakes instantly.

The button on the 12V switch cable wakes the display instantly.
Does this bother me? Honestly, no. After a week it's pure muscle memory - I press the button as I'm reaching for reverse, the way you'd cancel an indicator. But I know from the comments on my 3A review that some of you really want automatic activation. If you're determined, wiring a relay off the reversing light feed wouldn't be a terribly hard job for someone comfortable with 12V electrics - but at that point you're wiring things into your van again, which rather defeats the entire purpose of this camera.
Go in with your eyes open: it's a button-press, not an automatic trigger. For me, it's a small price for a completely wire-free system.
How It Compares to the Solar 3A Plus
I still think the 3A Plus is a fine camera - my review of it stands, and it continues to serve faithfully on the Jumper. But having lived with both, here's the honest comparison:
Installation: The 3A wants your registration plate bolts (easy in the US, drilling or an EU plate kit over here). The 5B is a magnet. Three seconds. No contest.
Positioning: The 3A lives wherever your plate is - which on a van is offset to one side. The 5B goes anywhere, including dead centre where a reversing camera belongs. This matters more than I expected it to.
Screen: Both are 7.2" 1080P, but the 5B's IPS panel with anti-glare coating is a clear step up from the 3A's glossier screen. The picture genuinely looks better.
Night vision: Both have it; the 5B's auto-switching infrared image impressed me more.
Battery & solar: Effectively the same excellent system - 5000mAh, solar-assisted, months per charge.
Flexibility: The 5B moves between vehicles, comes inside at night, and repositions in seconds. The 3A is a permanent fixture.

If you drive a car with a centred, unscrewable plate and want a fit-and-forget camera, the 3A Plus remains a great buy. For a van, motorhome or caravan, the 5B is the one I'd buy today, and it isn't close.
Real-World Tips
A few things I learned in my first month that will save you some faffing:
Try a few positions before you commit. The magnet makes experimenting free. High and centred gave me the most natural view by far.
If you're using the VHB plate, prep properly. Clean the panel with isopropyl alcohol, press the plate on hard, and give it 24 hours before hanging the camera on it. VHB rewards patience.
Charge everything fully before first use, then let the solar panel do its thing. Mine was on full charge out of the box, but worth checking.
Give the solar panel the odd wipe. A muddy panel is a poorly-charging panel, and the back of a van is a filthy place.
Parking somewhere questionable? Pull the camera off and pop it in the cab, or fit the security-screw plate. Three seconds either way.
Want loop recording? Check the microSD card is seated and set the loop going in the menu - it won't record by default.
Pros and Cons
Pros:
Genuinely tool-free three-second installation - no drilling, no bolts, no wiring whatsoever
Mount it anywhere - including dead centre on the vehicle, where a reversing camera actually belongs
Sharp 1080P image on a 7.2" anti-glare IPS screen - noticeably better than the 3A Plus
Impressive auto-switching infrared night vision, right down to total darkness
5000mAh solar-assisted battery - roughly 100+ days per charge; mine hasn't budged from full in a month
Instant, lag-free wireless connection with serious range headroom
Loop recording (DVR) included
Supports a second camera with split-screen view - handy for trailers and caravans
IP69K waterproof rating and a -20°C to 65°C operating range
Removable in seconds - swap it between vehicles, or bring it inside overnight
Cons:
Manual activation - you press a button rather than it triggering automatically in reverse gear
Non-metal vehicles (fibreglass caravans etc.) need the mounting plate fitted first - VHB or bolts
A magnetic camera is, in theory, as easy for a thief to remove as it is for you (mitigated by the security-screw plate, or by taking it inside)
The monitor occupies your 12V cigarette socket
Solar needs light - a dark winter under a cover will eventually mean a USB top-up
Costs more than a basic wired camera - though a fraction of a professional install
Conclusion: Is the Solar 5B Worth It?
I went into this review wondering whether a magnet could really replace a bolted-on camera. I'm coming out of it wondering why anyone still hardwires reversing cameras into vans at all.
The Auto-Vox Solar 5B fixes both of the niggles I had with the 3A Plus - the drilling and the offset positioning - and then improves on it everywhere else: a better screen, night vision that made me do a double take, and an install so easy it barely deserves the word. After a month of daily use on the van I live in, over bumpy Alpine roads and daily door-slamming, it has not slipped a millimetre or missed a beat.
For van, motorhome and caravan owners, I can't currently think of a better option - and I can no longer make a good argument for spending a weekend fishing camera cable through your headliner. This little fellow gets a 10/10 from me.
You can pick up the Solar 5B on Amazon US here. For readers this side of the Atlantic, it's also on Amazon UK and Amazon DE.
Still unsure how to design your van electrics?
Start with the free wiring diagrams below.
Want to build your van electrical system properly from start to finish?
The Van Electrics Masterclass shows you exactly how to design and install a safe, reliable electrical system — step by step.