
The Ultimate Guide to Van Sound Deadening (2026)
- Shane Monks O'Byrne

- May 7, 2022
- 16 min read
Updated: Apr 8
There is one small detail that can make your life on the road unbearable: noise. A rattling van that offers no protection from road or outdoor noise can quickly make an ordeal out of a pleasant road trip. According to our Roaming Home 2023 study, 82% of camper conversions have van sound deadening installed. Before insulating our van, we should first install some van sound proofing panels. This guide covers both van sound deadening and soundproofing, including the right materials, how to install them, and how to choose effective soundproof insulation for a campervan.

Shane is an NCC-certified electrical installer.
He has built, taught, and lived in campervans since 2019.
This post contains affiliate links. We may earn a commission at no extra cost to you. To understand our policies on content, affiliate commissions, and liability, please review our Terms of Use.
Prefer watching? Check out our video on van sound deadening:
In this guide
Why Campervans Are So Noisy
A campervan is a thin steel shell, and that creates two distinct noise problems:
1. Structure-borne noise (panel resonance)
Preventing this is known as sound deadening.
The van’s panels vibrate. As you drive, the large flat areas of the van — doors, walls, wheel arches, roof — flex with road texture, tyre hum, engine vibration and general movement. Thin sheet metal is excellent at one thing: acting like a resonant surface. When it vibrates, it amplifies noise inside the cabin, which is why untreated vans feel drummy, rattly, or loud even at moderate speeds.
A second factor is road-to-chassis vibration transfer: vibration travels up from the tyres and suspension into the body shell, exciting the panels even further.

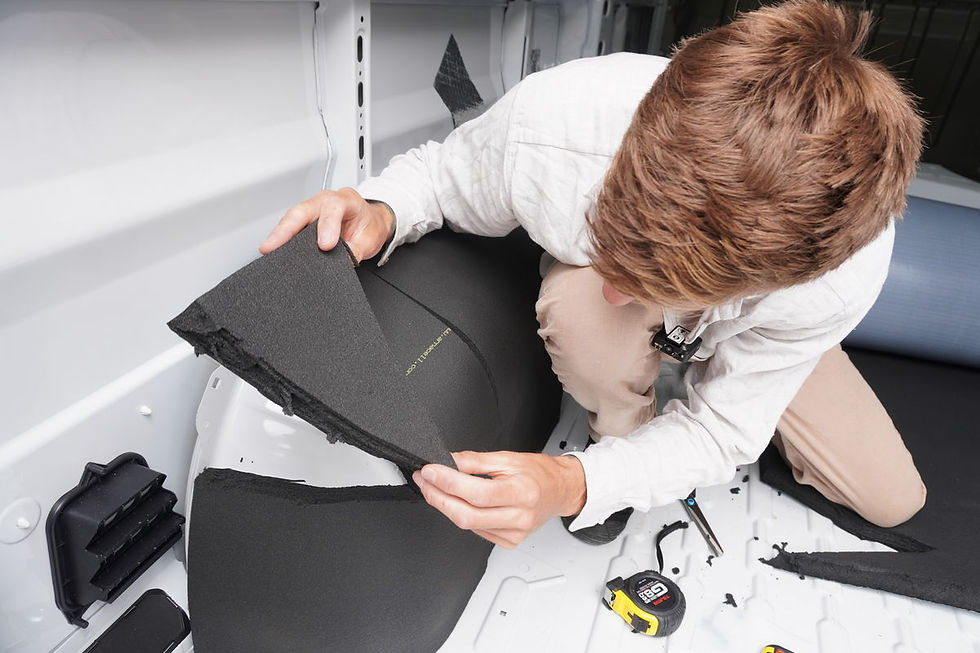
Vibration damping (like the butyl mat shown in the image above) tackles the noise created when the van’s metal panels physically vibrate. It stiffens those panels so they stop behaving like amplifiers.
What materials do this: Flexible, dense sheets (e.g., butyl mats) or coatings designed to reduce panel resonance.
You only need enough material to interrupt the vibration behaviour — it’s not about full coverage, and it’s not about blocking airborne sound. That comes next.
2. Airborne noise (ambient noise)
Preventing this is known as soundproofing.
Outside sound passes straight through the body - ie. ambient sound. Even when the van isn’t vibrating, it still lets in airborne noise: rain, wind, traffic, people, and the constant roar of tyres on tarmac. The steel skin has almost no sound-absorbing ability, so external noise simply reflects around the interior unless there’s proper insulation to absorb it.
The steel skin has almost no absorption, and at certain frequencies (its coincidence frequency) it actually transmits sound exceptionally well. This is why rain and motorway noise can feel unreasonably loud inside a van.
What airborne absorption does: It reduces this external noise by soaking up sound energy inside the insulation layer. The key metric here is the NRC (Noise Reduction Coefficient) — a higher NRC means better absorption.
What materials do this: Soft, fibrous insulation with high NRC values (Thinsulate, mineral wool, recycled plastic wool, etc.).
Why you need both methods
One deals with vibration, the other deals with ambient noise. If you only install one of the two, your van will still be loud — just for different reasons.
Together, they create a much quieter interior and form the foundation of a proper insulation stack. We will cover both methods in this article.

The Weakest Link Rule
When it comes to soundproofing, your van is only as quiet as its least treated surface. Sound will always travel through the easiest path available, so even a single untreated panel can dominate the overall noise level. For example, you can fully deaden the walls and roof, but if the rear doors or wheel arches are bare, you’ll still hear a roaring highway drumming through those weak points. Likewise, a gap in insulation behind a cabinet or an exposed steel rib can act like a “noise chimney,” bypassing all the damping work you’ve done elsewhere.
The takeaway is simple: treat the worst offenders first, and avoid leaving large uninsulated surfaces or obvious gaps. A small amount of well-placed material on the noisiest areas does far more than over-treating panels that weren’t loud to begin with.
Vibration Damping: Reduce structure-borne noise
First let's look at how to reduce structure-borne noise (panel resonance), ie. vibration damping. Then we will look at ambient noise reduction later.
What is the Best Van Sound Deadening for Reducing Vibrations in a Van?
The van sound deadening you choose should be thin and lightweight. It shouldn't take up too much space or add significant weight to your campervan. Some sound deadening products also incorporate thermal insulation to varying extents. Conversely, many thermal insulation materials also block out sound.
Butyl Mats
Butyl mats are self-adhesive, foil-backed sound deadening vibration dampers. They reduce unwanted vibrations and structural noise. The butyl sheet is made of butyl rubber, which makes it great at absorbing vibrations and road sound when driving. Butyl mats are also thin and relatively light, ensuring they don't take up too much space or add too much weight to your van. Note that butyl mats are very good at reducing vibrations and structural noise, but only provide limited ambient noise insulation. Butyl matting should therefore be used together with a thermal insulation material that has a high noise reduction coefficient (NRC).
There are many brands to choose from - from DodoMat to Kilmat. I personally use SoundSkins. I've found it to be effective and easy to install, and my van is very quiet whilst driving.

For our readers in the UK, Dead Sound have kindly offered readers of The Van Conversion 10% off their sound deadening or insulation purchase. Simply use the code THEVC10 at checkout.

Pastes and Paints
Butyl rubber sound deadening material also comes in the form of paints and sprays that are applied directly to the interior surface. It forms a thin, lightweight viscoelastic layer that effectively deadens sound in a campervan. Paints and sprays are generally less effective at damping sound, but are much thinner than butyl matting. This might make them better suited for use combined with additional layers of sound and thermal insulation. LizardSkin is a well-regarded manufacturer of paint-on butyl rubber insulation.

This video demonstrates the effect that a layer of butyl rubber insulation has on the inside of a vehicle:
Note again that butyl rubber paint effectively reduces structural and road noise, but not ambient noise. Use it as the first layer in your insulation system.
Mass-loaded Vinyl
Mass-loaded vinyl is a thicker material that combines vibration deadening, ambient sound damping, and minimal thermal insulation. Mass-loaded vinyl also improves the inside acoustics of the van. The benefit of mass-loaded vinyl is that it effectively dampens vibrations and road noise whilst also blocking ambient noise (ie. airborne noise).

DodoMat, whose butyl matting we mentioned earlier, also make mass-loaded vinyl insulation.

Panel Tapping Test: Identify the Noisy Panels First
Before sticking any sound deadening down, do a quick knuckle-tap test.

Walk around the van and tap every metal panel you’re listening for the difference between:
Boomy / drummy → flexible panels that need damping
Dull / solid → already stiff, lower priority
This stops you wasting material and tells you exactly where vibration is actually coming from.
Here’s what usually shows up:
Side doors: almost always the worst — big, thin, and very resonant.
Back doors: large surface area, often the main source of rear noise.
Wheel arches: the closest point to tyre noise, usually very “ringy.”
Large wall panels: typically drummy and benefit from spot damping.
Ceiling: moderate resonance; tapping helps you find weak spots.
Floor: usually the least resonant; most floor noise is airborne, not vibration.
Larger, flatter panels resonate far more easily than smaller or curved ones, which is why areas like side walls and doors usually need more damping than the stiffer sections of the van body.
Why do this? Because not everything needs coverage. Targeting only the “boomy” panels gives you better results, saves weight, and keeps costs down.
What Sort of Decibel Reduction Can You Expect from Butyl Mats?
When properly installed — enough coverage on major panels, good adhesion, and paired with complementary insulation — you can expect a reduction in interior noise on the order of 5 – 15 dB compared with an untreated van.
At the low end (≈ 5–7 dB reduction), you’ll notice a real improvement: less tinny “drumming,” fewer rattles, and a quieter general cabin hum. Here are the results of db meter test in a lightly sound deadend van (5-7db)
At the high end (≈ 10–15 dB), the van becomes substantially quieter — enough that constant road or tyre noise becomes much less intrusive, making conversation, music, or sleeping noticeably more comfortable. Here are the results of a db meter test in a heavily sound deadened van (15db)
Treating key panels (doors, wheel arches, roof, large walls) yields the biggest bang for the buck — because sound tends to leak in through the “weakest links.”
How to use Butyl Mat Sound Deadening
Measure and Cut Mats:
If your butyl mat doesn't already come in pre-cut squares, you will need to measure the areas you plan to apply the mats to (doors, walls, roof, wheel arches, and floor). Cut the mats accordingly. Sound deadening mats are heavy and dense, you generally only need to cover about 25% of a panel to get the desired benefits.

Apply to Steel Surfaces:
Apply the mats directly to the steel surfaces of the van. Peel off the adhesive backing and press the mat onto the metal, starting at one end and smoothing it out to avoid air bubbles.

Use a roller tool to firmly press the mat into place, ensuring good contact with the metal for maximum sound damping.

How to use Sound Deadening Paint
Sound deadening paint is an alternative to butyl mat.

Materials
Sound deadening paint (such as LizardSkin OEM 300)
Paint sprayer or brush/roller
Painter’s tape and drop cloths (to protect other areas)
Process
Use a sprayer for even coverage or a brush/roller for smaller areas. Apply a thick coat (about 1mm to 2mm) directly to the steel walls, roof, floor, and wheel arches.
Apply 2–3 coats, letting each coat dry according to the manufacturer's instructions. Paint is not as effective as butyl mats, but it helps with minor sound reduction and is easier to work with in hard-to-reach areas.
Where to Sound Deaden in a van
When it comes to sound deadening, not every part of the van needs the same treatment. Different panels resonate in different ways, and some areas contribute far more to overall noise than others. The goal isn’t to blanket the whole shell with butyl — it’s to target the panels that flex the most, absorb the most vibration, or sit closest to major noise sources like tyres and airflow. Below is a breakdown of each area of the van, how much damping it actually needs, and what role the insulation layer will play on top of it.
Still figuring out your van build?
This is where most people get stuck — jumping between blog posts, YouTube videos, and forums, never quite sure what to do next.
The Van Conversion Mastery Course gives you a clear, step-by-step system to design and build your van from start to finish — without the guesswork.

Ceiling
Your campervan’s roof takes the full force of wind and weather, and is one of the main sources of rain and environmental noise. For vibration damping, you only need strategic coverage (around 25%) of butyl on each roof panel to stop the metal resonating. The real reduction in rain noise comes later from the insulation layer, which should cover the ceiling fully.

Walls
The large sheet-metal wall panels in a van are some of the most prone to flexing and “drumming” while you drive. Adding vibration damping here makes a noticeable difference to how solid and quiet the van feels. You don’t need full coverage: treating roughly 25–50% of each wall panel is enough to stop resonance.
After that, your insulation layer (the high-NRC material) does the heavy lifting for reducing wind, traffic, and general ambient noise.

Doors
Vehicle doors (driver, passenger, back, and side doors) produce a lot of road sound, especially if the hinges and latches are aging. Sound deadening materials dampen vibrations in your doors, reducing this noise. 40-50% will be sufficient for vibration damping, and thermal insulation will absorb the rest of the ambient noise.

Focus on the larger flat areas of the doors. Follow up with foam or closed-cell insulation inside the doors after the sound deadening material is in place.

Wheel Arches
Wheel arches sit right beside the main source of road noise: your tyres. They experience constant high-energy vibration and also transmit a lot of airborne noise into the cabin. For vibration damping, apply a higher density of butyl here than on the walls — typically 50–75% coverage, focusing on the flatter sections of metal.
The real reduction in tyre roar comes from what you add on top: a full, well-fitted layer of insulation over the arches. Combining strong damping with full-coverage insulation gives you the biggest improvement in road-noise comfort.

Floor
Most of the noise that comes through the floor is airborne tyre and road noise, not panel vibration. The floor is structurally stiffer than the walls and roof, so it generally needs less vibration damping. A light application of butyl—around 10% coverage on the larger flat sections—is usually enough to stop any resonance.
Where the floor matters is in airborne sound.
If your living area is separated from the cab by a bulkhead, floor noise is less noticeable while you're driving. But if the space is open or you plan to use the living area while driving, adding a well-fitted insulation layer across the entire floor (above the butyl and below the subfloor) makes a much bigger difference than extra damping sheets.
In short:
Minimal butyl for vibration control
Full insulation coverage if road noise bothers you or the cab is open

Is Sealant, Expanding Foam, or Bedliner Good for Sound Deadening?
Sealant (Sikaflex, silicone, seam sealer):
Sealant is often assumed to be a cheap sound deadening hack, but it doesn’t actually damp panel vibration. It can stop small rattles where two metal surfaces touch, yet it’s far too thin and too soft to absorb resonance the way a proper constrained-layer damper (butyl mat) does.
Read more about sealants in our long-form guide on the subject.
Expanding Foam:
Spray foam doesn’t work as a vibration damper either. It adds very little mass, doesn’t convert vibration into heat, and can even increase resonance by coupling two skins together. It’s useful for thermal insulation, but not for reducing road noise or panel drumming. In door cavities it can also trap moisture and interfere with mechanisms — avoid for soundproofing purposes.
Bedliner / Rubberised Undercoating:
Bedliner and underbody coatings add some mass and can slightly reduce stone-chip noise, but their effect on panel resonance is minimal. They are not a substitute for proper damping materials and won’t noticeably quieten the van on their own.
Bottom line: none of these products — sealant, foam, or bedliner — are effective vibration dampeners. For real sound deadening, you need butyl CLD mats or a butyl-based coating, not general-purpose adhesives or coatings.
How Much Sound Deadening Do I Need in my Van?
When figuring out how much sound deadening you actually need, focus on where the van naturally resonates, not on covering every square inch with butyl. Different panels behave differently: walls, doors, and the ceiling only need targeted damping—around 25–50% coverage—to stop the sheet metal from flexing and “drumming,” while the floor usually needs even less because it’s structurally stiffer. The exceptions are the wheel arches and other high-noise zones near the tyres, where 50–75% butyl makes a meaningful dent in vibration. The real magic for ambient noise (rain, wind, traffic, tyre roar) doesn’t come from butyl at all—it comes from the insulation layer on top, which should cover the treated areas fully. In practice, tap each panel, treat the drummy ones strategically, and let your high-NRC insulation handle the rest.
We are going to dive into reducing ambient noise next.
Airborne Sound Absorption
Once the metal panels of the van have been damped and the structure is no longer acting like a drum, the next major source of noise is airborne sound — rain, wind, traffic, people outside, and the roar of tyres on tarmac — the part most people try to fix with soundproof insulation.. Unlike vibration, which you fix by stiffening the metal, airborne noise requires materials that can absorb sound energy.
Steel has almost no absorption, and at certain frequencies (its coincidence frequency) it actively transmits sound, which is why rain and road noise can feel unreasonably loud inside an untreated van. To fix this, we add a high-quality insulation layer with strong acoustic performance. The goal isn’t to block sound (steel already does that poorly) but to soak it up before it reflects around the cabin.
Understanding NRC (Noise Reduction Coefficient)
When we talk about blocking ambient noise in a van — rain, wind, traffic, people — we’re dealing with airborne sound, not vibration. This is where the Noise Reduction Coefficient (NRC) comes in.
What NRC actually measures
NRC is a 0.0–1.0 scale that describes how well a material absorbs airborne sound.
High NRC (0.70–1.00): absorbs a lot of sound → quieter interior
Low NRC (0.00–0.30): reflects sound → little to no acoustic benefit
Crucially: NRC does not measure vibration damping. Butyl mats can stop resonance very effectively, but their NRC is close to zero.
The two systems work together — but they serve completely different purposes.
Why NRC values vary in vans
The numbers you see for insulation products come from laboratory tests under controlled conditions (exact thickness, no compression, no gaps). Inside a van, performance changes based on:
how tightly the insulation is packed
whether it’s compressed behind cladding
moisture/vapour barriers
voids or air gaps
contact with metal surfaces
whether it’s allowed to “loft” properly
Because of this, you should treat NRC values as relative indicators, not exact real-world results.
Why some materials perform better than others
Soft, fibrous materials (Thinsulate, mineral wool, recycled plastic... ie. soundproof insulation)
→ high NRC because they absorb sound through friction within the fibres. These are ideal for reducing wind, rain, traffic and general van soundproofing.
Rigid materials (polyiso, PIR boards, XPS)
→ low NRC because they reflect sound rather than absorb it. They’re brilliant thermal insulators, but they contribute very little to acoustic comfort.
Vibration dampers (butyl mats)
→ great for stiffening the steel panels, almost zero benefit for airborne noise.
Here are the NRC numbers of some of the most popular van insulation materials:
Thinsulate: 0.95
Mineral wool: 0.95
Armaflex: 0.85
Recycled plastic wool: 0.85
Open cell spray foam: 0.70
Polyiso foam board: 0.15
This distinction clears up why a van treated with only butyl still sounds loud on a rainy night, and why insulation layers matter just as much as the deadening layer beneath them.
Compression and insulation loft
A quick note on compression: porous acoustic insulation only works well when air can move through its fibres. If you cram it into a cavity, press it tightly against the metal, or clamp it flat behind cladding, its NRC drops sharply and it starts behaving more like a dense foam board than a sound absorber.
For best results, let the insulation loft naturally. Fill the space without overpacking it, secure it lightly with spray adhesive or string lines, and avoid crushing it against the van’s skin. A fluffy, springy installation will always absorb far more sound than a tight, compressed one.
The Best Way to Reduce Ambient Noise in a Van
As we've just seen, airborne noise — rain, wind, traffic, voices outside — is reduced not by butyl, but by porous insulation with a high NRC.
The “best case” for pure acoustic performance would be a full-depth layer of mineral wool or fibreglass (NRC ≈ 0.90–1.00), installed loosely so it can absorb sound properly. But those materials shed fibres, absorb moisture, and aren’t ideal for vans (especially if you're not using a vapour barrier).

A more practical high-performance option is 3M Thinsulate, which offers excellent acoustic absorption (NRC ≈ 0.95), strong thermal performance, and is moisture-safe — making it the best van-friendly choice if your goal is a quiet interior.

How I Reduce Noise in my Van Builds
In my own builds, I prioritise warmth and moisture control over “perfect” acoustics.
Before I dive into my methods, if you want to go much deeper on van insulation, read our complete in-depth guide to campervan insulation here.

Armaflex
I use Armaflex on wheel arches, it is flexible, easy to work with, and has a great NRC.


I use Armaflex (NRC 0.85) around our wheel arches
Polyiso foam board
I use polyiso foam boards on the big flat areas. I use it as much as I can in the van due to its superior insulation properties.


I use polyiso foam board (NRC 0.15) as the primary insulation
Recycled plastic wool
I use recycled plastic wool insulation in awkward spots. You can use mineral wool here if you can't get your hands on recycled plastic wool, but you absolutely must use a vapour barrier in that case due to particulate matter coming off the mineral wool with the vehicles vibrations.


I use recycled plastic wool (NRC 0.85) in difficult-to-get-at-places
I also use the occasional touch of spray foam where absolutely nothing else fits.

I tend to use a couple cans of expanding foam (NRC 0.70) where nothing else fits
Polyiso isn’t great acoustically on paper, but after years of living in vans, I’ve found this mix surprisingly quiet — the van genuinely works well as a recording space.
It also helps that a finished campervan is full of sound absorbers: wooden furniture, mattresses, cushions, bedding, curtains, clothing. All of these break up reflections and soak up mid–high-frequency noise, giving you a much quieter space than the raw insulation numbers suggest.
Conclusion
If you’ve made it this far, you now understand more about van noise control than most car audio forums: vibration damping and airborne sound absorption are two completely different jobs, and you need both if you want a genuinely quiet van. The practical takeaway is simple: use butyl strategically on the panels that boom and drum, then let a high-NRC insulation layer (Thinsulate, Armaflex, recycled plastic, etc.) do the heavy lifting for rain, wind, and road noise. Treat the obvious weak links — doors, wheel arches, big wall panels, cab — and don’t waste weight or money blanket-coating every surface just because you can.
Get that combination right and you end up with a van that feels solid on the road, stays calmer on long drives, and actually feels like a room when you park up — not a steel echo chamber. You won’t block every sound (and you shouldn’t), but you’ll massively reduce the constant fatigue of tyre roar, panel drumming, and hammering rain.
Planning your van conversion?
Start with the free Van Conversion Diagram Pack below.
Want a clear step-by-step path for your full build?
The Van Conversion Mastery Course walks you step-by-step through the entire build process — from planning and layout to electrics, insulation, water, gas, carpentry, and more.
Until next time.


