
11 Easy Ways to Build a Campervan Bed (2026)
- Shane Monks O'Byrne
- Jan 17, 2023
- 22 min read
Updated: Apr 8
A campervan bed is pretty much the centerpiece of the entire build. Around it, all else is built. In this guide, we will examine 11 campervan bed ideas and how you can build one. We will look at how to build a campervan fixed bed, a folding campervan bed, a pull out campervan bed, and a sliding campervan bed. By the end, we'll have looked at every campervan bed frame or campervan bed system you can imagine.

Shane is an NCC-certified electrical installer.
He has built, taught, and lived in campervans since 2019.
This post contains affiliate links. We may earn a commission at no extra cost to you. To understand our policies on content, affiliate commissions, and liability, please review our Terms of Use.

In this guide
Design the Campervan Bed First
Broadly speaking, there are two types of campervan bed frame: fixed and non-fixed. In our 2023 study, we found that 57% of people install a fixed bed.

Before hopping into building a campervan bed, it is essential that you mock it up on paper or with CAD software first. Our full guide on campervan design will help you get started.

I highly recommend Vanspace3D for designing your campervan interior - it's a brilliant drag 'n' drop CAD tool specifically for van conversions. I designed my whole campervan interior with Vanspace. The quick and easy functionality for moving components around, changing their dimensions, and saving them as modules to use later made designing my van's interior a dream.

Van Bed Conversion Kit or a Full DIY Build?
When starting your vanlife adventure, choosing between a conversion kit or a complete DIY method for your bed setup is an important choice. Selecting a conversion kit can save time and guarantee superior quality, particularly for newcomers to van conversions. Van2B provides pre-built camper van bed systems, featuring foldable bed platforms with under-bed cabinets (among other designs). The products are compatible with Mercedes Sprinter, Ford Transit, and Ram Promaster vans.

CampervanHQ also provides a wide range of pre-built camper van bed systems, as well as folding and modular campervan mattresses.
On the other hand, diving into a full DIY project grants you the freedom to customize every detail according to your preferences and save money in the process. Most van converters opt for a DIY bed setup, and we'll mostly be focusing on these for the rest of this article.
Account for the Insulation & Cladding
Make sure you take into account the depth of the insulation and cladding on the walls of the van - they will take away from the dimensions of the bed you are able to build.
Sleeping Direction
Choosing whether to sleep lengthways or sideways in a van is a big decision, and determines the rest of your bed build. As a general rule of thumb, if you are taller than 5'9" (175cm), you will probably need to sleep lengthways. I am just a hair under 5'10" and I need to sleep lengthways in my Ford Transit. However, different vans have different widths. You can find the dimensions of the most popularly converted vans in our detailed article. In addition to your van's width, you also need to account for the depth of your insulation and cladding. These essential layers essentially make your walls thicker and reduce the space available for a bed.
A cramped sleep is a crap sleep. If you are intent on sleeping sideways, there are two things you can do to give yourself more wiggle room:
Campervan Bed Cutouts
This means using less insulation at the head and toes of the bed in order to give more sleeping room.

Georgia and Joe, owners of @Traceythetransit installed cutouts in their build. Needless to say, there are pros and cons to this. Notably, the lack of insulation acts as a heat bridge that allows heat transfer in your bed area, making winters colder and summers hotter. If the rest of your van is well insulated, this compromise might be worth it for the space savings you get with a sideways bed.
Campervan Flares
Flares are protruding panels installed on your van which add lateral volume.
Flarespace is a particularly well-known and reputable manufacturer of flares for vans. They even make flares with a sliding window in them, killing two birds with one stone.

We have a very detailed article on how to install flares in your van. In the guide, we cover everything — from dimensions and fitment, to in-depth, step-by-step installation steps, insulation, alternatives, and our hands-on experience using flares
![The Ultimate Guide to Van Flares [2025]](https://static.wixstatic.com/media/93c45c_d7f3f52083fa4c1ca3bdadfa8c91dc4f~mv2.png/v1/fill/w_1200,h_800,al_c/93c45c_d7f3f52083fa4c1ca3bdadfa8c91dc4f~mv2.png)

Material Considerations for Bed Frames
When building a campervan bed, choosing the right material for the bed frame is essential. The three most commonly used materials are wood, aluminum, and steel. Each offers its unique set of benefits and trade-offs, from weight and strength to ease of installation and cost. This section provides a detailed comparison of these materials to help you make an informed decision.
Wood
Wood is by far the most popular material for DIY campervan bed frames due to its accessibility, affordability, and how easy it is to work with.
Pros:
Easy to work with: Wood can be shaped with basic carpentry tools.
Cost-effective: Typically less expensive than metal materials.
Aesthetic: Wood offers a warm, natural appearance that complements many interior designs.
Cons:
Heavier: Wood can be significantly heavier than aluminum, which impacts fuel efficiency.
Susceptible to moisture: Without proper treatment, wood is vulnerable to rot and warping in humid conditions.
Lower strength-to-weight ratio: Compared to metals, wood doesn't offer the same level of structural strength for its weight.
Aluminium
Aluminium is a lightweight metal that offers great strength and durability. It's becoming more popular among vanlifers looking to save weight, especially in areas where fuel efficiency and vehicle performance are priorities.
Pros:
Lightweight: Aluminium weighs far less than both wood and steel, making it an excellent choice for saving weight.
Corrosion-resistant: Aluminium doesn’t rust, making it ideal for areas exposed to moisture.
Durable: Offers excellent strength for its weight and is not prone to warping.
Cons:
Higher cost: Aluminium is generally more expensive than wood.
Difficult to work with: Requires specialized tools for cutting and welding, making it less accessible for DIY builds.
We discuss how build a bed with extruded aluminum later in this article.
Steel
Steel is the strongest of these three materials, making it a great choice for those who prioritize durability and load-bearing capacity. Steel bed frames are often found in pre-made or high-end custom builds.
Pros:
Extremely strong: Steel has the highest strength-to-weight ratio, making it ideal for load-bearing applications.
Durable: Resistant to damage and can last for decades if properly maintained.
Affordable in certain types: While stainless steel is expensive, mild steel can be quite affordable for van builds.
Cons:
Heavy: Steel is the heaviest of the three materials, which can add significant weight to your van.
Prone to rust: Unless properly treated or painted, steel is susceptible to rust, especially in humid conditions.
Requires specialized tools: Like aluminum, steel needs welding or specialized fasteners, making it less DIY-friendly.
Material Comparison Table
Material | Weight (kg/m³) | Strength (MPa) | Cost ($/kg) | Corrosion Resistance | Ease of Use | Common Applications |
Wood | 600-900 | 40-80 | Low | Low | High | DIY bed frames, basic structures |
Aluminum | 2700 | 70-700 | High | High | Medium | Lightweight bed frames, custom builds |
Steel | 7800 | 250-500 | Medium | Low | Low | Heavy-duty bed frames, custom installations |
With all that out of the way, let's hop in and look at our campervan bed ideas.
Campervan Fixed Bed
The campervan fixed bed is the most common type of campervan bed system found in conversions. There is no faff with setting it up, because there is nothing to set up. It's a fixed, permanent installation.

Pros:
Ample storage space available beneath the bed.
No need to make the bed every day.
Simple and affordable to build, with plenty of DIY guides online.
Cons:
The bed occupies significant space.
Being closer to the van's ceiling can feel cramped and lead to heat buildup.
Requires additional furniture for seating and a table.

Building a DIY Campervan Fixed Bed
The campervan bed frame of the fixed bed should be built with thick and sturdy carcassing timber. Gorilla glue is the best wood glue for carpentry. Bed slats are then installed on top of the frame to give a comfortable, springy feeling. We want to use slats rather than a solid piece of plywood to promote airflow, which prevents mould from forming on our mattress.

One critically important thing that I want to point out when building a campervan fixed bed is the manner in which we join timber together. Screws are not designed to take shear force. This means that weight-bearing timber should rest on top of the adjoining piece, rather than being screwed into the side. Learn all about this concept and other elements of campervan furniture and carpentry in our comprehensive guide.

Another important consideration is the hardware used to secure the bed frame. The screws, bolts, and brackets should be rated for the load they will carry. Here’s a breakdown of some common fasteners and their load capacities:
Fastener Type | Max Load Capacity (per fastener) |
3-inch Wood Screw | 150 lbs (68 kg) |
1/4" Hex Bolt (Grade 5) | 300 lbs (136 kg) |
Steel L-Bracket | 200-500 lbs (91-227 kg) |
Cross Nuts / Rivnuts | 400 lbs (181 kg) |
Key Insight: For weight-bearing elements like bed legs and corner joints, it is best to use bolts over screws. A 1/4" hex bolt can hold up to 300 lbs (136 kg) per bolt, making it a safer choice for high-stress points in the frame.

The legs of the campervan bed frame should be made of very stiff wood with zero flex and bolted directly to the walls of the van.

I used VanSpace3D to mock up all sorts of different fixed bed configurations, like the large garage bed shown in the image above.
Campervan Fixed Bed Aluminium Frame
If you want to do a really pro job, you could buy an aluminum bed frame from Flatline Van co. This is one of the best campervan bed frame on the market and excels in terms of quality and ease of installation. It's extremely sturdy and will last a lifetime whilst being lightweight and promoting ventilation.

Campervan Fixed Bed Wooden Frame
If you prefer your build to be made entirely of wood, Flarespace also make a great birch bed system. It's lightweight, vented, and moisture protected. It's made of baltic birch, which is particularly strong without compromising on weight. It's also compatible with Flarespace flares as it sits perfectly flush with them when installed.

Campervan Table Bed
After the fixed bed, the campervan table bed, or dinette bed, is the second most popular choice of sleeping system. I built a table bed in my own van.

In a table bed system, a table top is mounted on an adjustable marine pedestal. When the table is up, you have a place to eat, work, or have friends over. When the table is down, you have a big, luxurious place to sleep.

This system is my personal favourite. Yes, I do need to lower the table and make the bed each evening, but the comfort it gives me in the van is amazing. I have a huge space to work from, can have 4-5 people over for dinner, and lots of headroom.

Apart from installing the bed on an adjustable pedestal, you will need to build two benches on either side of the table, which double up as large storage trunks.
Pros:
Space-saving design, combining a bed, table, and bench seating in one unit.
Ample storage available beneath the bench seats.
Plenty of DIY tutorials accessible online.
Cons:
Requires daily conversion between bed and seating.
The table can obstruct movement within the van.

I used VanSpace3D to mess around with lots of designs for my table bed before settling on the one shown above.
How to Build a Table Bed in a Campervan

Step 1: Build the Benches
First build the carcassing frame using 2X2 timber. These are your benches and your bed, so give it lots of structural strength. Most of the time, these benches will be installed over the wheel wells of your van, so create an interior frame for the wheel arches too.
Clad or plyline the frames to finish with two closed boxes. These benches are identical, so double up the cutting of timber and cladding to save time and ensure everything is the same size.
A jigsaw or circular saw is the best tool for this job.


Step 2: Build the slatted bench tops
Next, we need to build a slatted top for each bench. Ideally, you should use bed slats for this for their springiness.

Finally, add some large box hinges to the top so that the lids can open and close.

Step 3: Install the table
Cut your chosen tabletop to length using a circular saw. It can either match the length of the benches, or you can make it shorter if you are installing a third horizontal bench at the back of the van like I did.
Screw the marine pedestal into the centre of the table's underside.

Next, screw the pedestal into the floor of the van. Use big screws or bolts for this.
Finally, screw a thick piece of carcassing timber to the side of each bench, so that the table sits on this for support and is flush with the bench tops when lowered.

Folding Campervan Bed
Next up, we have the folding campervan bed. @jakeheard came up with the example shown in the image below. It's a multifunctional piece of furniture that serves as both a seating area and a bed. It folds out into a flat sleeping surface at night and folds into a comfortable sofa during the day, maximizing living space without sacrificing comfort.

The design of this campervan bed system is very simple. The carcass is made of 2X2 timber, and the top is ply lined. The two sections are attached together with several box hinges. The important thing to keep in mind here is that the backrest should be the same height as the legs of the bench.
The backrest should have an angle of around 15° to be comfortable. A miter saw is the perfect tool for this job. If you don't have a miter saw, a miter block works as a servicable substitute.
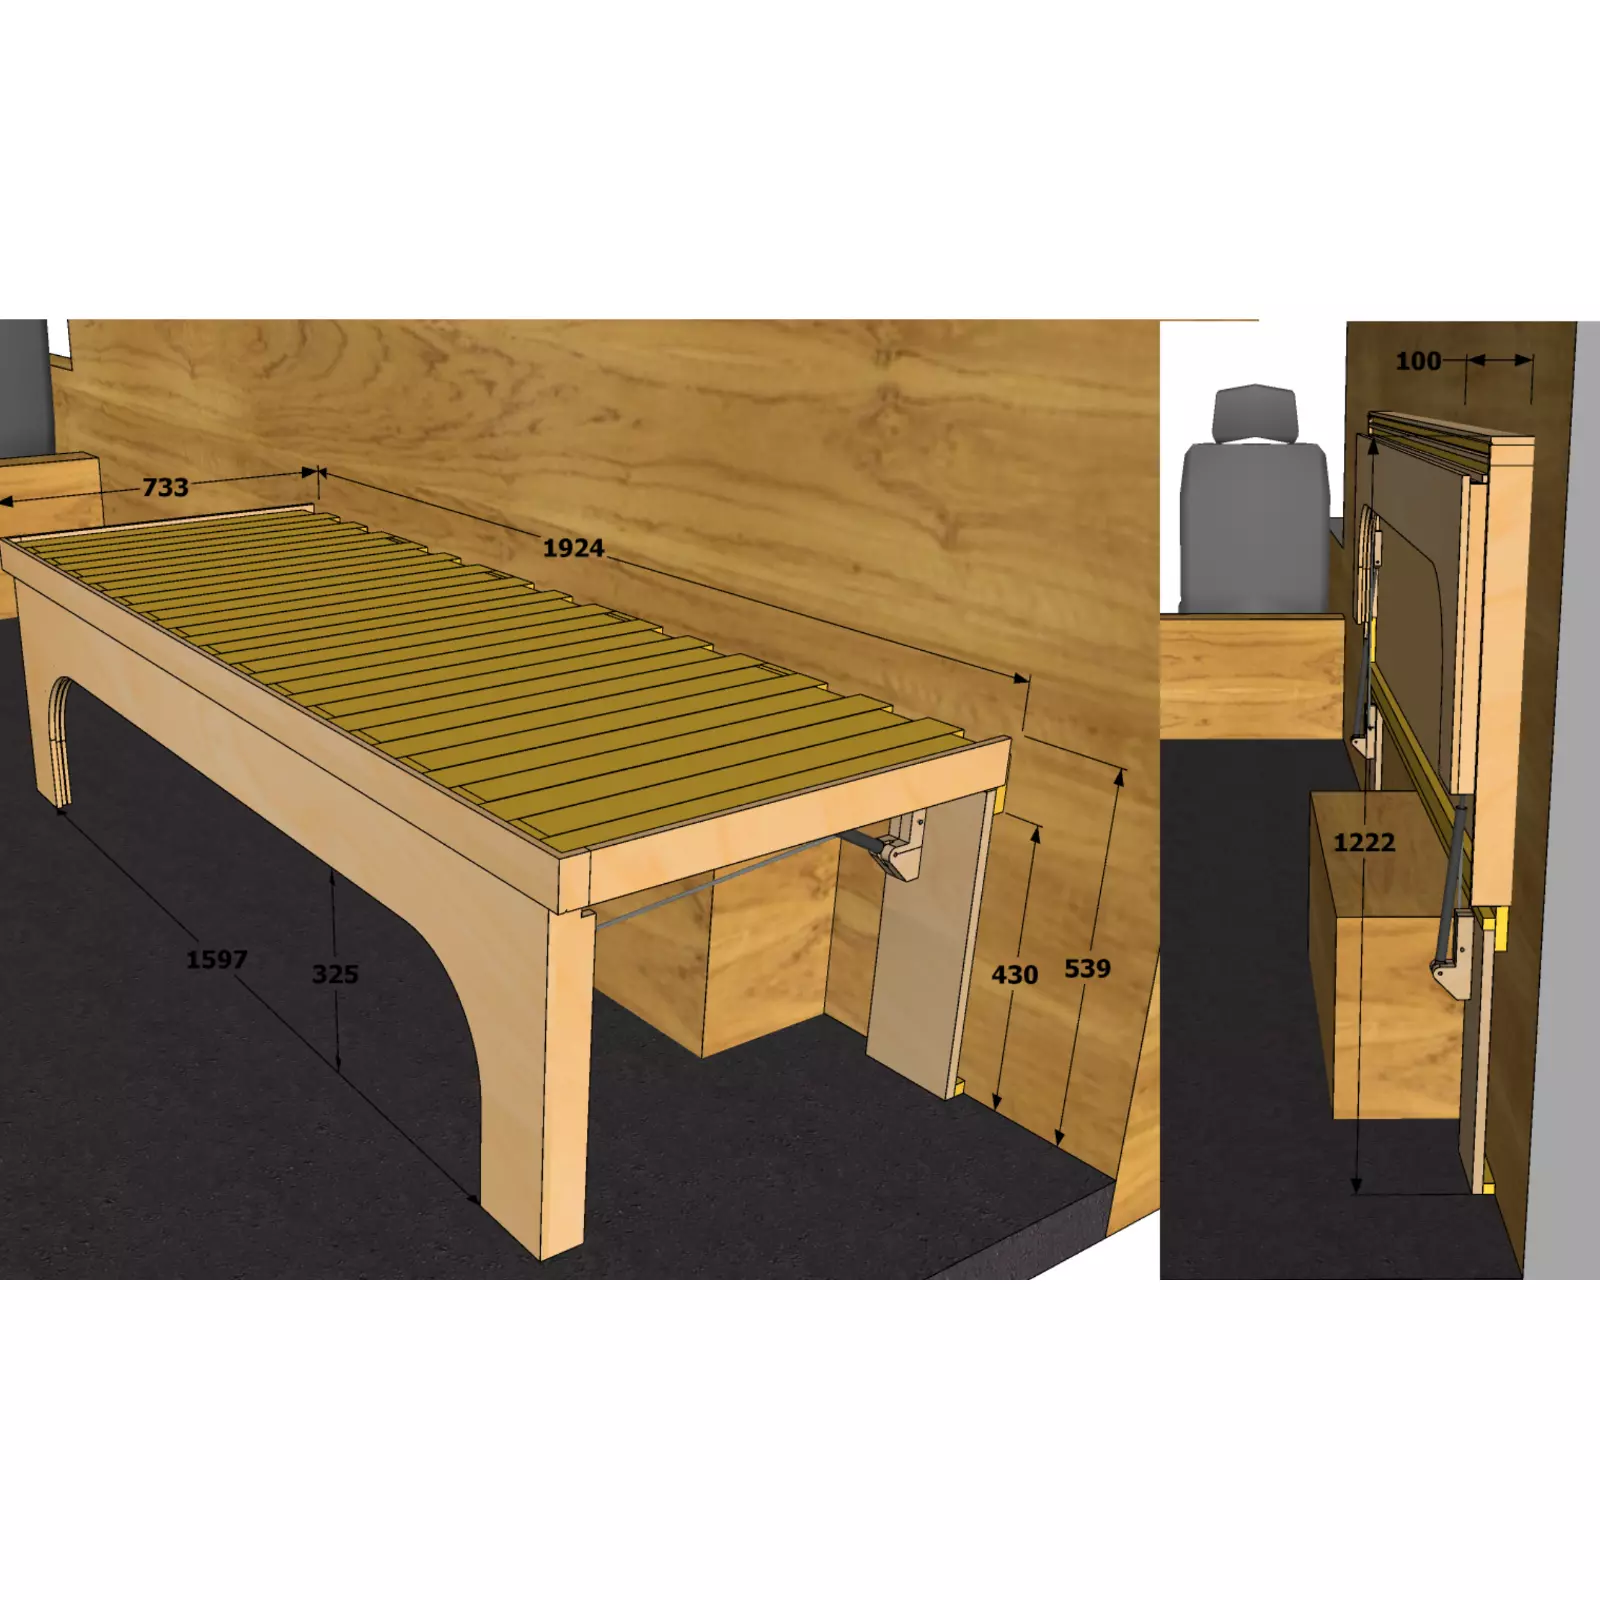
If you want to be even more space efficient, Kernow Carpentry have designed a really excellent folding campervan bed. It is the most space efficient bed we've seen! It mixes a sliding bed and folding bed together, taking up practically no room.


You can purchase the Kernow Carpentry bed on Ebay. Or, if you want to build it yourself, here are the dimensions below:

Next let's look at the pros and cons of a folding bed...
Pros:
Space-saving: Combines seating and sleeping in one unit, which is perfect for compact campervan layouts.
Comfortable seating: Provides a relaxing sofa during the day, making it ideal for lounging, working, or socializing.
Flexible configurations: Many sofa beds come in a variety of styles, including pull-out or fold-down designs, allowing you to choose a model that fits your space.
DIY-friendly: Simple designs can be built at home, offering a cost-effective alternative to purchasing a pre-made system.
Cons:
Requires daily setup: You’ll need to convert the sofa into a bed and back again each day, which might be inconvenient for some.
Limited storage: Unlike fixed beds, most sofa beds lack built-in storage underneath, although some designs offer small compartments.
Bed comfort varies: Depending on the design, the bed may not be as comfortable as other options, especially if the sofa cushions are thin or uneven.

VanSpace3D made playing with different folding bed configurations very easy, including designing drawers under the bench.
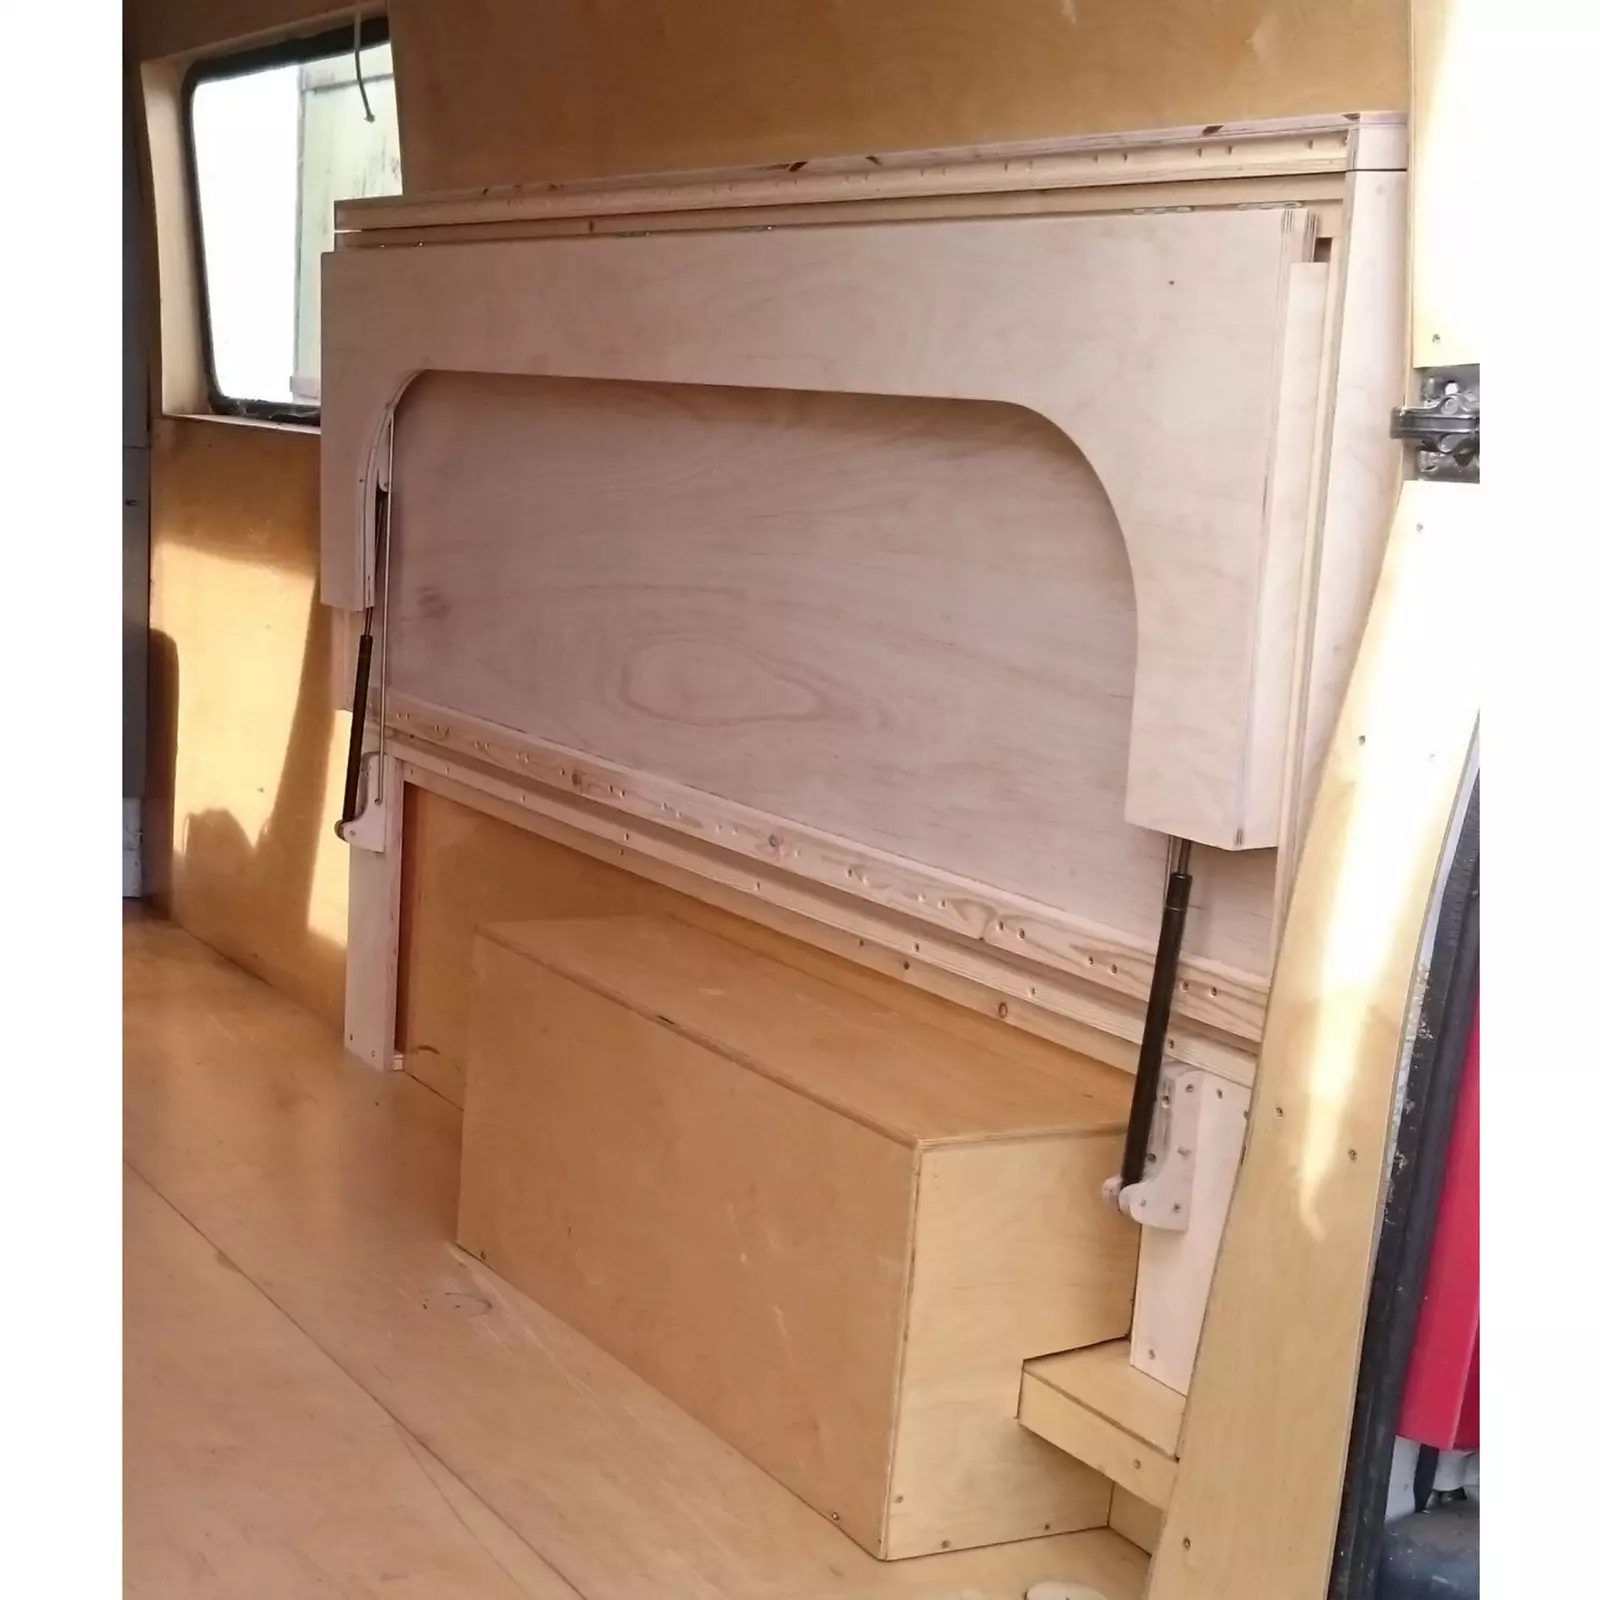
Pull Out Campervan Bed
The pull out campervan bed is another popular choice. Also known as a Murphy bed, the pull out campervan bed is stored upright in the wall when not used and pulled down when needed. This gives you a lot of living space during the day. I thought the build below by @rydawell was particularly beautiful.

Pros:
Space-saving when not in use.
Plenty of DIY tutorials are accessible.
Cons:
Requires daily stowing of the bed.
No under-bed storage available.
Separate table and seating are necessary.

I played with a number of Murphy bed setups in VanSpace3D before settling on my table bed.
Here's a detailed video on how to build a DIY pull out campervan bed. You can also buy pre-built murphy bed systems. Rover Vans have developed a flexible pull out campervan bed system that stows away very compactly. Its 3 modes allow you to have the bed completely stowed, partially unfolded and acting as a desk, or fully unfolded for sleeping.

ADF Sprinters build a similar bed which stows flush under the overhead lockers when not i use and integrates with the kitchen counter to form a full-width bed.

If you're looking for something cheaper and simpler, a Monk Bunk could be an interesting alternative.

Still figuring out your van build?
This is where most people get stuck — jumping between blog posts, YouTube videos, and forums, never quite sure what to do next.
The Van Conversion Mastery Course gives you a clear, step-by-step system to design and build your van from start to finish — without the guesswork.

Rock and Roll Bed
A rock and roll bed is a versatile seating and sleeping solution often used in campervan conversions. It serves as both a bench seat during the day and a comfortable bed at night, making it ideal for maximizing passenger seating in smaller vans. A big advantage is the speed at which these beds convert between sleeping and seating modes.
Pros:
Space-efficient: It serves a dual purpose, functioning as both seating and a bed, saving space in the campervan.
Easy to operate: The folding mechanism makes converting the bed quick and hassle-free.
Comfortable seating: When folded up, it provides a cushioned bench seat, making it perfect for relaxing or dining during the day.
Storage-friendly: Some designs include storage compartments beneath the seat, providing extra space for essentials.
Cons:
Complex installation: The folding mechanism and sturdy frame can make installation more challenging, especially for DIY builds.
Costly: High-quality rock and roll beds, especially those with integrated seat belts for passenger safety, can be expensive.
Limited bed size: Depending on the van’s dimensions, the bed may not be as large or luxurious as a fixed bed system.

VanSpace3D has a number of prebuilt modules for rock-and-roll beds, allowing you to easily design a small campervan around one.
Sliding Campervan Bed
Next up, we have the sliding campervan bed. Also known as a slat bed, the sliding campervan bed is a really efficient use of space. When not in use, it slides together to become half the size. I'm a really big fan of this type of bed - after a table bed, I think the sliding campervan bed is the next best convertible bed. Below is a photo of how @rayphungphoto built his.

The important thing with this kind of bed is that the slats all slide easily into each other. Careful measuring is essential. Leaving a few millimetres of clearance between the slats wouldn't go amiss, and a heavy-duty drawer slider could act as a guide rail. Felt furniture pads on the feet of the sliding section will ensure easy sliding without damaging your floor.

Campervan Bed Lift System
These electrical beds that can be raised up and stored in the roof when not in use are becoming increasingly popular in hich-tech conversions. A major advantage is that the bed can stay made when stored, making it the only example of a non-fixed bed that you don't have to make every night.
A campervan bed lift system is certainly something you could show proudly to all your friends. However, two important things come to mind. This system will take away from the standing height of your van, so they're not for tall people. The campervan bed lift system also draws a lot of electricity from the leisure batteries, so you will probably need a big electrical system.
Pros:
Maximizes space efficiency.
No daily bed-making required.
Cons:
Challenging to install.
Costly to construct.
Lacks built-in storage space.
Requires a separate seating and table area.
Lippert is a well known manufacturer of campervan bed lift systems. Their bed lift system has a vertical travel distance of approximately 95cm.

Alternatively, you could build a campervan bed lift system from scratch. You will need to buy linear actuators with sufficient lifting capacity and stroke. Here is a video on how to build one by Seven O Savage.

I had fun exploring VanSpace3D's bed lift modules before settling on my table bed setup.
Campervan Bunk Beds
Campervan bunk beds are a fantastic option for families or anyone traveling with multiple people, as they maximize vertical space by stacking two sleeping areas. This design is particularly useful in smaller vans where floor space is limited, offering an efficient way to add extra sleeping spots without compromising on living space.
If you've got swivel seat up front and are looking for extra bedding for guests or for little ones, Cabbunk's bunk beds are a great option.

Pros:
Great for multiple people: Accommodates two or more sleepers in the same footprint.
Space-efficient: Stacks sleeping areas vertically, freeing up floor space for other uses.
DIY options available: There are plenty of DIY guides and designs for bunk beds, making it a flexible option for van builders.
Cons:
Limited headroom: Each bunk may have restricted headspace, which can feel cramped for some.
More complex build: Requires careful planning and construction, especially to ensure stability and safety.
Access to the top bunk: Depending on the design, getting in and out of the top bunk may require a ladder or steps, which can be less convenient.

When I designed this bunk bed in VanSpace3D, I chose to make the children's bunk 'Murphy style', folding away when not in use.

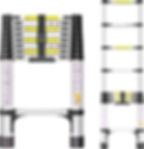
Another excellent format is a collapsing bunk bed that works like a normal single bed or sofa when two bunks aren't necessary. The construction is fairly simple, with a bottom trunk-style single bed supporting two telescoping pillars, which are in fact a pair of repurposed telescopic construction ladders. As long as you use a ladder that's rated to support a person's weight, two of them shuold have no trouble supporting a bed and a sleeping traveller.
Campervan Hammock Bed
Campervan hammock beds are simple, weight & space efficient, cheap, and very comfy as long as you're sleeping alone.

The campervan hammock bed is one of the easier beds to install. All it requires is heavy duty eyelets on either end. The eyelets should be attached directly to the metal structure of the van. DD Hammocks make excellent lightweight, breathable hammocks that are perfect for camping and vanlife.

L-Couch Bed
The L-couch pull-out bed is a clever and practical option for campervans, offering both seating and sleeping space. This design features an L-shaped sofa that pulls out into a bed at night. The L-shape not only provides extra seating compared to a sliding bed, but also makes lounging more comfortable. When it's time to sleep, the bed extends using sliding slats as with a sliding bed, creating a cozy sleeping area.

Pros:
Space efficient: Serves as both a seating area and a bed without taking up too much room.
Comfortable for lounging: The L-shape provides extra seating space for relaxation during the day.
DIY-friendly: Many online tutorials make it easy to build, even for beginners.
Cons:
Requires daily conversion: The bed needs to be pulled out and put away each day.
Limited storage space underneath: The pull-out design restricts storage options beneath the couch.
Separate table needed: You’ll need to install a separate table for dining or working.

I nearly went with an L-couch bed myself, and designed this one in VanSpace3D before settling on my table bed setup.
Using 80/20 Extruded Aluminium for the Bed Frame
80/20 extruded aluminium is an excellent choice for building a lightweight yet durable campervan bed frame. This material, commonly used in industrial and structural applications, offers several advantages for van conversions, especially in terms of strength, customizability, and ease of assembly.
Benefits of 80/20 Aluminium
Lightweight but Strong: Extruded aluminium offers a high strength-to-weight ratio, meaning you get a durable frame that doesn't add much weight to the van, making it ideal for vehicle applications where keeping the weight down is critical.
Modular and Adjustable: The 80/20 system is fully modular, which means you can adjust the bed frame size to fit your van’s dimensions and your personal needs. The T-slot design allows for easy attachment of additional components like drawers or storage underneath the bed.
Corrosion Resistant: Unlike steel, aluminium doesn’t rust, making it an ideal material for long-term use, especially in humid environments common in van life.
Precision and Clean Aesthetic: The clean, modern look of aluminium adds a professional aesthetic to your build, and its precision cuts and fittings ensure a tight, well-aligned frame.
Components of an 80/20 Bed Frame
To construct a bed frame using 80/20 aluminium, you will generally need:
Extruded T-slot Aluminium Profiles: These come in various sizes, with the 10 Series (1-inch profile) and 15 Series (1.5-inch profile) being popular choices for bed frames.
Joining Plates and Corner Brackets: These secure the aluminium profiles at the corners and junctions.
End Caps: These cap off the open ends of the aluminium for a neat finish.
Slat or Plywood Platform: Depending on your preference, you can attach wooden slats or a plywood board to the top of the aluminium frame to support your mattress.

Assembly and Customization
Ease of Assembly: One of the biggest advantages of 80/20 extruded aluminium is its DIY-friendly nature. Using standard connectors, bolts, and plates, you can assemble the frame without any welding or specialized tools. If changes are needed in the future (e.g., adjusting the bed height or adding storage), you can easily modify the structure.
Customizable Dimensions: You can tailor the bed frame to fit your exact needs, whether it's a fixed platform bed or an adjustable height system that raises the bed during the day to increase usable space below. Many van builders choose to incorporate sliding mechanisms or removable sections to make the bed more versatile.
Weight and Load-Bearing Capacity
Despite its lightweight nature, 80/20 aluminium can support significant loads. For example:
1.5" x 1.5" 15 Series Profiles can typically support hundreds of kilograms when properly braced, more than enough for two people plus storage underneath.
Load Distribution: The modular nature of 80/20 allows for even weight distribution by adding multiple support bars and bracing points. This minimizes the risk of frame sagging under heavy loads.
Cost Comparison
Although 80/20 aluminium tends to be more expensive than traditional wood or basic metal bed frames, the longevity, corrosion resistance, and adjustability make it a long-term investment. Many van builders appreciate the precision and customizability that this material provides, making it worth the initial cost.
If you're interested in building your bed from 80/20 extruded aluminium I highly recommend you check out this very detailed guide from Engineers Who Vanlife.
Maximising Under-Bed Storage
One of the major benefits of a campervan fixed bed is the opportunity it provides for maximising under-bed storage. This space is often referred to as the "garage" area of the van and can be an ideal place to store larger items like bikes, camping gear, or even your gas, water, and electrical systems. Proper organisation and smart design choices can help you make the most of this space.
Adjust Bed Height for Maximum Space
The higher the bed, the more storage you will have underneath. However, it's important to strike a balance between storage space and comfort. Most fixed beds are built at a height that provides around 50-60 cm (20-24 inches) of storage space, which is enough to fit storage boxes, bikes, or water tanks. Measure the largest item you need to store (like a bike or water tank) and use that as a guide for bed height.
Use Drawer Slides for Easy Access
Installing sliding drawers or shelves for boxes on heavy-duty drawer slides is an excellent way to organize and access items under the bed. Drawers can be designed to pull out from the back of the van, allowing easy access to stored items without having to lift the bed or crawl into the garage.

Use deep drawers with dividers to segment items and maximize space. You can customize these for specific items, like kitchen supplies, tools, or sports gear.
Install Storage Cubes or Bins
Modular storage bins and cubes are a practical and cost-effective way to organize under-bed space. Stackable, labeled bins ensure items are kept neat and can be easily removed when needed. Using transparent bins allows you to see the contents quickly without having to open each one.

Choose bins that match the height of the storage area to avoid wasted space.
Store Larger and Infrequent Items
Under-bed storage is ideal for larger, less frequently accessed items like camping gear, spare tires, or off-season clothing. By organizing in a way that keeps daily essentials in more accessible areas and larger gear under the bed, you can make the most of your van’s limited space. Divide your under-bed storage into sections, with everyday items toward the front and larger, less-used items toward the back.
Your Campervan Mattress
The final part of the puzzle to building a campervan bed is to pick a mattress and cut it to size. Memory foam is the best bet for a campervan mattress. It is comfortable and easy to cut.
You will need to cut your campervan mattress into sections. The number of sections will depend on the type of bed you have chosen to build. Since I have a table bed, I needed to cut the campervan mattress into four sections. Two for the bench seats, and two for the backrests.
I marked the four sections with a pen (measuring very carefully and drawing very straight). Cut the campervan mattress with an electric kitchen knife for a clean, straight cut.

The last step is upholstering the four cushions of the campervan mattress. I had zero experience in this domain, so I went to the local upholsterer and got him to do it for me. I chose my fabric and he did an excellent job sewing it all together.
If you are more adventurous and own a sewing machine, here is a really great video on how to sew a box cushion yourself.

If you don't fancy cutting your own mattress to size and then upholstering it, you could look at buying a purpose-built campervan mattress instead. RoamRest are the best known manufacturer of bespoke campervan mattresses, with both one-piece and folding mattresses available in a variety of sizes and configurations.

Ventilation Strategies for Mattress Longevity
Proper ventilation is crucial to extending the life of your campervan mattress. Poor airflow under the mattress can trap moisture, leading to mold, mildew, and deterioration of the foam.
Use of Slatted Bed Frames
Slatted bed frames are one of the most effective ways to promote airflow beneath the mattress. The gaps between the slats allow air to circulate freely, reducing the buildup of moisture. It is advisable to space the slats around 3-4 inches apart for optimal support and ventilation.
Type of Support | Airflow Quality | Notes |
Slatted Bed Frame | Excellent | Allows maximum airflow, prevents moisture retention. |
Solid Platform | Poor | Requires additional measures (ventilation mat) to improve airflow. |
Ventilation Mats
Installing a ventilation mat under your mattress can significantly improve airflow, especially if you have a solid bed base. These mats create a small gap between the mattress and the platform, allowing air to circulate and moisture to evaporate. A ventilation mat is especially important if your setup uses a solid plywood base as opposed to slats.

Raising the Bed Frame
If possible, raising the bed frame off the floor by a few inches can enhance airflow beneath the bed. Even small elevation changes can make a big difference, particularly in humid environments. This setup works best when combined with slatted bases or ventilation mats.
Ventilating Your Van
Good overall ventilation of the van contributes to mattress longevity. Use roof vents or side window vents to prevent condensation from building up, especially overnight.

For maximum impact, pair van-wide ventilation with under-mattress solutions to maintain a dry sleeping area.
Conclusion
You should now feel equipped to design your own campervan bed setup, finalising the centrepiece of your interior build. Don't forget to check out our overview of campervan carpentry for a huge amount of important information on materials, carpentry techniques, and recommended tools. Next, you might like to check out our guide on campervan table setups.
Before you get started, make sure you check out the excellent VanSpace3D for experimenting with your furniture layout and design.
Planning your van conversion?
Start with the free Van Conversion Diagram Pack below.
Want a clear step-by-step path for your full build?
The Van Conversion Mastery Course walks you step-by-step through the entire build process — from planning and layout to electrics, insulation, water, gas, carpentry, and more.
Until next time.