A Complete Guide to Campervan Ski Storage (2026)
- Shane Monks O'Byrne

- Aug 19, 2025
- 20 min read
Updated: Apr 8
Living in Chamonix, skiing isn’t just a hobby – it’s a religion. But after several winters of struggling with limited campervan ski storage, cramming skis into a single interior rack, space was tight and wet gear was a constant hassle. I needed a solution that could handle multiple pairs of skis, keep the mess outside, and still be easy to load after a day on the slopes or in the backcountry. In this guide, I’ll compare the most effective ski rack for campervan setups and show you step-by-step how I installed a purpose-built rear door ski box and built my own DIY ski box – a cost-effective, weatherproof way to carry all your winter gear storage in a ski town like Chamonix. By the end of the guide you will have a complete understanding of how to store skis in a van.

Shane is an NCC-certified electrical installer.
He has built, taught, and lived in campervans since 2019.
This post contains affiliate links. We may earn a commission at no extra cost to you. To understand our policies on content, affiliate commissions, and liability, please review our Terms of Use.

In this guide
Comparing Campervan Ski Storage Solutions
You're probably here because you're wondering how to store skis in a van. Well, before drilling any holes, it’s worth considering all the ways you can mount skis on a van. Each method has pros and cons in terms of cost, convenience, and security.
Note: If you are building a van for winter vanlife, you may be interesting in our article on how to winterise your campervan
Now then... here’s an overview of common ski storage solutions for campervans:
Interior Wall or Ceiling Ski Racks
Mount skis inside on a wall or ceiling. In my previous van conversion, I opted to go for a wall-mounted ski bracket above the sliding door. It was easy to build; I simply bolted two L-brackets together to create a U-shape, then I screwed it to the support beams of the van.
Pros | Cons |
Skis stay warm and dry (heater can help dry them... read our guide on diesel heater installation) | Take up valuable interior space |
Secure from theft | Meltwater can drip inside → potential moisture issues |
Requires mess management (drip tray, mat, etc.) | |
Limited capacity: usually one set of skis, maybe two at most |
I've had this setup for years and it's treated me well. This campervan ski rack even doubles up as a coat-rack you can hang things on. However, I now want to be able to carry multiple skis with me, so I need a better option.

If you didn't want to build your own, you could also get something cheap and cheerful ski rack from Amazon.
If you want to mount a pair of skis on the ceiling of your van, rather than the wall, I recommend mounting two of these ski clamps. They can easily screw/bolt into the ceiling and will easily hold a pair of skis. I have a good friend who has used this exact method for years.

Under-Bed “Garage” Storage
Slide skis under a raised bed or in a rear “garage” compartment. This is one of the most common way of storing skis in a campervan. Read our full guide to campervan beds

I recommend lining the floor with waterproof rubber floor mat if you go with this method. The skis are guaranteed to drip water on the floor and will eventually cause damage to the wood or subfloor.

Pros | Cons |
Keeps gear hidden and interior tidy | Requires a long wheelbase van to fit adult skis (~160–200 cm) |
Longer skis can fit with a diagonal slot or passthrough | Wet skis still end up inside (unless garage is isolated/waterproof) |

If you want to build a ski drawer in your garage like the image above, you will need some heavy duty drawer runners.

Roof Rack for Skis (Thule rack)
Attach skis directly to a roof rack using ski-specific mounts (similar to car ski racks) and mount on your van.

The Thule SnowPack is a particularly popular roof rack for skis. I personally know many people who use this system in Chamonix.

Pros | Cons |
Frees up all interior space | Skis exposed to weather, road grime, theft, and salt spray |
Quick to load/unload if you can reach the roof | Must climb/reach roof → risky in icy conditions |
Lower cost than a full roof box | Requires regular cleaning/drying to prevent rust & binding issues |
Here's a video showing you how to install the popular Thule Snowpack 👇
Rooftop Ski Box
Use a rooftop ski box (like a Thule or Yakima box) to enclose skis and gear.

Pros | Cons |
Frees up all interior space and keeps wet equipment outside | Climbing onto a slippery roof to stow skis is inconvenient and unsafe in winter |
Locked box protects gear from theft and the elements | Adds height → risk with low clearances |
Keeps skis cleaner than an open rack | Increases wind drag, reducing fuel economy |
Roof box locks can freeze shut; gear may still need drying to prevent rust |
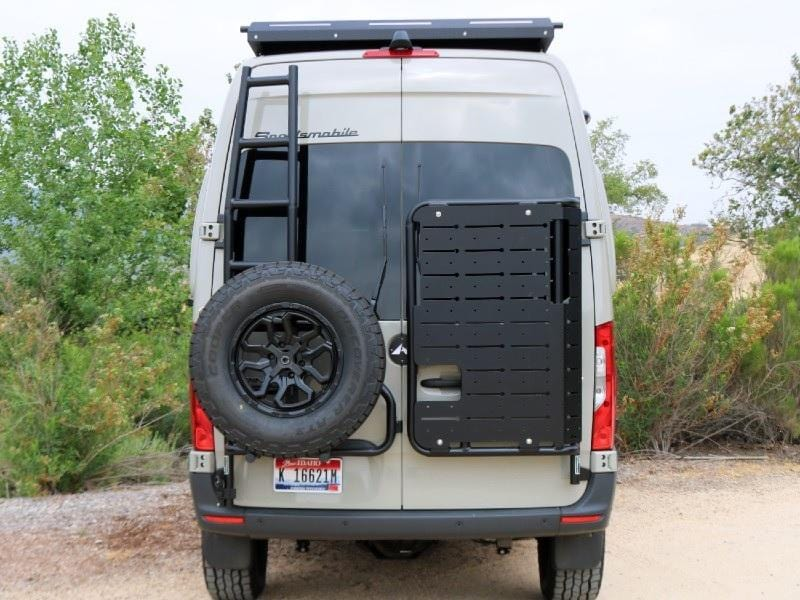
Rear Door Ski Rack
Attach skis directly to a rear door rack using ski carriers similar to Thule SnowPack, but mounted vertically on the back door.

If you look closely, you'll see that this is pretty much just a rear door rack with two Thule Snowpacks bolted on to secure the skis.
Pros | Cons |
Easy to load/unload — no ladders required | Skis exposed to weather, road grime, and salt |
Keeps skis outside, freeing up interior space | Requires locking mounts for theft protection |
Lighter and less bulky than a full box | Adds weight to the door; hinges bear the load |
Less impact on wind drag compared to a roof mount |
Some people use that same method (the side mounted Thule Snowpack) inside their van, but in a self contained garage at the very back (like the image below shows)

Hitch-Mounted Ski Rack/Box
Use a hitch ski rack or a hitch cargo box.
Pros | Cons |
No door modifications; attach/remove as needed | Blocks rear doors unless using a swing-away/tilt hitch mount |
Some hitch racks tilt or swing away for door access | Adds overall length; can impede parking or trigger rear sensors |
Exposes skis to road grime and salt unless using a weatherproof box | |
Quality hitch systems are pricey, and not all vans have a hitch receiver |

Rear Door Ski Box (My preferred method)
Mount a cargo or ski box on the rear door. This is what I've opted to go for on my new van conversion.

Pros | Cons |
Easy access — no ladders needed | Adds significant weight to the rear door — must avoid slamming |
Keeps gear completely enclosed, dry, and out of sight | Slightly increases van length, affecting parking and clearance |
Can be large (200+ L) without affecting roof height | May require a dedicated mounting system |
Preserves a warm, dry interior by keeping wet skis outside | Buying a pre-made box can be costly |
Next, let’s look at what the market offers for rear ski boxes and why I chose to build my own.
Commercial Rear Door Ski Box Options
If fabrication isn’t your thing, several companies sell purpose-built campervan ski storage boxes. These rear-mounted ski lockers are designed to carry skis vertically on a van’s back door or ladder system. They typically feature aluminum construction, locking latches, and seals to keep out weather. Here’s an overview of some popular products in the USA and Europe:
Rover Vans Ski Box (USA): A concept by Rover Vans (Illinois, USA). It’s an all-aluminum, TIG-welded box with a black powder coat and weather seals. The “Large” size is about 79″ tall × 16″ wide × 14.5″ deep externally, accommodating skis up to 200cm. It runs about $1,999 for the large and $2,295 for an XL variant. Rover’s box works with their own door rack or other brands’ racks (drilling may be required) and includes internal mounting brackets for skis/snowboards. Essentially, it’s one of the longest ski boxes on the market, built to last, but again comes with a premium price tag.

RB Components Large Ski Box (USA): RB Components offers a rear door “Adventure Box” that many van upfitters use. It measures ~80″ H × 24″ W × 16″ D and weighs ~35lbs, giving about 30 cubic feet of storage (~850 L). It’s made from 0.090″ aluminum, has adjustable hinges and a MOLLE-pattern exterior panel for additional gear. Price is roughly $1,900–$2,400, and it’s often seen on Sprinter builds. This is a very spacious option (it can hold multiple skis plus gear) but requires a compatible door mount and a healthy budget.

Sandy Vans “Tall BoostBox” (USA): Sandy Vans makes a modular storage box system for Sprinters and Transits, with the Tall BoostBox being their dedicated ski/board locker. It’s built from lightweight aluminum with a powder-coated finish, weather seals, and internal organization. Dimensions are ~80″ H × 16″ W × 15″ D, giving plenty of room for skis up to 200 cm. Pricing starts around $2000, and it mounts directly to Sandy Vans’ BoostBox rack system. A slick option for vanlifers who want a more integrated storage solution.

Tec Vanlife Ski Box (Canada/USA): Tec Vanlife (British Columbia) produces a highly regarded rear-mounted ski/gear box designed for Sprinters. It’s CNC-cut aluminum with a powder-coated finish, weather-stripped door, and lockable latch. The standard ski box is ~78″ H × 18″ W × 16″ D, fitting skis/snowboards up to 200 cm. Internal racks for skis/poles are included. Price is around CAD $2,800–$3,200 (~USD $1,900–$2,400), plus shipping. Tec’s design is very clean and durable, though it’s primarily tailored for North American Sprinters.

Dutch Van Parts “Sequoia” Box (EU/UK): In Europe, a notable product is the Sequoia Board/Ski Box by Dutch Van Parts. It provides ~550 L of storage – enough for skis, snowboards, or even surfboards up to 200 cm long. It’s a fully welded aluminum box (approximately 200 cm tall × 60 cm wide × 46 cm deep) with internal shelf and ski pole holders included. It costs about €2,235 (ex VAT) (~£2,000 or $2,500) plus shipping. It’s designed to bolt onto a rear cargo ladder system, giving flexibility in mounting height.

As you can see, buying a rear ski box is a significant investment. The ski box alone often exceeds $2,000, and when you factor in the mounting system you could be hitting the $4,000 mark. Kind of insane. However, they excel in convenience: bolt it on and go. The decision boils down to budget and priorities: Is the turn-key solution worth the premium, or would you rather save money and get a bit hands-on?
Buy vs. DIY Ski box: Cost and Considerations
For my van, I chose to build a DIY ski box – mainly to save money. Below is a frank take on buying versus building:
Buying (Ready-Made)
Pros: Minimal effort and time. You get a product engineered for the task, often with nice features (internal racks, drain plugs, etc.) and a factory finish. Compatibility with your van’s door system is known (especially if made for your van model).
Cons: The cost is the biggest deterrent – expect $1.5K to $2.5K for the ski box alone, another $1k to $1.5k for the mounting system. Additionally, availability can be an issue (lead times of weeks or months). Some systems also require drilling or purchasing extra brackets (e.g. door plates), adding to cost and complexity.
Building (DIY)
Pros: Big cost savings and customization. You can mix-and-match components (as I did with a generic aluminum box and a separate door rack) to suit your needs. My entire DIY setup came in at less than half the price of a commercial ski box. If you enjoy hands-on projects, it’s rewarding and you learn new skills.
Cons: It requires time, tools, and a bit of DIY skill. You’ll be drilling into metal, aligning parts, and ensuring weatherproofing yourself. The finished product might not be as polished; for example, a generic box may not perfectly fit skis upright (you might have to angle them or use it for boots/gear instead). Also, any DIY solution is on you to ensure it’s safely mounted and won’t rip off on the highway – there’s little room for error in assembly.
Cost Savings: In my case, the numbers speak volumes. A comparable ready-made ski box setup was well over €2,500. Instead I bought a generic aluminium box for 700€ (this one from Big Fic in France).

But as I mentioned previously, the ski box is only half the total price, you also need a mounting system.
Choosing a Mounting System for Your Rear Door Ski Storage
Before you can attach a ski box or rack to your campervan’s rear door, you need a secure mounting system. This is the foundation that will carry the weight of your gear and withstand the constant vibration, wind load, and weather exposure of van life. A solid mount is non-negotiable — cut corners here and you risk damaging your door, losing your box on the road, or both.
Purpose-Built Rear Door Racks
These are professionally designed systems that bolt directly to your van’s hinges and/or door structure, distributing weight across strong points. They’re usually modular, letting you attach different accessories (boxes, bikes, jerry cans, skis) interchangeably.
Wheeliams Modular BackRack (UK) – The system I used. Heavy-duty steel/aluminium frame, 50 kg capacity, model-specific kits (drill-free for Sprinter, minor drilling for Ducato/Relay/Boxer). Adjustable horizontal rails make box mounting straightforward. It cost me 650£ (which I paid customs on to import to the EU).

RB Components Rear Door Gear Rack (USA) – A steel/aluminium rack with MOLLE-style panels that lets you mount gear boxes, skis, recovery boards, and other equipment. Designed mainly for Sprinters, it spreads load across the hinges and door structure. Price is around $1,695, and it’s frequently paired with RB’s Adventure Boxes.

Sandy Vans “Starboard” Rack (USA) – A sleek aluminium rear door rack designed for Sprinters and Transits. It uses a modular panel system with plenty of tie-down and mounting points, making it easy to attach ski boxes, storage lockers, or bikes. Sandy Vans markets it as lightweight but strong, keeping install simple while giving flexibility for different accessories. Pricing runs about $1,600–$1,800 depending on configuration.

Owl Vans Sherpa (USA) – Popular with Sprinter and Transit owners. Aluminium plate system with slotted mounting holes for multiple accessories. Usually paired with Owl’s Alpine Box, but works with generic boxes too.

Aluminess Rear Door Racks (USA) – Aluminium tube frame racks designed for Sprinters, Transits, and Promasters. High capacity, powder-coated, often integrated with ladders or tire carriers.
Flatline Van Co Rear Door Rack – The modular rear door rack from Flatline can carry anything from a ski box to maxtrax, or more. It is very similar to the Aluminess rack shown before.

In general, you are looking at a price tag of $1,500 for these rear door mounts. The company in the UK I went for was Wheeliams, which came in a little bit cheaper at £650.
Purpose-built rear door racks are strong, safe, and modular, spreading the load across hinges and the door frame for maximum stability. The trade-off is a higher upfront cost, with some models being van-specific and often requiring paint or powder coating for weather protection.
DIY Rack Alternatives (If You Don’t Buy a Mounting system)
What if you don’t want to purchase a $1,500+ door rack? There are DIY alternatives to mount a ski box, though they come with caveats:
Aluminium / Steel Profile
A cheap and simple method you could use would be to bolt a couple lengths of aluminium or steel (stainless steel preferred) rectangular profile to your back door. You can then bolt your box directly onto the profile. You could do this for less than $100!

You could also look at using Unistrut or 80/20 extruded aluminium for a more modular installation. It will be far easier to pass bolts through this material and would be the preferred method over the steel profile aforementioned.

Note: be mindful of galvanic corrosion. If you use aluminum on a steel door or mix metals, isolate them (use rubber washers or anti-corrosion paste) so they don’t corrode each other over time.
Also be aware that if you use steel (not stainless) you will need to prime and paint it so that it doesn't rust.
Rear Ladder Hacks
If your van already has a rear ladder (for roof access), you might adapt it to carry a ski box. For instance, some ladders have flat platens or you can U-bolt a lightweight box onto the ladder’s rungs. This keeps drilling minimal (since ladder is already mounted).

In summary, a purpose-built rack is the safest bet for heavy loads (plus it’s modular for future needs). But if you’re only mounting a fairly light box for a pair of skis, a well-reinforced DIY mount can do the job. Whichever route you choose, always err on the side of over-engineering the attachment – you don’t want your box wobbling or ripping off on a bumpy mountain road.
Now, let’s dive into the step-by-step installation of my rear door mount (Wheeliams) and the DIY Ski Box. The process is divided into two parts: first installing the rear door rack, then mounting and outfitting the ski box. I’ll also mention some alternative approaches along the way for those who might want to improvise a rack.
Still figuring out your van build?
This is where most people get stuck — jumping between blog posts, YouTube videos, and forums, never quite sure what to do next.
The Van Conversion Mastery Course gives you a clear, step-by-step system to design and build your van from start to finish — without the guesswork.

Part 1: Rear Door Rack Installation (Wheeliams BackRack)
To mount a heavy ski box on a campervan rear door, you need a strong support structure. I used the Wheeliams Modular BackRack, a hinge-mounted rear door rack system built in the UK. It’s a versatile cargo rack that provides a metal frame and adjustable horizontal rails to secure boxes, jerry cans, bikes, etc. Similar racks or rear door ladder systems (like Owl Vans Sherpa, Aluminess ladder racks, Flatline Van Co ladders, etc.) could also work – but I’ll focus on the Wheeliams rack I installed on my van.
Step-by-Step Installation: rear door rack
Step 1: Paint the rear door mount
The Wheeliams BackRack I bought ships in bare metal (to avoid shipping damage to paint & allowing you to paint in whichever colour you choose). The key to painting metal that will live outdoors is proper prep and primer.
Note: Aluminium is notoriously hard for paint to stick to, so follow these steps and don't skip anything!
First, I lightly sanded the entire steel frame in circular motions. Then I wiped it down with isopropyl rubbing alcohol (degreaser will also work).

Then I wiped the entire surface down with a microfibre cloth.

Then I applied two coats of self-etching primer. Leave about 10 minutes between each coat. Etch primer is crucial for aluminum parts in particular, as it chemically bonds to the metal for better adhesion. The use of a respirator mask (or normal PPE mask at very least) is highly recommended as etch primer in particular is pretty awful stuff.

After priming, I sprayed multiple thin coats of matte black paint (RAL 9005 to match my ski box).

Step 2: Mark the drill holes on the van
With the help of a friend, I held the BackRack up against the rear door to position it. (Having a second person here makes a huge difference – the rack is ~14 kg and awkward to juggle alone.) We made sure it was aligned correctly with the door and hinges.
I marked the holes to be drilled. For my Relay, this meant marking one spot on each rear door hinge and two spots on the door panel for the left-side support bracket.


Top hinge, bottom hinge, and interior drill locations
Note the interior drill location should be 25mm minimum from the edge of the door.
Step 3: Drill the Holes
I drilled a pilot hole (~4 mm) through the hinge on each marked spot. Then I stepped up to the final 9 mm size bit to enlarge the holes. Going slow and steady is key; let the drill do the work.


After drilling, I cleaned up burrs with a deburring tool and applied a dab of metal paint to the raw edges to prevent rust. Read our full guide on rust prevention.(depending on the model van you have, you may skip this drilling – instead, you’d remove the inner hinge bolts and later re-use those holes with the provided brackets.)

Step 4: Attach Rack to Hinges
Before attaching the rack to the van, I recommend you first line up your ski box with the rack and mark any drilling locations you need to make on the box. I'll be discussing the ski box installation in detail later.

We lifted the BackRack into place and aligned the hinge bracket and interior brack with the holes we just drilled. The kit’s hardware included hex bolts that go through the hinge into the rack’s brackets and torx bolts for the interior holes. I inserted the bolts (with washers & nyloc nuts) and tightened them down. Use a torque wrench if you have one: M8 bolts go to ~24 Nm, M6 to ~10 Nm. Don’t overtighten and strip anything.


Tightening the hinge bolts and interior bolts
Before bolting the rack’s panel bracket to the door, I applied a touch of Sikaflex sealant on the mating surface to help waterproof.

The door rack installation was now complete. I stepped back and checked that the door opened and closed smoothly with the rack on. (It will feel heavier; remember not to let it swing in the wind and never slam a door with extra weight on it – always close gently.) If you have 270° opening hinges, test carefully – in some cases a rear box could contact the side of the van when doors are swung fully open. Medium wheelbase vans often have a long door check strap (“extended bumper”) to prevent door-to-van contact.
Now that our rear door rack was installed and ready, it was time for the fun part: mounting the big ski box and turning it into a mobile ski locker!
Part 2: DIY Ski Box Fabrication & Mounting
For the actual storage box, I opted for a BigFic 230L aluminum box – a generic cargo box that turned out to be perfect for this DIY project. It’s originally meant for vehicles (often used on trucks or trailers), and its specs caught my eye: all-aluminum construction, lockable, waterproof, and relatively lightweight. The model I got has 230 liters of volume and exterior dimensions of 850 × 500 × 600 mm (W×D×H), which is about 33.5″ × 19.7″ × 23.6″. It cost me around €700 (about $800).
I decided to mount the box with its hinge on the right side. This way, when it’s on the right rear door, the lid opens toward the passenger side (curb side), giving me unobstructed access.
Step-by-Step Installation: DIY Ski box
The diagram below shows what we're aiming for in this installation. The box is secured with an M8 bolt to the rear door mount (with a nyloc nut). On the inside and outside is a rubber strip. On the very inside is a metal backing plate to help distribute the load and take the pressure off the thin aluminium.

Step 1: Mark Holes on Box
I decided to install 3 M8 bolts up high on the box, and 3 M8 bolts down low. I placed the ski box against the rear door rack (before installing it on the rear door) and marked with a sharpie the appropriate drill locations.

Step 2: Drill Box Holes
I removed the box and drilled at the marked spots. Aluminum is much softer than steel, so drilling the M8 holes was easy. Still I made sure to drill pilot holes first to prevent wandering. I also applied a bit of primer on the raw aluminum edges to help prevent any possible corrosion (aluminum self-protects with oxide, but a coat of paint doesn’t hurt and may prevent galvanic corrosion).

Step 3: Drill the backing plate
Aluminium is very soft metal so I highly recommend installing a stainless steel backing plate on the inside where the bolts go through. I cut two pieces of 2mm sheet steel to size, then drilled the M8 bolt holes through the steel sheet.

Step 4: Drill the rubber sheet
In order to waterproof the box, add some shock absorption, and add some protection from galvanic corrosion, I recommend installing rubber on the inside and outside of the box where the bolts go through. You can get a roll of rubber on Amazon.

Cut the rubber roll to size (matching the width of the steel backing flange).

Then punch out the bolt holes with an awl and increase the size to M8 with a drill.

Step 6: Install ski holders on the inside
There are many ways you can secure skis inside the ski box, from straps to clamps to Thule SnowPacks. The installation will differ slightly depending on your chosen method. You will certainly need some method of securing skis to the inside in order to prevent them from flying about when you're driving.
The easiest method would be to bolt two ski clamps per set of skis you plan on having (one high on the ski, one low on the ski).

Alternatively you could bolt two small (2-ski) Thule Snowpack to the inside.

You should install the ski holders using the same method as the rest of the bolts going through the box - rubber on the inside and outside (small rubber washers will do)
Step 7: Install rubber matt on floor
I recommend installing rubber matt on the base of the box. It will protect the base of the box from inevitably getting scratched by the skis.

You can stick the rubber mat to the base of the box using spray adhesive or an adhesive like sikaflex 522.
Step 8: Drill a drainage hole
If you don't drill a drainage hole in the base of the box you will have a lot of snowmelt with nowhere to go collecting in the base of the box. Drill a small hole(s) through both the rubber and metal in the base (M6 will do).
Step 9: Mount the ski box on the rear door frame
Slip the M8 bolts (with washers) through the steel backing flange, rubber strip, and the ski box.

Then add the rubber strip on the backside of the box.

With the help of a friend (trust me, it will help), mount the box on the rear door rack. Add on the back washers and nyloc nuts (resistant to vibrations). Then tighten down the bolts. A torque wrench is recommended so as not to overtighten and strip the nuts.

Finally, I relubricated the box’s locks with silicone spray after painting, to ensure smooth operation in cold weather. A little spray in the lock mechanism helps prevent freeze-up.
Conclusion & Key Takeaways
And that's all she wrote! I was very happy with how the whole project turned out, it looks very professional.

Building and installing a rear door ski box has been a game-changer for my campervan. Now I can chase powder days around the Alps with a place to stash all our skis, boots, and snowy gear outside the living area. No more crowded aisle or melted snow puddles inside the van!
To recap the important points for your own campervan ski storage project:
Evaluate Storage Options: Consider interior vs exterior solutions. For frequent skiers, an exterior box keeps the wet mess out of your van and frees up space – a big win.
If Buying, Choose Wisely: There are excellent ski-specific boxes on the market (Owl, Rover, etc.) but they are expensive. Make sure they fit your van’s mounting system and ski lengths. They’re ideal for those with the budget or less DIY inclination.
DIY Cost Savings: You can replicate the functionality of a $2,000 ski box setup at roughly half the cost by pairing a door rack with a generic aluminum box. The trade-off is your time and labor (a few hour's work). For many van builders, that’s a trade worth making.
Quality Rack is Key: However you mount your box, ensure the support structure is strong. A purpose-built rear door rack (like the Wheeliams BackRack) provides a safe foundation and can be used for other gear in the off-season. It’s a worthy investment for vanlifers carrying lots of equipment.
Take Your Time with Install: Measure twice (thrice even) and drill once. Use proper hardware (stainless steel, nyloc nuts, large washers). Waterproofing is crucial for longevity – you want this upgrade to last through many winters.
Safety and Tools: Wear eye protection when drilling metal, use clamps instead of hands to hold things whenever possible, and get a helper for lifting and aligning heavy parts. When spray painting aluminum or any metal, use an etch primer and wear a respirator mask. Your lungs and your paint job will thank you.
With a bit of effort, you can create your own DIY campervan ski box that rivals the pricey commercial ones. My van now carries multiple skis or boards securely on the rear door. It’s truly like having a mini “ski locker” on wheels, and it makes winter vanlife so much more organized.
Planning your van conversion?
Start with the free Van Conversion Diagram Pack below.
Want a clear step-by-step path for your full build?
The Van Conversion Mastery Course walks you step-by-step through the entire build process — from planning and layout to electrics, insulation, water, gas, carpentry, and more.
Until next time.