
How to Build a Tilting Solar Panel Mount for Your Campervan (and 3 Reasons Why You Should)
- Chris Wallace-Tarry
- Jan 14
- 32 min read
Updated: Apr 12

Standard flat mounting of solar panels makes sense for a lot of people; it's simple and solid, and maximises sun exposure on a platform whose orientation is constantly changing. However, unless you live quite close to the equator, flat-mounted solar panels suffer heavily in winter. Our latest van build is planned for year-round use, including for winter trips in the Alps and Scandinavia. For that reason, we decided to mount our solar array on a tilting solar panel mount. This allows us to raise the panels until they're perpendicular to the sun even when it's at a very low angle, maximising solar generation.
This seemed like an ambitious project at first, but we broke it down into manageable steps, and the final product works brilliantly. In this article, we'll go over the theory behind a tilting solar panel mount, who they're for, and how to build one yourself.

Shane is an NCC-certified electrical installer. He has built, taught, and lived in campervans since 2019.
This post contains affiliate links. We may earn a commission at no extra cost to you. To understand our policies on content, affiliate commissions, and liability, please review our Terms of Use.
In this guide
Why Build a Tilting Solar Panel Mount?
Domestic solar panels are almost invariably mounted at an angle. This is because the sun is almost never directly overhead; in the Northern hemisphere, it tracks across the sky to the south of the observer. The angle of the sun's path changes over the year; in summer, it's high in the sky, giving us very long days. In winter, the sun's path is low in the sky, close to the horizon.

Solar panels are most effective when the sun is pointing directly at them; when sunlight hits them at a 90° angle. For this reason, it makes sense to tilt them towards the sun. The data bears this out; one study using identical solar arrays demonstrated that at a latitude of 45° north (Portland, USA and Milan, Italy), tilting the array to the South increased annual solar generation by 18% [1]. This benefit is greater in winter; a Swiss study demonstrated 30% increased solar generation in winter with a 30° tilt [2], and a Norwegian study demonstrated 30% increased winter solar generation with a vertical solar array [3]. These are substantial increases, and they're even more desirable in a campervan.

If your desire to live in your van through winter is based around winter sports, a tilting solar panel rack is a very good idea. The mountains you seek out block the low winter sun from reaching into the valleys where you park, effectively shortening your days further. If your solar panels are only going to actually see the sun for a handful of hours a day, you want to absolutely maximise their efficiency during those hours. That 30% solar generation increase will make all the difference.
In an off-grid campervan, solar power is a major component of your electricity generation. In winter, you use far more electricity than in summer; even if your heating and cooking runs on gas or diesel, you spend much more time in your van due to worse weather and shorter days. Boosting your winter electricity production is vital if you want to enjoy the van life without worrying about draining your batteries.
The Benefits of a Tilting Solar Panel Mount in Numbers
We can determine the benefit of installing a tilting solar panel mount by comparing solar generation figures for a given solar array at different tilt angles. The benefit varies across the year and with latitude; you see a bigger benefit at high tilt angles at high latitudes in winter. We've used the PVWatts solar generation calculator to estimate output figures for a 500W solar panel array tilted south at a variety of latitudes, from near the Arctic Circle to the Mediterranean.

We've plotted these data on graphs below:


From the data, we can see that at high latitudes, a tilt angle of 40° gives us the biggest benefit over the whole year, whilst at lower latitudes, 30° is better. This trend would continue as we moved southwards, with decreasing benefits as we approached the equator.
However, we can also see that the effect of tilt angle changes over the year. At very high latitudes, tilting solar panels to 70° or 80° offers a benefit in winter, whilst in summer, 30° is best. Thus, a solar panel tilt angle that we can vary over the course of the year actually gives us optimal solar generation. Taking the data for London as an example:
Annual solar generation with no solar panel tilt: 389kWh
Annual solar generation with optimal fixed tilt (40°): 465kWh (+19.5%)
Summer solar generation at optimal 30° tilt: 340kWh
Winter solar generation at optimal 60° tilt: 139kWh
Annual solar generation with variable tilt (30° in summer and 60° in winter): 479kWh (+23%)
This benefit would increase if we varied our solar panel tilt month by month across the year. Using the PVWatts calculator, we can determine the optimal solar panel tilt angle for each month of the year:
London, UK; Calgary, Canada: Optimal Solar Panel Tilt Angle by Month | ||
Month | Angle | Solar Generation (kWh) |
January | 70° | 18 |
February | 60° | 23 |
March | 50° | 36 |
April | 40° | 57 |
May | 20° | 58 |
June | 20° | 64 |
July | 20° | 64 |
August | 30° | 53 |
September | 50° | 48 |
October | 55° | 27 |
November | 70° | 21 |
December | 70° | 14 |
Total | 483 | |
Optimising our solar panel tilt angle throughout the year gives us a total annual generation of 483kWh, an increase of 24% over a fixed 0° solar panel. The benefit is most marked through winter. By optimising our solar panel tilt between October and March, we increase our solar generation from 76kWh to 139kWh; an increase of 55%. This would be a very noticeable increase in available electricity day-to-day.
These data demonstrate some important things:
First, that solar generation can be significantly improved even in summer by tilting our solar panels.
Second, that the benefit is more pronounced in winter.
Third, that optimal tilt angle for solar generation varies throughout the year.
Finally, we can also see that the benefit of continually varying tilt angle through the year is minimal compared to setting it at 30° from April to September and at 60° from October to March.
Who is a Tilting Solar Panel Mount For?
As we've established, all solar installations benefit from an ability to tilt. However, the complexity and added expense of implementing a tilting solar panel mount mean it's still not for everyone.
Are You Limited by the Size of Your Roof?
When you're calculating the size of your solar array, you're limited by the size of your van's roof. Depending on the size of your van, your daily sunshine hours, and your projected electricity usage, you might find that your roof isn't actually big enough for the solar array you'll need. You may also like to use your roof space for more than just panels. Roof vents, fans, and storage racks are all common and desirable upgrades that take up roof space.
Seeing as winter is the time you'll be generating the least power from your panels, it's your winter generation potential that dictates the size of your array. By tilting your panels to 60° throughout winter, you can increase your solar generation by 55%, meaning you could install an array that's 55% smaller by wattage.

Will You Live Off-Grid in Your Van in Winter?
This was the deciding factor in our choice to install a tilting solar panel mount on Shane's new van. He'll be living in his van all year in central Europe, where his on-paper solar generation would drop by more than 60% in winter compared to summer. Worse than that, he'll be spending winters parked in Alpine valleys, where the mountains further reduce sunlight hours. As it is, we're installing a whopping 555W of solar capacity on his van. The non-negotiable installation of a roof vent and fan reduce the available space for solar panels. Putting the array on a tilt provides a huge boost to the van's solar input, giving Shane peace of mind during the shortest days of the year.

Implementing a tilting solar panel mount provides another bonus in winter; with the panels tilted to their optimal winter angle of 60°, they're much less likely to collect snow. Snow is a major issue for solar panels, as it needs to be brushed off them before they'll generate any power. When I spent winters in a van, every snowy morning would start with me on a ladder, clearing snow off my panels. I'd have been much happier had my panels been at a steep tilt, shedding the snow before it had time to stick.
Will You Spend a Lot of Time Parked?
Due to the relatively small size of my solar array, it was driving around that kept my leisure batteries charged during the darkest months. This worked fine for me, as I was travelling across the mountains of Turkey and Georgia, and never spent more than 2 or 3 days in one place. The van was my only vehicle, and I used it to get from my overnight sleeping spots to the bottoms of ski hills. Thus, my DC-DC charger ran often enough to pick up the slack from my solar panels.
If you don't want to have to pack up and go for a drive just to keep your batteries alive, you'll have to rely more heavily on solar power. In this case, the added solar generation gleaned from mounting them on a tilt will be a noticeable upgrade.
In the end, it's the combination of full-time winter use without a lot of driving around that makes a tilting solar panel mount worth considering. You might be able to get away with just adding solar capacity to get you through winter if your electricity use is modest. Staying on the move and relying on your DC-DC charger would also do the job. However, if your consumption is medium-to-high and you want to be able to park up for more than a couple of days, putting your solar panels on a tilt is the only way you'll be able to make the weak winter sun work for you.
The Elements of a Tilting Solar Panel Rack
Let's start looking into how to actually put a tilting solar panel mount together. The principle components are:
Fixed roof supports: these are the structural elements which will be permanently fixed to your roof. They're what the moving component will be hinged to, and they'll take most of the weight of the panels, so they need to be sturdy.
Hinges: your panels will connect to the fixed supports with hinges. These hinges are also a crucial weak point of the whole mechanism, so they need to be tough and there need to be enough of them.
Rack: most solar panels are framed with thin, bendy aluminium. This isn't sturdy enough to support the weight of the panels at a point as they hinge up and down, so your panels will need to be fixed to a strong, rigid rack.
Lifting mechanism: if you go with manually lifted panels, you need some way of locking them in place at your desired angles. The other option is motorised lifting, for which you'll need linear actuators.
Locking mechanism: it's important that your panels clamp down securely for driving and storms.
Roof Mount
The first element to figure out is the fixed rails on your van's roof to which the solar panels will attach with hinges. These elements need to be raised a few centimentres off the van's roof, as there needs to be room under the panels for wiring, connectors, and entry glands. They need to be very sturdy, and fixed somehow to your van's roof.
T-slot Aluminium Extrusion Rack
T-slot aluminium extrusion (often sold as “80/20”) is a modular framing system: lightweight aluminium sections with continuous grooves that accept sliding T-nuts, so you can bolt brackets anywhere along the rail without drilling holes.

As a fixed base rack for a tilting solar mount, it’s popular because it’s (1) drill-free and adjustable, sturdy, lightweight, easily adjustable for panel spacing, cable routing, and future add-ons, and modular.
To fix it sturdily to a van roof, most builders either:
mount dedicated feet into the van’s structural roof members using rivnuts, then bolt the extrusion down
use custom hardware kits which clamp to the existing roof lugs. Many modern vans have t-shaped roof lugs/pins intended for the mounting of roof racks. You can buy roof rail fixing brackets which fix to these and provide solid mounting points for bolts.
We really like the simple, drill-free solution provided by roof rail fixing bracket kits. Using these, you'll be building a solar panel rack that's as sturdy as a professional roof rack without having to drill into your van's roof. North Star Off-Grid have an excellent video on building a custom tilting solar panel mount where they use these to great effect.
Use a Dedicated Roof Rack or Rail System
A very simple solution for a solid mounting base is to simply mount a pre-built roof rack or roof rails. There are many professionally-made roof racks available for all van models. As long as you choose a model with flat, square structural elements rather than curved ones, you'll have a perfect surface to which to bolt your hinges. For example, Tec Vanlife's modular rack attaches to your van's existing roof mounting points, has plenty of pre-drilled bolt holes for attaching hinges, and is compatible with L-track hardware.

Build a Custom Roof Rack
This is the toughest option, but probably the cheapest, and it might be the only option if T-slot extrusion is unavailable where you live. There's an infinite number of ways to build a wholly custom roof rack, but it generally involves the installation of two long metal profiles along the long edges of your van's roof. Rivnuts are a good option for mounting these, and you'll need to ensure that you're using backing plates inside your van to spread the weight. Crucially, the metal profiles need to be bolted to the van's structural metal frame elements which run between the front and rear corners of the roof.
Hinges
Most DIY tilting racks use either a continuous (piano) hinge or 2–4 discrete strap/leaf hinges per panel. A piano hinge is popular because it spreads the load across its full width, reducing point-stressing. Discrete hinges can work just as well, but you need them beefy and sufficient in number to avoid point-stressing and flex of the whole assembly. Once mounted, the hinge should support the rack with no play; rattling by hand shouldn't be possible. Use washers and spreader plates to allow you to pull bolts tight, and use nyloc nuts or thread locker to ensure nothing ever rattles loose.

Stainless steel is the only appropriate hinge material in all cases. When bolting different metals together, galvanic corrosion is a concern. This happens because two different metals in contact with each other promote a slight current flow between them. Over time, this current flow causes corrosion. Separate dissimilar metals with nylon washers or rubber plates and anti-rust paint.
Tilting Rack
Your tilting rack needs to be as light as possible to minimise the strain on your hinges, whilst being rigid enough to eliminate flexing.
Shane and I used steel L-profile to make crossbars to which we bolted our solar panels at their top and bottom edges. We thought that L-profile wouldn't flex significantly, but with the weight of 3 large solar panels, this wasn't the case. I therefore can't recommend L-profile for your crossbars.
A much better solution would be to use tubular aluminium bars or square aluminium t-slot extrusion. Tubular profiles resist flex better than anything, meaning your crossbar system doesn't actually need to be incredibly heavy-duty. For example, Ray Rambles built a tilting solar array composed of three 100W panels and only used two lengths of 3/4 inch conduit piping for his crossbars. His frame is perfectly rigid and, because the bars are circular in cross-section, they rotate inside eyebolts without the need for dedicated hinges.

North Star Off-Grid used aluminium T-slot extrusion to build a rectangular frame for their large solar array. Just like for the roof rails, T-slot extrusion is an excellent choice due to its light weight, extreme rigidity, and the fact that it slots together without the need for drilling and bolting in precise locations.
Lifting Mechanism
For the lifting mechanism itself, you can go with either a manual mechanism or a powered system using linear actuators. The choice will depend on a number of factors:
Solar array weight: large arrays are too heavy to lift by hand and must be lifted mechanically instead.
Roof access: you need a strong position from which to raise your array by hand. If your van roof is too high, if you don't have a ladder or if it's in the wrong place for manually lifting your array, you'll need to raise the array mechanically.
Desired effort: you may simply not want to raise and lower your solar panels by hand, preferring the convenience of a button-operated array.
Manual Lifting Mechanism
The simplest form of tilting solar panel mount is using no mount at all, with each solar panel tilting individually. In this case, you don't need to worry about crossbars or weight, as even large single panels can be easily raised by hand. Whether you do this or bind your panels together onto one frame, you need a way of propping them up once tilted.
The simplest solution here is an arm which braces against a solid element on the roof or rack. This can be attached to the rack or solar array, hinging out and securing at the other end. Or, as Ray Rambles demonstrates, you can use a detachable arm which stows away when not in use. Prop arms like this are very simple and easy to implement, but only offer one angle of tilt.

If you want to be able to vary your tilt angle (we explained why you would earlier in the article), you'll need a prop arm whose length can be varied. Telescopic awning poles could be a good option here, as could the poles from a telescopic ladder.
Automatic Lifting Mechanism
If your panels are big and heavy, if you've a tall van with no easy roof access, or if you simply want the convenience, a motorised lifting system is the only way to go. Shane and I used a pair of 12V linear actuators mounted on either side of the middle solar panel. They're fixed at one end to the van's roof using the included mounting hardware, and at the other end to a pair of joist hangers fixed to the solar panel frames. It's essential that your linear actuators are fully waterproof and designed for outdoor use, and that the stroke length is enough to raise your panels to your desired angles.

Wiring your actuators up is as simple as bringing the wires through the same entry gland as your solar panel cables. From there, they can be connected to a simple 12V actuator controller. The one we installed is remote controlled, meaning the controller itself can be hidden away and the array controlled from anywhere inside or outside the van.
Locking Mechanism
A tilt rack needs a driving lock-down that holds the array tight against vibration and wind uplift. The tidiest option in our opinion is a set of stainless steel toggle latches, sized and spaced so they pull the frame down hard onto the support rack. These are easy to mount to your metalwork and clamp down really hard due to their lever mechanism.
Separate the contact surfaces of your rack and frame with rubber bump plates to provide cushioning. That way, the latches can pull the frame really tight into a vibration-damping surface.
Pre-built Titing Solar Panel Mounts
If you don't want to fabricate your rack yourself, pre-built options can work well. Both Renogy's tilt mount brackets and Photonic Universe's triangular brackets come pre-drilled with bolt holes for easy mounting to your roof rack.

What We Did: Step-by-step Build Guide
After much discussion and sketching, we went for a custom roof rack, supporting a hinged array framed in steel L-profile, operated by 12V linear actuators. We'll share the step-by-step build process here.

Phase 1: The Roof Rack
We were unable to find T-slot extrusion in France, which would have been our preferred material for building the roof rails. We didn't want to buy a pre-built rack due to the cost. We therefore went with two lengths of aluminium rectangular profile tubing.

The tubing is 50mm x 100mm in cross-section. We decided to mount it standing on its narrow face, as the resulting 10cm of height would be enough to accommodate actuators and wiring below the solar panels.
Cutting and Coating the Aluminium Tubing
We cut the tubing down to a length that matches the width of our three solar panels put together, plus a bit extra to account for the space between them. Our angle grinder made short work of the comparatively soft aluminium.

The bare aluminium needed to be treated in order to better weather the elements. Aluminium doesn't rust as badly as steel does, but we wanted to give it some extra protection regardless.
We sanded down the whole exterior surface to provide a textured surface for paint to bind to. Then, we coated the whole thing with an anti-rust primer, followed by two coats of black metal paint. We gave these 24 hours to fully cure, and went over it all with a lacquer spray.

Drilling and Fitting Rivnuts to the Aluminium Tubing
We then needed to drill bolt holes in both the van's roof and the aluminium tubing. These holes needed to be very precisely aligned. We decided to drill the holes in the roof first, then line up the tubing on top of the holes and mark their location onto the profile tubing from the inside of the van.
This was partially because the internal structure of the van determines where holes can be. Along the structural members at the top of the van's walls, there are access ports in fixed locations. These ports are the only place one would be able to place a bolt and spreader plate.

We made little dents in the precise drill locations from the inside of the van using an awl and a rubber mallet. These dents were clearly visible from the outside of the van. We drilled them out using a 4mm HSS drill bit for a pilot hole, then an 8mm bit to accommodate our M8 bolts. We sprayed each hole with anti-rust spraypaint.
Once the holes were drilled in the van, we positioned the aluminium tubes on the roof, exactly where we wanted them to be mounted. Shane held the tube firmly in place whilst I traced each hole with a pencil from the inside of the van. The result was that the bottom surface of the aluminium tubes had marks which exactly matched the holes in the van. We drilled these out, again starting with a 4mm pilot hole for precision before moving up to the full size. We drilled the holes in the aluminium tube to 10mm, as we would be inserting M8 rivnuts, which have a 10mm external diameter.

We then fitted the holes in the aluminium tubing with rivnuts. This allowed us to get a secure, bolted connection into the tubing where we couldn't access the interior to fit a nut.
We used a rivnut gun and M8 rivnuts, which have a 10mm external diameter. The rivnut tool is very easy to use: open the handles, fit the rivnut to the chuck, insert it into the hole, and squeeze the handles closed.

You don't want to over- or under-expand the rivnut in the hole. Expansion is adjusted by turning the knob on the rivnut gun. Our advice would be to use a test piece of metal of the same thickness, and visually observe the setting that gives you maximum expansion without cracking the rivnut.
With our rivnuts in place, we also cut lengths of 3mm rubber ribbon which would sit between the aluminium tubing and the van roof. This would compress as we tightened the bolts, providing a seal around the bolt holes. We pre-drilled M6 bolt holes in the rubber ribbon to avoid splitting the rubber as the bolts went through.

Mounting the Aluminium Tubing
To minimise the risk of metal deformation and maximise support of the load-bearing roof rack, we used spreader plates and washers on the inside of the van. The spreader plates were square pieces of 4mm steel through which we drilled 8mm holes. On the inside of the van, we placed a washer, a spreader plate, and a square of 3mm rubber ribbon on each bolt. We also applied Sikaflex 522 to the drilled hole in the roof before putting the bolt through.

We first applied thread locker to each bolt, to act against vibrations. We then fitted each bolt and gave it a few turns with a ratcheting spanner. When all bolts were inserted and half-tightened, we went back along the row and tightened each one very tight, until the aluminium tubing was pulled tightly against the roof and the rubber ribbon had deformed.

We repeated this whole process for both aluminium tubes on each side of the van roof. The result was a pair of aluminium bars which were very solid; we were unable to get them to move or flex against the roof at all. The combination of Sikaflex in the bolt holes and rubber ribbon on the inside and outside gave us a seal we were very confident in. The rubber ribbon, in addition to the anti-rust spraypaint, gave us confidence that we'd avoid galvanic corrosion from two dissimilar metals touching.
We finished off the rack with two plastic end pieces of the same dimensions as the aluminium tubing's cross-section.

Phase 2: The Tilting Frame
With the roof rack in place, we started work on the tilting solar panel frame itself. This was to be composed of three solar panels connected by steel L-profile bars. In between the panels, joist hangers would serve as attachment points for the linear actuators. The actuators themselves came with metal hardware for fixing them to the van roof and the tilting array. Finally, we had six heavy-duty stainless steel hinges; two per solar panel. The first step was to treat and spraypaint all these pieces of metal.
Still figuring out your van electrics?
This is where most people get stuck — trying to piece everything together from scattered advice, second-guessing cable sizes, fuses, and system design.
The Van Electrics Masterclass walks you through the entire system step-by-step — so you can design and install it properly, with confidence.

Treating the Metal Mounting Hardware
Like with the aluminium profiles, we started by sanding down the surfaces. We then applied an anti-rust primer, two coats of black metal paint, and, after allowing these layers to cure for 24 hours, sealed them with clear lacquer.

Constructing the Tilting Frame
To minimise the number of drilled holes, we decided that we'd bolt through the hinges, the L-profile, and the aluminium frame of the solar panels all in one go. Therefore, the first step was to drill out the holes in the hinges. Our hinges came pre-drilled, but the locations of these holes didn't work for our mounting locations. We measured a distance on the hinge which would place the bolts exactly in the middle of the L-profile and solar panel frames. We marked this measurement on the hinge with a line, and marked drill points which were sufficiently indented from the edge. We drilled 4mm pilot holes first, before boring out the 8mm bolt holes.

We then lined up the L-profile against the solar panels, with the joist hangers in place between the panels to give the appropriate spacing. We placed the hinges against the L-profile where we'd be mounting them, and traced the drilled holes onto the metal. Then, I held each solar panel firmly in place whilst Shane drilled through the L-profile and the solar panel frame.

We then went along the frame, putting a bolt through each hole. Each bolt was supported by washers on both sides, and we used nyloc nuts to act against vibration. We held the nut in place with a box spanner and simultaneously tightened the bolt with a ratcheting spanner.

We repeated the process on the other side of the panels, this time without the hinges. When we were finished, we had three solar panels attached together with steel L-profile and equipped with hinges along one edge.

Attaching the Joist Hangers
This part required some thinking. The joist hangers would be our attachment points for our linear actuators. We chose joist hangers which had a vertical projection that would sit a few centimetres above the top surface of the solar panels. This was because linear actuators need to be at an angle to get started; they can't handle the strain of pushing from flat. Having our linear actuators attached to a point above the solar panels would give them a good starting angle of about 10°.

The point where the linear actuator attaches to the solar array would be determined by the following factors:
Length of linear actuator when fully extended: 930mm
Maximum desired tilt angle: 60°
Both ends of linear actuator fixed in place
Long lever desired; distance between hinge and actuator attachment point to be maximised
We had to work out where along the solar panels a 930mm linear actuator would need to be fixed in order to give a 60° tilt angle whilst maximising its distance from the hinged bottom edge of the panels. We used our 12V portable power station to fully extend one of the linear actuators in the workshop. Then, we raised the hinged edge off the floor to the same height as the roof rack. This way, the workshop floor was where the van roof would be in relation to the solar array. We tilted the solar array about its hinged edge to 60°. We found the point on the tilted array where the actuator, attached at one end and hanging vertically, extended to the workshop floor. This represented the attachment point that would give us our desired tilt angle at maximum actuator extension, with the actuator mounted to the van roof as far as possible from the hinge.
We thus needed to bolt the joist hangers in place at this calculated point. The pre-drilled holes in the joist hangers were in the right place, but needed to be drilled out to M8 size. We positioned the hangers where we wanted them, and traced the holes onto the solar panel's aluminium frames. Then, we drilled holes in the frames at these marked spots. Finally, we fixed the joist hangers in place with bolts, washers, and nyloc nuts.

We now had a fully-constructed solar array which was ready to go on the roof. Testing it for rigidity, it did display more flex than we were expecting. If I were to build one of these again, I would use tubular steel rather than L-profile, as this has almost no flex at all.
Phase 3: Mounting the Frame to the Rack
We had our rack, and we had our tilting frame. Time to put them together. The first task was getting the frame onto the roof; fortunately, we had help.

Bolting the Hinges to the Aluminium Profile
We positioned the frame on the rack, with the hinges in place on the top surface of one of the aluminium profiles. We chose to mount the panel so that it tilted in the same direction as the van's side door. Our thinking was that most often, we park so that our doors face the sun, and would thus want our solar panels to face the same direction.
We aligned the frame on the rack exactly where we wanted it, then drilled through the holes in the hinges into the aluminium tubing. We used a 10mm drill bit, as we would be fitting M8 rivnuts which have a 10mm external diameter.

With the holes drilled out, we fitted rivnuts into each one. We didn't like how the slightly raised surface of the rivnut would have allowed some play between the hinge and the aluminium profile. We therefore cut lengths of rubber ribbon and placed them between these two surfaces in order to even out the irregularity.

We used thread locker again, applying it to the bolts before inserting them. Each bolt was supported by a washer.

With every hinge securely bolted down, we gave the frame a test tilt. It worked brilliantly. The number of hinges and bolts supported the whole structure adequately as it tilted. There was no play in any of the connections as we moved the frame up and down, and the whole operation was smooth.

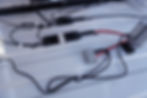
Fitting the Linear Actuators
The final piece of the puzzle was the linear actuators. These came with their own little mounting brackets which would be fixed to the joist hangers on the tilting frame and to the van roof. We bored out the pre-drilled holes in these brackets and the joist hangers so that they'd receive an M8 bolt. We bolted the brackets in place, and attached the piston end of the linear actuator using the included pin.

A mistake we made here is that we didn't reinforce this connection. You can see that as the actuator piston drives outwards and upwards, it's pushing against the top of the bracket. The first part of the actuator's stroke is where the most force is exerted. There's quite a distance between the actuator's attachment point and the single bolt connecting the bracket to the joist hanger. This works like a long lever and a comparatively weak connection point. The result was that when we tested the lifting mechanism, the bracket bent backward at the bolt and severely deformed the joist hanger. We ended up reinforcing the whole connection with a strip of steel bar and two extra bolts. Think about levers and the force exerted at the start of the actuator stroke when you're building these attachments.
The next step was to mount the other ends of the actuators to the van roof. The mounting brackets only come with one hole; we drilled another to make sure the connection was solid. Because of the force going through the actuators, we knew the van's thin sheet metal needed reinforcing. We bought a pair of flat steel brackets to act as backing plates on the inside of the van. These fit perfectly in the ribs in the van's roof.
We fitted the mounting brackets to the actuators and placed them against the roof. We traced the locations of the drilled holes onto the roof, drilled them out, and applied anti-rust spraypaint. We also drilled out the holes in the backing plates.

We again decided to put a strip of rubber between the bracket and the roof to make a seal and absorb vibrations. We also liberally applied Sikaflex 522 to the bolts and the underside of the rubber.

We fitted the backing plates over the bolts and secured them with nuts. Again, I held the nuts in place on the inside of the van with a box spanner whilst Shane tightened the bolts with a ratcheting spanner. We ended up with two very solid and tightly sealed attachment points.

Testing the Tilting Solar Panel Mount
With everything in place, it was time for a test. We first connected the actuators' wires in parallel with WAGO connectors. Then, we used our portable power station, fitted with a cigarette lighter plug with leads, to power the actuators.
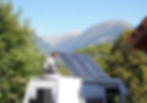
It was amazing to see our scratch-built tilting solar panel mount lifting up to catch the sun. Besides the aforementioned warping at the joist hangers, everything worked flawlessly. We reached our target maximum tilt angle of 60°, at which point the actuators locked in place, fully extended.

We didn't like how hard the contact was between the lifting edge of the frame and the roof rack. We were principally concerned about vibration and rattling as the van drove. We therefore decided to apply rubber ribbon along the full length of the roof rack, to provide cushioning and vibration absorption.

Phase 4: Wiring Up the Solar Array
The final step in building our tilting solar panel mount was to wire everything up.
Wiring Up the Linear Actuators
The actuators were wired in parallel. We ran 4mm² tinned, double-wall UV-resistant cable through our solar cable entry gland to the actuators. This cable clipped into 3-way WAGO connectors. We separated the positive and negative leads from the pre-wired actuator cables, and clipped these into the WAGOs as well. Both WAGOs were installed in a WAGO Gelbox; a weatherproof, IPX8-certified junction box.

We fixed the junction box securely in place using 3M VHB tape, ensuring there was enough slack in the wires. Below is a wiring diagram for this setup:

Wiring Up the Solar Panels
Wiring solar panels is straightforward using MC4 connectors. We planned to wire up our three solar panels in parallel, so we ordered two 3-to-1 MC4 parallel adapters; one for the negative lines, one for the positive lines. The solar panels already had cables with MC4 connectors pre-wired, but we needed to order an extra pair of MC4 terminals for the cables that would run inside the van (one male, one female). These cables were 16mm² tinned, double-wall UV-resistant solar cables. We fused these circuits with three 15A MC4 inline fuses.
We equipped each positive cable coming from the solar panels with an inline fuse. MC4 connections are plug-and-play; very convenient. Each fuse then clipped into the 3-to-1 adapter.

We did the same thing for the negative solar panel wires, giving us two neat connection points for the solar cables that would run inside the van.

We stripped 1cm of insulation off the ends of our 16mm² solar cables using wire strippers and crimped in place the metal coaxial pins using a crimping tool. These insert into the waterproof plastic housing, and it's all sealed with the included rubber washers and tightened with the included plastic spanner.

Tidying Everything Up
With the connections in place, all that remained was to tidy the wiring up and secure it to the roof of the van. As discussed in our article on wiring regulations, all horizontal cable runs must be supported every 300mm. We also needed to secure the 3-to-1 adapters to the van roof. For the adapters, we used strips of 3M VHB tape, and stuck them to the ribs in the van roof. For the cable supports, we used zip ties with adhesive mounts. We made sure there was enough slack in all the cables, making especially sure that there was sufficient slack to accommodate the movement of the solar panels and that cabling was kept away from pinch points at hinges and under actuators.
All that remained was to run the solar cables and the actuator cables through our cable entry gland and into the van. We've got a Scanstrut entry gland mounted to the van, which is exceptionally easy to use; read more about it here.

Wiring Up the Actuator Controller
With the cables run inside the van, the final step was to wire the actuator cables into the Ecoworthy actuator controller. These are screw terminals, so all we needed to do was strip a bit of insulation back and insert the ends into the appropriate terminals (helpfully labelled 'motor'). We used 4mm² twinned single-wall cable for the connection between the controller and our 12V fuse box.

A final test using our portable power station confirmed that the controller was wired correctly and that the remote worked. It was amazing to finally see our tilting solar panel mount rising and lowering at the touch of a button.
We felt that the extra work that went into motorising the tilting mechanism was definitely worth it. The operation is so easy, and the wiring is simple enough that we're not concerned about it standing the test of time. Vanlife is all about minimising effort barriers; the effort it takes to raise and lower our solar panels is so low that there's never a reason not to do it.

What We Learned
This was the biggest single project of our van build. Doing it from scratch, we learned a lot, and there are things we'd do differently next time.
Building your own roof rack is a real pain. If your budget allows, we'd absolutely recommend using a pre-built rack as the base for your tilting solar panel mount. If you can't justify the cost, use T-slot extrusion profiles to build your rack, rather than scratch-building it from aluminium tubes.
Mounting anything that requires drilling through the van roof is a real pain. We can't adequately describe how fiddly and unpleasant it was getting the bolts, backing plates, and rubber pads into the roof through the little access ports in the van's structural conduits. There are loads of options out there for mounting pre-built roof racks and T-slot extrusion to existing structural elements on the van roof, no drilling required. Use them.
Painting metal is a real pain. We had a lot of trouble figuring out the proper treatment for outdoor metalwork. The gold standard is powder coating, but this requires a special machine; you'd have to get this done by a custom workshop at great expense. Our primer + metal paint + clear coat technique ended up working ok, but:
make sure you're using automotive-grade paints for all three layers
apply at least two coats of each for proper coverage
wait the manufacturer-specified curing time before applying the next layer
use a gloss/enamel clear coat rather than matte, and lay it on thick
L-profile flexes too much, even when it's steel. Use tubular metal bars (or T-slot extrusion) for your tilting frame; they flex so little that aluminium is a perfectly good choice over steel.
Linear actuators put out a lot of force during the first part of their extension. It's vitally important that your linear actuators start pushing at an angle of at least 10°. The greater the start angle, the more smoothly everything will go. Think about levers when you're building attachment points for your actuator pistons. A long lever will want to bend under the force of the actuators, and single-bolt attachment points won't cut it.
Final Thoughts
We've established in this article that tilting your solar panels always provides a benefit to electricity generation. The returns are probably not worth it for summer use in sunny countries, or for vanlifers who regularly top up their batteries by driving or plugging in at a campsite. In a lot of cases, you can simply add more solar panels instead of incorporating tilt. However, if:
you spend significant time at high latitudes in the dark half of the year, or;
you live in your van in winter anywhere north of the Mediterranean, or;
you don't have the roof space for a solar array to support your consumption, and;
you don't want to rely on driving and shore power to keep your batteries full,
a tilting solar panel mount is well worth considering. This is especially true if you're building your van around high-wattage appliances, like air fryers and induction hobs. If the satisfaction you get from a remote-controlled tilting solar panel isn't worth it, the significant winter solar gains will be. Follow our process, learn from our mistakes, and we think it's a perfectly manageable project.
Still unsure how to design your van electrics?
Start with the free wiring diagrams below.
Want to build your van electrical system properly from start to finish?
The Van Electrics Masterclass shows you exactly how to design and install a safe, reliable electrical system — step by step.
Until next time.