
How to Install a Solar Cable Entry Gland (Scanstrut Inlet)
- Shane Monks O'Byrne
- Aug 15, 2022
- 8 min read
Updated: Apr 5
Cutting a hole in your van roof for solar wiring can feel like a nerve-wracking moment. But if you’re installing solar panels, you need a safe, waterproof way to bring the cables inside — and that’s where a solar cable inlet (also called a cable entry gland) comes in.
In this guide, I’ll show you exactly how to install one, focusing on my go-to choice — the Scanstrut DS-H-Multi horizontal multi-cable seal — and also cover alternative inlet types so you can pick what’s best for your van.

Shane is an NCC-certified electrical installer. He has built, taught, and lived in campervans since 2019.
This post contains affiliate links. We may earn a commission at no extra cost to you. To understand our policies on content, affiliate commissions, and liability, please review our Terms of Use.

In this guide
Supplies List
 | |
 | For driving and drilling |
 | For protecting bare metal from rust |
 | Sikaflex 522 sealant For adhering the entry gland to your van and forming a watertight seal |
 | For keeping the hole saw lubricated |
 | For cutting circular holes in wood and metal |
 | Metal file For smoothing cut metal edges |
What Is a Solar Cable Inlet?
A solar cable inlet is a sealed fitting mounted to your van roof that allows electrical cables to pass from outside (your solar panels) to inside (your electrical system) without leaks. The seal is crucial — water ingress here can cause costly rust damage and electrical hazards.
Other common names for this part include:
Solar cable entry gland
Roof cable pass-through
Cable seal
On my previous van I had 400W of solar power on the roof. I used a cheap plastic dual-cable solar inlet from Amazon to bring the positive and negative wires into my van. Victron also make this type of inlet (which I would trust more than a no-name Amazon brand).

On my new van I have over 600W of solar on the roof plus actuators to raise on lower the solar panels at the click of a button. This means I have 4 cables coming from the roof. This made a Scanstrut inlet the obvious choice as they allow you to pass multiple cables into the van in a single inlet. They are also by far the highest quality solar inlets on the market.

In this article I will show you the installation for both types of solar cable inlets.
Our detailed guide on campervan solar systems discusses solar panels, wiring, and all the other details of a campervan solar setup.
Why I Recommend Scanstrut Cable Seals
Scanstrut cable seals are widely regarded as the best on the market for marine and vehicle applications.
They’re:
IP68 waterproof – dust-tight and submersion-proof.
Built from marine-grade materials – high-impact plastic or anodised aluminium.
Designed for easy, clean installation.
Available in multiple styles for different cable sizes and mounting positions.
Because they’re originally made for boats, they’re perfect for withstanding the harsh weather a van roof experiences.
Types of Scanstrut Cable Seals
Type | Material | Max Cable Size | Best For | |
 | High-impact plastic | ~6–10 mm | Single or twin solar cables, low profile | |
 | Marine-grade aluminium | Up to 15 mm | Multiple cables, larger diameters, custom hole layout | |
 | Aluminium / stainless steel | Varies | Sleek look, minimal protrusion | |
 | Plastic or stainless | Varies | Running cables with connectors attached |
Tip: If you only need to pass one or two small cables (e.g., 6 mm² solar cables), the horizontal model is ideal. If you need to pass multiple cables or a mix of solar and other wiring (actuator, antenna, lighting), the multi-cable seal is the way to go.
Why I Chose the DS-H-Multi for My Van
On my latest build, I needed to pass through both solar panel cables and actuator cables for tilting panels. The DS-H-Multi made it simple:
I could drill custom holes in the rubber bung exactly where I wanted.
It accepts cable diameters up to 15 mm.
Its marine-grade aluminium body is incredibly robust.
The seal compresses tight around each cable for a watertight fit.
I've actually installed many Scanstrut electrical inlets in my van - you can read all about those here.
Pro Tips for Working With Scanstrut Cable Seals
From Scanstrut’s own recommendations (and my own experience):
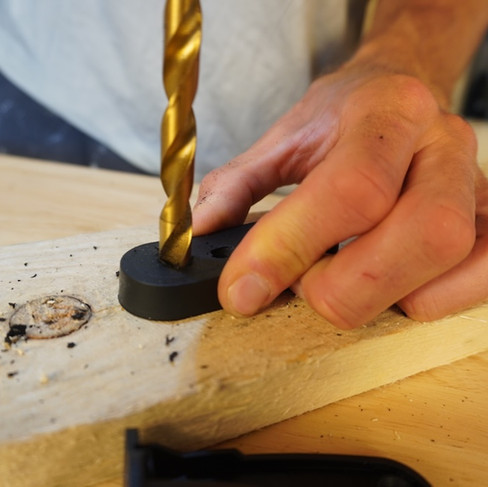
Chill the rubber bung in the fridge before drilling — makes cleaner holes.
Drill each hole 1.5 mm larger than the cable diameter so the seal compresses properly when tightened.
Leave at least 4 mm between holes to maintain the seal’s integrity.
Use their cutting template for accurate placement.
How to Use a Hole Saw
You will need to use a bi-metal (metal cutting) hole saw drill attachment to cut a circular hole in the side of your van for your entry gland.

There are a few things you should be aware of when using a bi-metal hole saw:
Oil: Use tapping and cutting fluid (e.g. WD40) liberally on the metal you're cutting. The high friction will destroy the hole saw otherwise.
RPM: Use the drill on a low RPM (rotations per minute) to keep friction low. This means that you shouldn't press your finger all the way down on the trigger of the drill.
Pulsate: Pulsate the drill while you are cutting. Using a stop and start motion while drilling gives the hole saw a chance to cool down.
Don’t cheap out: Real bi-metal hole saws cost a bit of cash - the cheap ones you find online may not work as well or at all.
Be careful of the swarf:
When using mechanical tools on metal, a lot of metal shavings are produced (known as 'swarf'). It is vital that you remove all these shavings from the van when you are finished. If you don't, they will very quickly rust and damage your vehicle.
Always wear eye protection while using mechanical tools on metal. Swarf can cause real damage if it gets in your eyes.

Learn from my mistakes; the first time I used a hole saw, I destroyed it within 5 minutes because I didn't follow the above advice.
Step-by-step: How to Install a Waterproof Solar Cable Entry Gland
A waterproof solar cable entry gland will be needed if you plan on having solar panels on your van. The entry gland provides a watertight, secure channel for the solar panel wires to come into your van and connect to your electrical system.
Tools & Materials
Scanstrut DS-H-Multi cable seal
Cutting template (supplied)
Bi-metal hole saw (44 mm)
Jigsaw or hacksaw
Drill + M4 bolts & nyloc washers (for metal roofs)
Zinc spray paint or rust protection paint
Butyl/mastic tape (for uneven roofs)
Sikaflex 522 sealant/adhesive (if not using the Scanstrut foam backing)
Microfibre cloth
Installation Steps: Scanstrut waterproof solar cable entry gland
Step 1. Prepare the rubber bung
Put the bung in the fridge. Once chilled, drill holes to suit your cables, leaving 4 mm between each. Remember: 1.5 mm bigger than cable size.


Step 2. Position the template
Tape Scanstrut’s template to the roof. You can download and print the template here.
Mark:
The centres of the two large holes
The four bolt holes

Step 3. Drill the large holes
Using a 44 mm bi-metal hole saw, cut the two large openings. Use cutting fluid and keep the drill at low RPM to avoid overheating.


Alternative: If, instead of Scanstrut, you are installing a "standard" solar cable gland (like the one from Victron), you will only need to drill a single holesaw (70mm or so).

Step 4. Join the holes
With a jigsaw or hacksaw, cut between the two circles to form the slot.


Still figuring out your van electrics?
This is where most people get stuck — trying to piece everything together from scattered advice, second-guessing cable sizes, fuses, and system design.
The Van Electrics Masterclass walks you through the entire system step-by-step — so you can design and install it properly, with confidence.

Step 5. Deburr & clean
File away burrs and sharp edges. Wipe clean with a microfibre cloth.


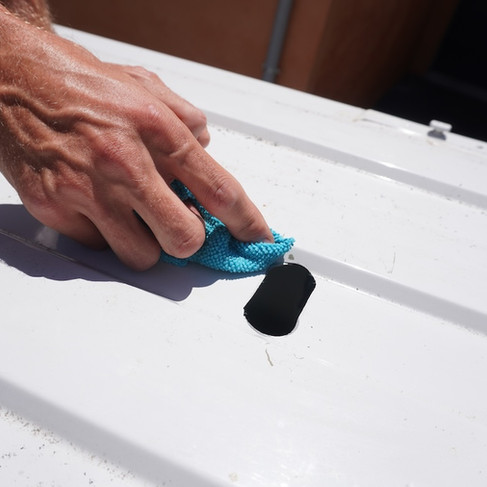
Step 6. Protect the metal
Spray or paint all cut edges with zinc paint to prevent rust.


Step 7. Drill and protect bolt holes
Drill the four bolt holes, then paint them too (if you are using the scanstrut inlet). If you are using a "standard" solar cable inlet, you do not need to drill any bolts.

Step 8. Level the surface (if needed)
If your van roof has ridges, build up a flat base using butyl / mastic tape.


Step 9. Seal the base
Instead of the supplied foam backing, I applied Sikaflex 522 to the underside of the inlet for a permanent, watertight bond. I did this because I had layered down butyl tape already and felt the bond would be better with Sika.


Alternative: If you are installing a "standard" solar cable inlet (like the one from Victron), the process is the same. Apply a thick bead a Sikaflex 522 in the narrow channel around the base of the inlet. Then press the inlet onto the roof of the van. No screws or bolts are needed for this installation - the Sika is enough.

10. Bolt the inlet
Press the inlet into place and bolt it down using M4 bolts with nyloc washers. Note that the Scanstrut inlet comes with screws. These should inly be used with wood or fiberglass (eg. on a boat). In a van M4 bolts are recommended. These are not supplied with the inlet.
If you are installing a "standard" solar cable inlet (rather than the Scanstrut one), you do not use screws or bolts for the installation.
11. Route the cables
Feed your wiring through the roof opening and into the drilled bung holes. If you are struggling to fit the cables through the rubber, consider using a bit of grease to lubricate the cables. Then place the bung (with cables in place) into the base, then screw on the faceplate. As you screw the faceplate, the seal between the rubber and cables improves .

13. Fit the cover
Secure the top cover over the assembly and screw it tight.

14. Add a bead of sealant
I recommend running a bead of sealant around the perimeter of the baseplate to give you extra peace of mind. Cutting holes in a van always has the potential of leaks, I recommend you check out our roof sealing guide for more info on how to prevent that.

Conclusion
I hope you found this guide to installing a solar cable entry gland useful. You are well on your way to a beautiful self-build campervan. Your next steps might be the installation of solar panels or a leisure battery. Check out our guides to learn more.
Still unsure how to design your van electrics?
Start with the free wiring diagrams below.
Want to build your van electrical system properly from start to finish?
The Van Electrics Masterclass shows you exactly how to design and install a safe, reliable electrical system — step by step.
Until next time.