
Van Floor Insulation: How to Build a Campervan Floor
- Chris Wallace-Tarry

- Dec 14, 2025
- 28 min read
Updated: May 18
Your van’s floor has a lot to put up with, so it's worth getting it right. It’s the coldest surface in the build, it bears the brunt of mud, meltwater, spills, and scuffs, and it's a deciding factor in your van feeling cosy rather than clammy. Get your van floor insulation wrong and you trap moisture against bare steel, create cold spots underfoot, and spend winter wondering why your beautifully built home still feels chilly. Get it right and you barely think about it again: the floor just feels solid, warm, and shrugs off years of wet boots and heavy kit.
In this article, we’ll walk through how to build that kind of floor. We’ll start by stripping back and inspecting the bare metal, dealing properly with rust, and explaining why a vapour barrier belongs in your walls and ceiling, not under your feet. Then we’ll look at how to handle the factory ribs and troughs, plan in wiring and optional underfloor heating, and build a batten grid that supports everything. Finally, we’ll compare the main insulation options (polyiso, XPS, and composite panels), talk through tricky detail areas like conduits and wheel arches, and finish with sub-floor and flooring choices, plus exactly what we did in our latest build.

Shane is an NCC-certified electrical installer.
He has built, taught, and lived in campervans since 2019.
This post contains affiliate links. We may earn a commission at no extra cost to you. To understand our policies on content, affiliate commissions, and liability, please review our Terms of Use.

In this guide
Cleaning and Prepping Your Van's Floor
Before you start building your van's new floor, it's important to prep the base you'll be building it on. If you've bought a second-hand van with a floor lining already installed, it's time to strip this out. It might be tempting to use existing ply-lining as a base for your new floor, but it's much better to start from scratch. Existing lining can hide water damage, mold, and rust, which will cause problems for you down the line.
Once the bare metal floor is exposed, we need to give it a good clean. Any remaining adhesive should be stripped off using a chisel or plasterer's spatula. Clean up any residue with a solvent like white spirit or ethyl alcohol, and wash the whole thing with soapy water. Finally, give the floor a good sweep to clear any remaining debris.

With your van's metal floor fully exposed and clean, it's now time to do a thorough rust inspection. Check every inch of the floor carefully, including all seams where metal sheets are welded together, the wheel arches, the side and rear door steps, and spaces behind structural elements (as best you can).
If you do find any rust, you'll need to assess the severity and choose a removal and repair method accordingly. We've got a whole article on rust removal and repair which goes over the three levels of rust severity and how to deal with each one. Check it out here.

With your van's floor stripped, clean, and rust-free, we can now start building your van floor insulation on top of it.
Vapour Barriers: The First Layer of Van Floor Insulation
As we discuss in our ultimate guide on the subject, a vapour barrier is an impermeable layer of material that prevents all water from getting into your insulation layer. It can be a useful component of your insulation setup if it's installed correctly. However, we would never recommend installing a vapour barrier in your floor. This is because the floor is the one place where water is almost guaranteed to infiltrate. Your door sills (rear and side) will always let some amount of rainwater in under the floor, and standing liquid water from wet gear, spills, and plumbing leakages will inevitably infiltrate. If you install a vapour barrier, you'll effectively seal this water into your floor, where it will cause mold and rust.

It's much better to leave the floor 'breathable', so that any water that gets in is able to evaporate back out. A proper ventilation system will encourage this evaporation; read all about ventilation in our article on roof vents.
Common vapour barrier materials are Reflectix and similar double reflective film insulation wraps. Whilst we don't recommend using these to make a vapour barrier in your floor, we did use them as our first van floor insulation layer for a different reason.
What to do with Ridges and Troughs in Your Van's Floor
Every panel van I know of has a floor that's textured with a pattern of raised ridges running the length of the van. These ridges form troughs between them which are usually about 1cm deep. The troughs are a problem because they form perfect convective air loops, which set up a continuous flow of cold air that reduces your insulation's effectiveness. Thus, any van floor insulation build needs to fill them in.
There are a couple of ways of doing this. Because of the aforementioned inevitable water penetration, you'll want to use a material that doesn't retain water. Thus, batt and wool insulation types are out. The engineers at EXPLORIST.LIFE used thin foam board insulation, which they had to slice lengthways using a hot knife to get it thin enough to match the height of their floor ridges.

We went a different route with our latest van build. Reflectix is inappropriate as a vapour barrier here, but we can line our troughs with it to turn them into a series of insulating air cavities instead of bare metal trenches. Bare steel has a relatively high emissivity (e-value) of around 0.8–0.9 [1], meaning any warm interior surface readily transfers heat to it across an air gap.
By wrapping the sides and bottoms of the grooves in foil with a very low emissivity (typically e ≈ 0.03 [2]), you’re drastically cutting this radiative heat transfer within each cavity. The air in the groove still conducts a bit of heat and can support very small convection currents, but radiation is suppressed. This means that any heat leaking through your main van floor insulation into those voids meets a low-e foil surface rather than a high-e metal surface, so less is radiated into the steel and out of the van.

Underfloor Wiring
Before we go much further, we need to look at any floor-level wiring that we're going to be burying in our floor layers. This might be cabling running from your DC-DC charger in the cab to your leisure batteries, or it might be wires supplying floor-level lighting.
You need to plan any floor-level wiring that you want hidden into your van floor insulation stack. The grooves in your floor double perfectly as conduits, and we recommend routing your wiring through these. You'll need to plan where your wiring will go, and have it in place before covering everything over with your main insulation material. In our next section, we'll talk about battens; it's useful to plan your wiring before putting in battens as you'll need to cut channels in your battens through which you'll pass your wires.

A word of warning; we were lazy and didn't test the circuits that power our floor-level lighting before going ahead with our insulation stack. We tested them once the insulation and sub-floor were in and, sure enough, they didn't work. We had to pull up our sub-floor and insulation to get at them. This is where a small portable power station becomes invaluable; you can test all your 12V circuits as you wire them up, way before getting your leisure batteries in.

Underfloor Heating
Whilst we're talking about underfloor wiring, we can also talk about underfloor heating. This is becoming increasingly popular as an alternative to air heaters powered by LPG and diesel, and some heater companies are coming out with units specifically designed for underfloor heating. We'll have a full-length article on underfloor heating coming out in the future where we'll detail our own experience, so the following will be a quick summary.
12V Heating Mats
One way of getting underfloor heating is to install 12V heating mats between your sub-floor and main floor covering. Obviously, this will only go in after your floor insulation stack is in place, and you don't need to plan anything particular in advance. These electric underfloor mats, like these from Vantopia and these from Expedition Upfitter, are ultra-thin and run directly on 12V power. However, be wary of their power consumption. The Vantopia mats use 110W or 9A per mat, whilst the Expedition Upfitter ones use 6.7A. Even if you only use 3 or 4 mats to heat just the parts of your floor you walk on, that's still 20-36Ah per hour of usage; significantly more than a fridge pulling 40-70Ah per day. Anyone we've found who has installed mats like this uses them in addition to a standard air heater, and only as a luxury when plugged in to shore power.

Hydronic Heaters
Another option which is far more viable is underfloor heating using a hydronic heater. Hydronic heaters are like diesel/LPG air heaters, except they heat glycol (engine coolant liquid) instead of air. This glycol retains heat for a long time, and can be used to efficiently heat blown air, water for showering, and can optionally be routed through underfloor heat piping. These systems can optionally be plumbed into your engine's coolant system, so that excess heat from your engine can be used to heat your water and floors.

The main issues here are price and complexity, with a DIY kit costing £2,000-3,000 and a complex installation. It's definitely an interesting heating solution, but due to the cost and complexity of the installation, we can't recommend it to most vanlifers. The more standard option of pairing a well-insulated van with a decent air heater works perfectly fine even in deep winter, as I and the team at Engineers Who Vanlife can attest.
On the other hand, we'd argue that hydronic makes sense for winter vanlifers who are also installing showers and will thus need a lot of hot water. In this case, we recommend Eberspacher's S3 D5E heater, which you can buy in a complete kit. If you do go down this route, you'll need to lay them on top of your insulation. You'll therefore need to cut grooves in either your insulation material or your sub-floor to accommodate them.

Battens
Whether or not you've got underfloor wiring or heating to manage, it's now time to get your battens in. These are the wooden beams which support your sub-floor and raise it above your insulation.

It's a fairly simple concept. We need some rigidity in the floor and enough longitudinal and lateral (y and x axis) support. In our latest build, we went with a grid of four lateral battens, four longitudinal battens at the front, and three at the rear, between the wheel arches. Not everybody chooses to put battens around the wheel arches, but we felt it proper to put these in to support the floor along its edges.

We'd suggest sticking the battens between the ridges on your floor, as they'll be better supported and will block airflow beneath your insulation. That being the case, you need to choose battens whose thickness is the same as the thickness of your insulation plus the height of your floor ridges.

We used Sikaflex High Tack to stick our battens to our floor. Do not bolt your battens to your floor; there's no need and it's far too many holes to the exterior which would be susceptible to rust. We're very happy with the performance of Sikaflex High Tack; the battens are rock solid once the adhesive has fully cured.
Door Sills
Your door sills are special areas that need extra attention. For one thing, they're areas you'll be able to see when the floor is finished, so you need to think about how you want to trim them so they look nice. For another, they're places where outside moisture from rain and wet shoes can get in under your floor. For that reason, they need to be properly sealed.

We went with a fairly simple wooden trim to hide the rough wood of the battens at both our side and rear doors. We then carefully sealed along the bottom edge of this trim with silicone sealant to protect against water ingress. Our sill trim is quite basic, and might not end up fitting with the style and standard of the rest of the van. If this is the case, we'll likely go back and refit something more pleasing to the eye. For now, however, it's doing the job of protecting our floor layers from rain whilst we work on the van outdoors.
You might like to fit something more hard wearing for this high-footfall area. Again, we'll point to Explorist's excellent new build, where they lined their sills with metal L-profile bars.

These look really professional and will do a great job of protecting wood from longterm scuffing and water damage.
The Best Van Floor Insulation Material - What to Use
There aren't actually loads of different options for your van floor insulation material, as it needs to be something lightweight that has both a high R-value (insulation factor by thickness) and low compressivity. This leaves us with a handful of viable options.
Polyiso Board for Van Floor Insulation
Rigid polyisocyanurate foam board, commonly called polyiso board, is the best all-rounder for most builders. It's got a high R-value of 6.0 to 6.5 per inch of thickness [3] and doesn't compress under a person's weight. A key factor is that when polyiso board is produced in the factory, the gas used to expand the foam has a comparatively low GWP, or global warming potential. This is a measure for how strongly a gas heats the atmosphere relative to CO₂, which has a GWP of 1. Modern polyiso board is generally expanded using gases with a GWP of 7-11 for pentane [4] or less than 1 for HFO-1234ze [5].

Polyiso's main drawback is the fact that it performs badly when it's cold. Once the foam itself gets colder than 15°C, its insulating performance starts to drop. Once the board gets down to -20°C, it might have lost up to 40% of its insulating property [6]. Note that this refers to the temperature of the board itself; as long as you keep the inside of your van warm, the board will keep that warmth in. A van lined with polyiso board might take longer to warm up when it's really cold, but this will be helped by ensuring you don't have thick insulating layers covering up your insulation. Shane has lived full-time through Alpine winters in a van insulated with polyiso board, and he's never had any issues thanks to his Propex LPG heater, which quickly and efficiently heats up his whole van.
XPS Board for Van Floor Insulation
By contrast, XPS board, which is an alternative to polyiso, is often still expanded using HFC-134a with a GWP of 1,430 [7]. The industry is shifting to low-GWP gases like HFOs (GWP 7) and NGX blends (GWP 100 to <1 depending on the manufacturer), but this shift isn't consistent and you need to check the specific product and manufacturer.
XPS' insulation factor doesn't change with temperature, a factor in its favour over polyiso. However, its R-value is lower for a given thickness, coming in at 4.2 per inch at 25mm in contrast to polyiso's 6-6.5 per inch. This means that you'd need about 50% more XPS board by thickness to match the insulating capacity of polyiso.
XPS is also generally more expensive than polyiso board. Modern low-GWP polyiso costs around £10–15/m² for 100mm boards, which is the same as 100mm high-GWP XPS. For low-GWP XPS, you're looking at more like £18-30/m². Bear in mind that due to the lower R-value of XPS, you would need to buy more to achieve the same insulation.
Polyiso vs. XPS for Van Floor Insulation
We're clear on the fact that polyiso board is the best all-rounder board insulation for use in vans. We've summarised the comparison between polyiso and XPS in the table below to make your decision easy.
Metric | Polyiso Board | XPS Board |
|---|---|---|
R-value per inch | 6-6.5 | 4-4.5 |
Behaviour when cold | Can lose up to 40% of its R-value at low temps | R-value barely changes with temperature |
Compressive strength | 120-170kPa (fine for walking and furniture) | 300-700kPA (will withstand very heavy point loads) |
Moisture behaviour | Foam itself is impermeable, but cut edges and foil facers can take on water if left wet | Very low water absorption, is used in basements and roofs |
UK cost for 100mm | £10–15/m² | £10–15/m² for high-GWP, £18-30/m² for low-GWP |
Global warming potential | <1-11 | 1,430 for high-GWP, <1-7 for low-GWP |
Best use-cases | When you want maximum R-value per thickness and low GWP rating for the lowest price | When you want extreme compressive strength, moisture tolerance, and extended extreme-cold performance |
Composite Panelling for Van Floor Insulation
A final option worth considering is composite panelling like ZIP System R-sheathing. This is a layer of polyiso foam bonded to OSB board or plywood. The wood panel has a weather-resistive coating on top, and some kinds even have a foil facer on the underside of the polyiso, acting like the Reflectix we discussed earlier in the article. Composite panelling is therefore a complete floor stack that you can install without putting in battens and measuring insulation board to fit between them.

Xtratherm Plydeck is a good example which comes in a great variety of thicknesses, from 2.4mm to 174mm total board thickness. Kingspan Thermaroof TR31 uses 6mm plywood instead of OSB and incorporates a foil vapour control layer on the underside of the polyiso. Finally, FOAMtech insulated chipboard is chipboard bonded to XPS insulation board. All of these products are designed for insulated flooring and roofing applications in a building and refurbishment context, but we expect to see them increasingly used by van builders.
The downside with these composite boards is of course price, with the per-m² cost being more than what you'd pay for insulation board and sub-floor wood individually. The upside is that it's a single stack that you buy and install in one step, without needing to install battens.
Detail Areas
There are always areas in your van that you won't be able to insulate with board insulation. In your floor, these are the conduits that run along the edges of your floor, and your wheel arches.
Conduits
These are empty voids directly against your van's external metal walls, and are actually quite large, so they definitely need insulating.
In many vans, these conduits actually act as drainage areas for standing water in the van's floor. All the way down along the bottoms of these conduits are rows of drainage holes, which are stoppered with rubber plugs. We decided to leave these alone as we didn't believe they would take on water. What we didn't like, however, were the bung holes above them, which serve to hold the van's exterior black plastic trim in place. These holes aren't sealed in any way, and the plastic bungs they hold are loose. We felt that spray from under the van could infiltrate these holes over time, and decided to seal them up.

Once you've sealed up these holes, fill them with batt insulation. Batt insulation is any soft insulation usually referred to as some kind of wool. There are many kinds; sheep's wool, recycled plastic wool, plastic wool like 3M Thinsulate, recycled cotton wool, wood fibre wool, and rock wool. Your best bet for floor-level insulation is something with high moisture resistance and low ecological impact. Sheep's wool, wood fibre wool, and cotton wool readily take on and retain water and aren't suitable. Rock wool resists water but is terrible for the environment and shakes apart with your van's vibration into microscopic fibres which are a serious health hazard.

This leaves plastic wool; if you can get it, recycled plastic wool is eco-friendly, has a high R-value, and is water resistant. Stuff the plastic wool into the nooks and crannies using something long, thin, and flexible for spots you can't reach into with your hands. A key here is to not overly compress the insulation; wool only performs at its stated R-value when it's minimally compressed.
Wheel Arches
Your wheel arches are another area that's tricky to insulate with foam board. It's not impossible; some van builders build angled frames around these with battens and panel them with foam board. Others simply build a box around their wheel arches, panelling it with foam board and plywood and using it as a structural element. If you go with either of these options, we'd still recommend filling any empty spaces with batt insulation to eliminate uninsulated air pockets.

An alternative solution is to use flexible foam insulation to line your wheel arches. Mass-loaded vinyl would be perfect for this, as it doubles as excellent sound deadening. Flexible elastomeric foam like Armaflex is also a good option, as it also combines decent thermal insulation with sound isolation. We chose Armaflex to line the wheel arches in Shane's new van for its flexibility and how easily it works around complex shapes. Whatever you choose, make sure you properly sound deaden your wheel arches before insulating them, as they're major focal points for outside noise penetration.

Sub-floor
Once your battens and insulation are in, you're ready to cover it all up with a sub-floor. A sub-floor is a layer of sturdy material which closes in your insulation and spreads load over it whilst acting as a base for your floor finishing material. This will most likely be either plywood or OSB (chipboard). We don't recommend any kind of MDF or fibreboard as it's simply too heavy. We initially bought 10mm OSB for the sub-floor in Shane's new van, but also found this to be incredibly heavy. In the end, we went with 5mm plywood which is light, durable, and easy to work with.

When putting in your sub-floor, make sure that it's fixed to your battens at its edges. Thin wood is likely to warp as it changes temperature and takes on atmospheric moisture. If you've got panels whose edges are free, these will start to rise as the panels warp, leaving you with an uneven floor. For this reason, you'll need to measure between battens for your sub-floor panels. Make sure you take measurements from the mid-point of your battens, so that adjacent panels each overlap the batten by half.
Shaping the Edges of Your Sub-floor
The trickiest part of measuring and cutting your sub-floor is shaping the wood so it matches the complex shapes where your van's floor and walls meet. It's not just the indents around the wheel arches that make this tricky, but the points where conduits and pillars bulge outwards, the four shaped corners of the floor's footprint, and the complex shaping at the bulkhead. To get a floor that's as seamless and gap-free as possible, all these shapes will need to be traced and cut out of your sub-floor panels.

The traditional way to do this is using a scribing tool, which does work if you get the technique right. A scribe tool like this one is relatively easy to use and gives you good results as long as you're very accurate with your tracing. In our most recent conversion, we did have trouble with pieces of sub-floor which needed to be scribed on more than one side. For example, the piece which sits against the front bulkhead and the sliding door needed to be scribed on both its front and right hand edges to fit into the complex shapes here. We found it difficult to figure out how to offset our scribing so that the scribed shapes were correctly placed on both the x and y axes. The process ended up involving a lot of trial and error and many adjustments.

If we were to do this again, we'd use EXPLORIST.LIFE's brilliantly simple cardboard template method. They used big pieces of cardboard to make a perfect template of the shape of their van's floor. Using a Stanley knife, they gradually trimmed away at the cardboard until it perfectly matched whatever shape they were working on. Once they were happy with the fit, they taped the shaped piece to the next sheet of cardboard until the whole floor was covered. They then pulled the whole cardboard assembly out and traced its shape onto their subfloor wood. It's an elegant solution to a tricky problem, and we wish we'd thought of it ourselves.

Still figuring out your van build?
This is where most people get stuck — jumping between blog posts, YouTube videos, and forums, never quite sure what to do next.
The Van Conversion Mastery Course gives you a clear, step-by-step system to design and build your van from start to finish — without the guesswork.

Flooring - Finishing up Your Van Floor Insulation
The last layer in your van floor insulation stack is the external floor material itself. This is the visible layer that you'll actually be walking on, so aesthetics are going to be the principal factor to consider. Other than looking good, you'll need a material that's waterproof, hard-wearing, lightweight, and easy to cut and shape.
Shane and I have both used laminate flooring boards with an imitation wood finish in our vans. This commonly comes in tongue and groove style which is very easy to install and is commonly called click LVT flooring. Stick it down with wood glue or a high-tack sealant and weight it evenly and heavily overnight to ensure proper bonding to your sub-floor.
Other flooring materials vary by aesthetic, durability, waterproofness, and weight. We've broken down the most commonly chosen options in the table below:
Material | Thickness | Waterproof? | Durability | Weight | Underfoot Feel | Pros and cons |
|---|---|---|---|---|---|---|
Click LVT boards | 4-8mm | Yes | Very good | Medium | Hard and on the cold side; fine with a rug or underfloor heat | Looks like real wood, easy to sweep and mop, easy to install |
Sheet vinyl | 2-4mm | Yes | Good but can gauge with heavy dragging | Light | Slightly softer than boards but no warmer | One big sheet makes for easy installation, not as premium in appearance |
Rubber coin/stud flooring | 3-4mm | Yes | Very tough, used in industrial settings | Heavy | Slightly soft but industrial feeling | Bomb-proof, grippy, heavy and utilitarian-looking; good for garage areas |
Sheet linoleum/marmoleum | 2.5-3.5mm | Yes | Good but can dent and gauge | Light | Warmer and softer than both boards and vinyl | Matte look with lots of colour and texture options, can look tacky and less durable than vinyl or rubber |
Cork tiles/cork click flooring | 6-10mm | Spill-resistant with good sealing | Dents and scratches quite easily | Light | Very warm and comfortable underfoot | Looks and feels cosy and warm but won't withstand abuse and frequent wetting |
Wood boards | 10-15mm | Water-resistant if well-sealed | Good but can dent | Heavy | Warm and natural underfoot | Premium cabin look and feel but heavy and expensive, doesn't tolerate temperature and humidity swings |
Carpet tiles | 5-8mm | No, holds dirt and moisture | OK but stains | Light | Cosy and warm | Warm and comfortable underfoot, but totally wrong for wetness and mud. Better as a rug. |
Painted or coated plywood | 5-10mm | Water-resistant if well-sealed | Can dent and scratch | Medium | Warm and natural underfoot | Cheap and easy to finish to your liking, easy to touch up. Needs good sealing and can look like a work van without tasteful finishing. |
What We Did: How to Install Van Floor Insulation
Here we'll share our full process for insulating and flooring Shane's new van, including the mistakes we made and what we'd do differently next time. Note that we haven't installed the final flooring material yet; this guide will be updated when we do.
Materials and Components

Wooden Battens
Make sure they're the same height as your insulation material plus the height of your van's floor ribbing.

High-tack Adhesive Sealant
A high tack sealant provides the needed structural strength for a floor without needing to drill into your van's chassis.


Trough Lining Material
It's important to fill in the troughs or at least line them with insulating material to eliminate these metal-backed empty voids.

Board Insulation
Polyiso board is our board insulation of choice; it's the best all-rounder van floor insulation for most builds. Measure out your floor area to make sure you buy enough; remember that any excess can be used to insulate your walls.


Long Straightedge
A long straightedge allows you to quickly mark long cut lines in your insulation board.


Batt insulation
Recycled plastic wool is our choice of batt insulation for getting into hard-to-reach cavities.


Wood Screws
Get yourself a selection of wood screws for your van build; you'll use comparatively thin ones for fixing your sub-floor to the battens.

Electric drill/screwdriver
You'll use an electric combination drill/screwdriver for drilling pilot holes and driving screws into your sub-floor.

Scribe Tool
If you choose this method over the cardboard template method, you'll need a decent scribe tool to accurately trace the contours of your van's walls.

Wheel Arch Insulation Material
If you decide to insulate your wheel arches in something other than foam board; we went with Armaflex flexible foam insulation.
Step 1: Clean and Prep Your Van's Floor
Shane bought a brand new van for his latest conversion, so we didn't have a lot to do here. We did nevertheless give the inside of the van a stiff sweep and a hoover, as we'd previously installed windows, skylights, and flares which had left metal shavings and general debris all over the floor.

If you don't have the luxury of starting with a brand new van, you'll need to do a more thorough clean and inspection as detailed at the start of this article.
Step 2: Insulate Your Wheel Arches
Before doing anything with the floor, you need to insulate the wheel arches. We did ours with Armaflex flexible foam insulation. It's very flexible, which was great for forming it to the curves of the wheel arches. We cut multiple panels of Armaflex with a Stanley knife, trimming and adjusting them to ensure a seamless fit and complete coverage. Armaflex is backed with a strong adhesive, and it sticks straight to the wheel arch.
Step 3: Insulate Cavities with Batt Insulation
It's likely that your van has drainage channels running along the long edges of the floor. These need to be filled with batt insulation, as they're large cavities that would otherwise be prime locations for heat loss and vapour condensation.
In Shane's new Citroën Relay, these drainage channels were lined with bung holes which secure the van's plastic exterior trim in place, but which are unsealed and partially open to the outside. We felt that spray from under the van could infiltrate these holes, and decided to seal them up.
With the holes sealed and the sealant cured, we started stuffing the long cavities with recycled plastic wool insulation. Batt insulation is most insulative when it's not compressed, so don't stuff it tightly. It's not always easy to get your hands into the holes that access the cavities, so we improvised poking tools from cut and bent wire coathangers.
With the cavities evenly filled with batt insulation, we can move forward with installing our battens.
Step 4: Install Your Battens
We started with a floor plan here. We took the measurements of the van floor, then decided where our battens would be. We noted all the batten lengths and gave them all numbers.

We then measured our battens and cut them to length with a mitre saw. As we cut each batten, we labelled it with its corresponding number from the floor plan. This allowed us to keep track of all the battens, as there are a lot of them and at a glance they all look to have similar lengths.

Once we had all our battens cut, we started sticking them down. We ran a good thick bead of Sikaflex High Tack along the bottom of each, aligned it precisely where we wanted it, and stuck it down. Remember that we're putting these battens in the flat bottoms of the troughs between the ribs in the van floor.

With all the battens in place, our floor grid was ready to receive the insulation layers. We left the high tack adhesive to cure overnight to ensure we didn't knock any battens off kilter whilst it was still soft.

Step 5: Line the Troughs in Your Van's Floor
As we discussed earlier, we can't just leave the troughs as empty voids directly against the van's exterior metal. Shane and I opted to line them with vapour barrier material, transforming them into insulated pockets that prevent radiative heat loss.
If you go down this route, you'll need to start by measuring the individual floor panels between your battens and cutting sheets of reflective foil insulation to size. Make sure you're measuring along the inside edges of your battens to get the right size.

We used standard Sikaflex adhesive sealant to stick the reflective foil down. We squeezed out beads of sealant into the troughs, then used a squeegee tool to spread these beads out into a uniform bed that covered the floor of the troughs. Doing this ensured that the foil really lined the bottoms of the troughs, eliminating empty space between the foil and the metal floor.

Having lined every floor panel with reflective foil, we were ready to start laying our main insulation board.

Step 6: Line Your Big Floor Panels with Insulation Board
Start by measuring the inside edges of your big square panels. Shane and I split this job in two, with one of us measuring and noting panel dimensions and the other cutting polyiso board. We used a long straightedge and marker pen to mark straight lines on polyiso board, along which we cut with a hand saw.

Sawing polyiso board produces a lot of foam 'sawdust'. This stuff really isn't good for the environment and is light enough to blow away in the slightest breeze, so don't do your sawing outside. It's also incredibly susceptible to static electricity, and will stick to any 'fluffy' clothing you're wearing; that means socks, tracksuit bottoms, and fleecy jumpers. It's a nightmare to shed yourself of and you'll be finding it in your house, car, and washing machine for weeks. Wear slick clothing like jeans whilst doing this job. We made heavy use of our portable hoover to control the amount of this stuff that was flying around in the van.

You don't need to stick the foam board to the floor as it'll be enclosed by the sub-floor. In fact, you might find that your insulation panels fit so snugly that they need to be forced into place. A rubber mallet is very useful for this.
Once you've done the big square panels, you need to fill in all the gaps. That means small, complex shapes around wheel arches and the edges of the floor. The goal here is to eliminate all cavities that are big enough to permit airflow. Airflow against your van's sheet metal permits both heat loss and moisture condensation; the more detailed you are in this gap-filling stage, the warmer and less damp your van will be. Read more about how cavities in your insulation relate to moisture in our vapour barriers article.

Step 7: Install Your Sub-floor
We want our sub-floor to fully cover the floor, fitting flush against the wallls and door sills on all sides. Shane and I muddled along with a scribe tool in our latest build, but I'd actually recommend Explorist's cardboard template method for tracing shapes that will fit perfectly flush into all the nooks and crannies.
Once you've got your template, you need to split it up into panels that match the size of the panels you bought your sub-floor in. The important thing here is to make sure that the edges of your sub-floor material line up with your battens. Shane and I didn't do this, and our sub-floor has since warped and curled slightly at all the unattached edges, meaning we'll have to be very rigorous when installing our floorboards to make sure it all stays flat.
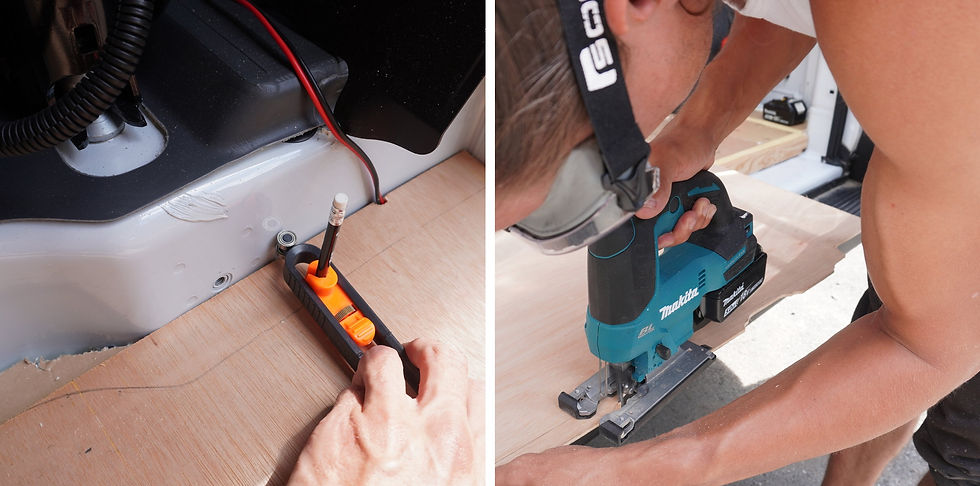
Trace your template onto your sub-floor material with a pencil and cut out your panels. We used a circular saw for the long, straight cuts and a jigsaw for the scribed fiddly bits. There's no need to worry about the plywood fraying at the edges as your sub-floor will be completely hidden under your main flooring material.

Make sure you're measuring your panels so that they only half overlap the battens at which two floor panels meet. That way, you'll be able to fix each panel to a batten at its edge. When screwing so close to the edge of plywood, there's a real risk of splitting the wood. We therefore used thin screws and dilligently drilled pilot holes for each one.

Our impact driver drove the screws until the heads were flush with the wood surface, meaning we didn't need to counter sink every hole; a significant time saving.
One tricky point was where the edges of the sub-floor overlapped the battens in order to fit flush with the walls. We needed to know where the battens ran under the sub-floor so we could screw into them accurately. We therefore measured the distance from the van walls to the centre of the batten and marked straight lines this distance from the edge of the plywood, before putting it in place. We then drilled and screwed along these lines; they're the pencil lines you see in these images.

With the sub-floor screwed into place, we can now cover it with our final flooring material.
Step 8: Install Your Flooring
We'll be using click LVT (laminate) boards for our flooring as it's lightweight, easy to install and cut to size, waterproof, and hardwearing whilst retaining a natural wood look. We'll be installing it by spreading an even bed of wood glue on the bottom of each plank and sticking it directly to the plywood sub-floor.
To ensure as even and flat a floor as possible, we'll be weighing the whole thing down as the glue cures. This is doubly important with our warped and slightly uneven plywood sub-floor.
We'll be putting this in once we've finished cladding our walls and ceiling; watch this space for the updated how-to.
Final Thoughts
As with everything in this van build, the floor seemed simple at first but ended up taking a long time. There's a lot to consider, and doing a perfect job entails a lot of detail work. We hope you'll be able to learn from our mistakes and install your van floor insulation with a minimum of fuss.
If you'd like to learn more about the insulation principles that we mention in this article, check out our ultimate guide on insulation as a whole, where we deep dive into all of it. You might also like to brush up on the principles behind vapour barriers and moisture control before going further with your build. If you're ready to move on to the next step, take a look at our article on wall cladding; we'll have an updated guide on this once we're finished with that step of our new build.
Planning your van conversion?
Start with the free Van Conversion Diagram Pack below.
Want a clear step-by-step path for your full build?
The Van Conversion Mastery Course walks you step-by-step through the entire build process — from planning and layout to electrics, insulation, water, gas, carpentry, and more.
Until next time.


